

")
Components are one of the basic concepts of Angular applications. Thus, if you want to make sure your app is as high quality as it can possibly be, you’ve got to give those basic building blocks some love. When it comes to software quality, testing is caring, so let’s see how to perform Angular unit testing to ensure your components work perfectly.
In this post, we’ll provide you with an introductory guide to Angular component testing. We’ll discuss the importance of testing and the tools used and provide examples on how to approach testing your components.
What Is Angular Component Testing?
Angular component testing means to check the quality and performance of your components. Angular component testing can be done manually by running the application yourself and checking to see if a component’s behavior is working as expected. But as web applications get larger and more complex, manually testing your components, consequently, becomes more time-consuming. In reality, this isn’t practical, so ultimately we’ll need to find a better solution for Angular component testing.
Luckily for us, an Angular project created using the Angular CLI comes with Karma and Jasmine to make testing simple by automating the process. Jasmine is a behavior development testing framework. Unit tests are written using Jasmine and are run to see if individual parts of an application are working correctly. As a result, unit tests will either pass or fail depending on if the code is working correctly or has a bug. Angular uses Karma as the test runner for the project’s unit tests.
Angular Unit Testing: Understanding The What and Why
In the previous section, I’ve briefly mentioned the concept of unit testing. Before I go on to show you how to start with Angular testing in practice, let’s take a step back to gain a more solid understanding of unit testing itself.
Defining Unit Tests
As you’ve seen, unit tests are tests you write to check whether very small parts of the app are behaving as expected. These small parts are called units, hence the name “unit testing.” In unit testing, you verify that the units work correctly, in a way that’s independent both from other units and from external concerns.
Unit Tests = Isolation Tests
What do I mean by external concern? Anything that’s extraneous to the source code: the filesystem, a database, or more commonly in the case of a single-page application, calls to HTTP services (e.g. RESTful APIs.) Unit tests can’t interact with such external dependencies—or, in the broader sense, neither consume nor produce any side-effects.
At first, such restrictions might sound draconian, but they generate interesting and valuable results. For starters, unit tests tend to be fast, since they don’t interact with things that could slow them down. Also, unit tests give very precise feedback; since they don’t rely on anything other than the code under test, they can’t fail for accidental reasons—such as a database authentication issue, or a network outage.
Unit Tests Are the Ones You Can Trust
Last, but not least, unit tests are deterministic. If a unit test is currently passing, it will continue to pass, unless someone makes a change to the production code—or the test code itself—that causes it to fail. The opposite is also true: if a test is failing, it won’t start passing out of the blue. This property means the unit tests don’t randomly fail, which helps developers gain more confidence in them.
In time, the suite of unit tests start acting is an effective regression testing suite. The tests act as a safety net for developers and everyone involved in testing: if some bug dares reappear, it will be detected.
Unit Tests Lead to Better Code
I like to think of unit tests as a tool that allows developers to be more confident when changing code. Fearless developers result in high quality code. If they know the suite of unit tests will catch defects they might introduce, engineers won’t be afraid of refactoring—i.e. changing the code without changing how it behaves—which leads to a cleaner and more maintainable design.
How Do We Start Testing Our Components?
Test files should follow the name.component.spec.ts naming convention and should be located alongside the component’s other files. If you used the Angular CLI to create your Angular application, you might have noticed the app.component.spec.ts file. This file contains unit tests for the main AppComponent. When running tests using the Angular CLI, all unit tests in files with the *.spec.ts extension will run.
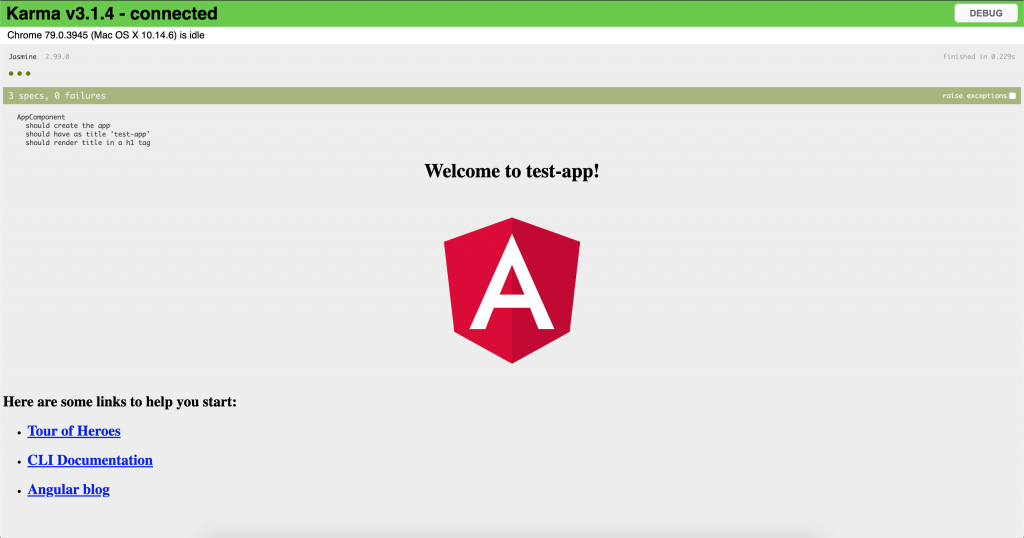
To run your tests using the Angular CLI, you use the ng test command in your terminal. As a result, Karma will open up the default browser and run all the tests written with the aid of Jasmine and will display the outcome of those tests.
Expand Your Test Coverage
Angular Unit Testing: First, the Requirements
You’re about to roll up your sleeves and start learning Angular unit testing in practice. Since this will be a 100% hands-on tutorial, you’ll need some requirements.
First, make sure you have Node.js and the Angular CLI installed. Also, make sure you have your favorite text editor ready to go.
You’ll be executing a lot of commands, so we assume at least basic familiarity with the command line.
With all of that out of the way, let’s get started!
Learning the Basics of Angular Component Testing
To learn the basics of Angular component testing, we’ll be using a brand new application created with the Angular CLI, then we’ll examine app.compoment.spec.ts in detail. To start, create a new Angular application by typing ng new angular-component-testing from your terminal. Be sure to select “no” when asked to include Angular routing. If you run ng test in your new application’s directory, your default browser should open and display the outcome of the tests for the AppComponent.
Karma Basic Configuration
Before we go any further, let’s examine how Karma is configured. If you enter the folder created for your project, you’ll find a file called karma.conf.js. Open it using your favorite text editor and you’ll see something like this:
// Karma configuration file, see link for more information
// https://karma-runner.github.io/1.0/config/configuration-file.html

module.exports = function (config) {
  config.set({
    basePath: '', // 1
    frameworks: ['jasmine', '@angular-devkit/build-angular'], // 2
    plugins: [ // 3
      require('karma-jasmine'),
      require('karma-chrome-launcher'),
      require('karma-jasmine-html-reporter'),
      require('karma-coverage-istanbul-reporter'),
      require('@angular-devkit/build-angular/plugins/karma')
    ],
    client: {
      clearContext: false // leave Jasmine Spec Runner output visible in browser
    },
    coverageIstanbulReporter: {
      dir: require('path').join(__dirname, './coverage/angular-component-testing'),
      reports: ['html', 'lcovonly', 'text-summary'],
      fixWebpackSourcePaths: true
    },
    reporters: ['progress', 'kjhtml'],
    port: 9876,
    colors: true,
    logLevel: config.LOG_INFO,
    autoWatch: true,
    browsers: ['Chrome'], // 4
    singleRun: false,
    restartOnFileChange: true
  });
};
While we won’t cover the whole configuration in detail, we’ll walk you through the elements marked by numbers:
- The basePath property allows you to configure the base for all relative paths used in testing files.
- This line identifies Jasmine as the testing framework. It’s possible to choose a different one.
- Here, the configuration defines plugins that will be used for various ends, such as launching the browser, reporting results and reporting code coverage results.
- You must choose which browser will be used. As you can see, the default is Chrome.
Jasmine Basic Terminology
But before we examine app.component.spec.ts in detail, let’s learn some Jasmine terminology.
- describe(string, function) functions take a title and a function containing one or more specs and are also known as a suite or test suite.
- it(string, function) functions take a title and a function containing one or more expectations and are also known as specs.
- expect(actual) functions take a value, called an actual. An expect function is typically used alongside a matcher function. Together they return a boolean value that depicts the passing or failing of a spec.
- Matcher functions take a value that represents the expected value. A matcher function is chained alongside an expect function. Together they return a boolean value that depicts the passing or failing of a spec. Some examples of matchers are toBeTruthy(), toEqual(), and toContain().
A Closer Look Into App.component.spec.ts
Now that we have some basic terminology down, let’s take a look at app.component.spec.ts. Below is the original generated code for app.component.spec.ts with added comments for easy reference.
// app.component.spec.ts
import { TestBed, async } from '@angular/core/testing'; // 1
import { AppComponent } from './app.component';

describe('AppComponent', () => { // 2
  beforeEach(async(() => { // 3
    TestBed.configureTestingModule({
      declarations: [
        AppComponent
      ],
    }).compileComponents();
  }));

  it('should create the app', () => { // 4
    const fixture = TestBed.createComponent(AppComponent);
    const app = fixture.debugElement.componentInstance;
    expect(app).toBeTruthy();
  });

  it(`should have as title 'angular-component-testing'`, () => {  //5
    const fixture = TestBed.createComponent(AppComponent);
    const app = fixture.debugElement.componentInstance;
    expect(app.title).toEqual('angular-component-testing');
  });

  it('should render title in a h1 tag', () => { //6
    const fixture = TestBed.createComponent(AppComponent);
    fixture.detectChanges();
    const compiled = fixture.debugElement.nativeElement;
    expect(compiled.querySelector('h1').textContent).toContain('Welcome to angular-component-testing!');
  });
});
- In order to test our Angular component’s functionality, we need to import some Angular testing tools, which we’ll use alongside Jasmine. TestBed is used to configure and initialize the environment unit tests.
- The describe code block represents the test suite for AppComponent. It contains specs and additional code that’s used for testing AppComponent.
-
beforeEach is a global function in Jasmine that runs some setup code before each spec in the test suite. In this test suite, beforeEach is used to create a testing module using the TestBed object and declares any components that would be used in this testing module. This code creates a version of your Angular application that can be used alongside Jasmine to test component functionality.
- This is the first spec of the test suite and tests to see if the component compiles correctly. The TestBed.createComponent() method is used to create an instance of the AppComponent. The spec then uses expect and matcher functions to see if the component produces the expected behavior. As a result, the spec will either pass or fail. In this case, the expectation is that the AppComponent is defined.
- This spec tests to see if the AppComponent has a local variable called title with the hard coded value of “angular-component-testing.” The spec prevents any unwanted changes or deletions of the variable title in the AppComponent.
- This spec tests to see if the page’s welcome text reads correctly. The spec introduces the detectChanges() method, which binds the data to the component instance. Then, using the fixture.debugElement.nativeElement property, we’re able to check if the compiled component code contains an h1 HTML element with text that reads “Welcome to angular-component-testing!” The spec expects the welcome message to be placed inside of an h1 HTML element that reads “Welcome to angular-component-testing!”
Creating Our Own Unit Tests
Now that we know a few Angular component testing basics, let’s create a component where we eventually will write our own unit tests. First, we’ll create a TitleComponent. TitleComponent has a text input and a button used to change the title property in the parent AppComponent with an EventEmitter. Place the code below at src/app/title/title.component.ts.
// title.component.ts
import { Component, Input, EventEmitter, Output, ViewChild, ElementRef } from '@angular/core';

@Component({
  selector: 'title',
  template: `
    <p>{{ message }}</p>
    <input #titleField type="text" />
    <button (click)="handleButtonClick(titleField.value)">Change Title</button>
  `,
  styles: [`h1 { font-family: Lato; }`]
})
export class TitleComponent  {
  @Input() message: string; //1

  @Output() changeTitleEvent:EventEmitter<string> = new EventEmitter(); //2

  @ViewChild('titleField') titleField: ElementRef;

  handleButtonClick(newTitle) {
    if(newTitle) {
      this.changeTitleEvent.emit(newTitle);
      this.titleField.nativeElement.value = '';
    }
  }
}
There are two things to note with the code above:
- @Input named message, which will display a message above the text input.
- @Output, which will emit an event to replace the value of title in the parent AppComponent, therefore changing the welcome message.
Later we’ll be writing unit tests to make sure that the component is receiving an input correctly as well as outputting data correctly.
However, for TitleComponent to work correctly, we also need to update the app.component.ts, app.component.html, and app.module.ts files.
// app.component.ts
import { Component } from '@angular/core';

@Component({
  selector: 'app-root',
  templateUrl: './app.component.html',
  styleUrls: ['./app.component.scss']
})
export class AppComponent {
  title = 'angular-component-testing';

  changeTitle(newTitle) {
    this.title = newTitle;
  }
}
Firstly, in app.component.ts, we added a method that changes the title property for when the TitleComponent emits a new title.
<!-- app.component.html -->
<div style="text-align:center">
  <h1>
    Welcome to {{ title }}!
  </h1>
  <title message="Enter a new title" (changeTitleEvent)="changeTitle($event)"></title>
</div>
We’ve added the TitleComponent in the app.component.html file. We also included a value for the message attribute and provided a function for the changeTitleEvent output.
// app.module.ts
import { BrowserModule } from '@angular/platform-browser';
import { NgModule } from '@angular/core';

import { AppComponent } from './app.component';
import { TitleComponent } from './title/title.component'; // Import new TitleComponent

@NgModule({
  declarations: [
    AppComponent,
    TitleComponent // add TitleComponent to declarations
  ],
  imports: [
    BrowserModule
  ],
  providers: [],
  bootstrap: [AppComponent]
})
export class AppModule { }
Lastly, we declared our new component in our app.module.ts in order to use the TitleComponent in our application.
Keep Your Tests Updated
One major challenge with Angular component testing is keeping your unit tests updated. Often, with the addition of new components working together, unit tests will fail or no longer be valid. One example of this is our unit tests for AppComponent. Because our new TitleComponent isn’t declared in our test for AppComponent, you’ll notice that the “Application should create the app” spec is failing. To fix this, we need to import the TitleComponent and include it in the test module’s declarations.
// app.compoment.spec.ts
import { TestBed, async } from '@angular/core/testing'; // 1
import { AppComponent } from './app.component';
import { TitleComponent } from './title/title.component'; // Import TitleComponent

describe('AppComponent', () => {
  beforeEach(async(() => {
    TestBed.configureTestingModule({
      declarations: [
        AppComponent,
        TitleComponent // Add TitleComponent
      ],
    }).compileComponents();
  }));

  it('should create the app', () => {
    const fixture = TestBed.createComponent(AppComponent);
    const app = fixture.debugElement.componentInstance;
    expect(app).toBeTruthy();
  });

  it(`should have as title 'angular-component-testing'`, () => {
    const fixture = TestBed.createComponent(AppComponent);
    const app = fixture.debugElement.componentInstance;
    expect(app.title).toEqual('angular-component-testing');
  });

  it('should render title in a h1 tag', () => {
    const fixture = TestBed.createComponent(AppComponent);
    fixture.detectChanges();
    const compiled = fixture.debugElement.nativeElement;
    expect(compiled.querySelector('h1').textContent).toContain('Welcome to angular-component-testing!');
  });
});
Now that you’ve got your TitleComponent up and running, let’s start writing some tests.
Start out by creating a title.component.spec.ts file that lives in the same folder as the title.component.ts file, with the following code.
// title.component.spec.ts
import { async, ComponentFixture, TestBed } from '@angular/core/testing';
import { TitleComponent } from './title.component';

describe('TitleComponent', () => { // 1
  let component: TitleComponent;
  let fixture: ComponentFixture<TitleComponent>;

  beforeEach(async(() => { // 2
    TestBed.configureTestingModule({
      declarations: [ TitleComponent ]
    })
    .compileComponents();
  }));

  beforeEach(() => { // 3
    fixture = TestBed.createComponent(TitleComponent);
    component = fixture.componentInstance;
    fixture.detectChanges();
  });

  it('should create', () => { // 4
    expect(component).toBeTruthy();
  });
});
Our Test Suite in Detail
- We start out by creating a test suite for our TitleComponent. Within the describe() function, we create a ComponentFixture of the TitleComponent. ComponentFixture provides methods and properties that help test the functionality of a component.
- We use the beforeEach function to create a test module that sets up the environment for testing our component.
- We use another beforeEach function to create an instance of the TitleComponent and call the detectChanges() method to ensure that the component data is up to date.
- This is our first spec, which tests to see if the component compiles correctly.
Although we have a unit test that tests to see if the TitleComponent compiles correctly, unfortunately, it’s not enough. In reality, we should also test that the component implements its @Input and @Output correctly.
Testing the @Input of a Component
In order to test that @Input works correctly, we’ll write a spec that checks to see if the message property is equal to what we expect it to be.
// app.component.spec.ts
it('should correctly render the passed @Input value', () => {
  component.message = 'Enter a new title'; // 1
  fixture.detectChanges(); // 2
  const compiled = fixture.debugElement.nativeElement; // 2
  expect(compiled.querySelector('p').textContent).toBe('Enter a new title'); // 3
});
The Spec in Detail
- We set the value of the component’s message property to “Enter a new title.”
- Update the component’s data.
- Create a variable reference to the compiled component code.
- Check if the text in the compiled component’s paragraph element is equal to the value of the component’s message property.
Testing the @Output of a Component
Now we’ll need to test that the TitleComponent implements @Output correctly. We’ll write a spec that checks if the component emits the correct value when changeTitleEvent is emitted.
it('should correctly @Output value of text input in component', () => {
  spyOn(component.changeTitleEvent, 'emit'); // 1
  const button = fixture.nativeElement.querySelector('button');
  fixture.nativeElement.querySelector('input').value = 'A new title'; // 2
  const inputText = fixture.nativeElement.querySelector('input').value;

  button.click(); // 3
  fixture.detectChanges();

  expect(component.changeTitleEvent.emit).toHaveBeenCalledWith(inputText); // 4
});
The Spec in Detail
- Use the spyOn function to effectively “spy” on the emit method of component.changeTitleEvent object.
- Change the value of the component’s text input.
- Simulate the button click of the comment.
- Check to see if component.changeTitleEvent.emit emits the value of inputText.
There you have it—the TitleComponent unit tests are now complete.
Angular Unit Testing: Testing Is Caring
Testing is an essential part of software development. It helps maintain quality high by constantly verifying the app’s behavior against its specifications. And, more specifically, automated testing is crucial for modern software development.
Sure, manual testing is still valuable in many situations. However, it’s virtually impossible to ship high quality software at the speed the modern world demands relying only on manual processes. They simply can’t scale.
In today’s post, we’ve covered Angular unit testing. You’ve learned more about the fundamentals of unit testing, and how to use best-of-bread tools—such as Karma and Jasmine—to perform efficient Angular component testing. Overall, Angular unit testing saves time, helps find bugs early, and inspires confidence in your applications code.
What should your next steps be? Well, education is always a great next step. One suggestion is to continue to educate yourself on testing-related topics. As it turns out, the Testim blog is a great place for that.
And when I say testing, I don’t mean just “unit testing.” You see, there are many types of automated software testing. And despite unit testing being arguably the most important of them, you’d be wise in learning about other types, such as end-to-end testing and integration testing. While you’re at it, get acquainted with the concept of the testing pyramid, which will guide you on how to distribute your testing efforts across your application.
This post was written by Jonathan Dauz. Jon is a front-end engineer who loves to build fun, innovative, unique websites and web applications. Most of his work has been focused on the front-end, but that hasn’t stopped him from working with back-end technologies. Jon has experience working with a wide array of languages, tools, and frameworks, such as Angular, React, Vue, PixiJS, and Node.
What to read next
Angular Testing Tutorial: What You Need and How to Start
Angular Integration Testing: A Practical, Introductory How-To


