


Testing is an important part of the software development process. You should test your Angular apps at various stages of development. Angular integration testing is just as important as unit testing and end-to-end (E2E) testing. Using Angular integration testing, you can test two or more units of an Angular app that work together to perform a specific task. For example, you can test to verify that your app sends or receives the expected data from a service. Writing integration tests for Angular projects should be a must.
In this post, you’ll learn how to write integration tests for an Angular app. First, we’ll cover how to test using Angular’s built-in testing tool. In other words, we’ll be testing our example Angular project without changing any configurations or adding any third-party APIs. Next, we’ll go over writing integration test using a third-party tool. At the end of each section, we’ll look at some strengths and weaknesses of the tool used.
What Is Integration Testing?
Before we get to the “how” of this how-to, let’s address the “what.” One of the best ways to understand integration testing is to compare it to other types of tests. So, let’s define unit and E2E testing so we can see how integration testing is similar and different.
- Unit testing: Just as an atom is the smallest independent unit of matter, a unit test is the atom of tests—that is to say, a unit test is written for individual units or components of an application.
- Integration testing: Here, we test the integration of two or more units. Integration tests usually require external resources like network and database. An integration test does not test a complete workflow, nor does it test an isolated unit.
- E2E testing: In E2E testing, you test the workflow of your application from start to finish. In other words, you test for actions that real users can perform on your app to check that desired outputs are obtained.
Angular Integration Testing With Built-In Tools
The Angular framework supports test-driven development (TDD) out of the box, so you can start writing tests right after creating your project. And in this section, you’ll learn how to write an Angular integration test for a to-do app using Angular’s built-in testing tools. Throughout this post, we’ll reference an Angular to-do app. You can download or view the source code here to follow along better.
Prerequisites
To follow along with this tutorial, you’ll need to have at least beginner-level knowledge of Angular and be comfortable working with CLI tools. You’ll also need the following resources:
- Node.js
- Angular CLI
- A text editor (VS Code, Sublime, Webstorm, or your preferred editor)
Step 1. Set up an Angular Project
We have provided a sample Angular to-do app for this post. However, feel free to create your own project from scratch if necessary.
To create a new Angular project, type the following command in your terminal or command prompt:
ng new angular-todo-app
Replace angular-todo-app with whatever name you prefer for your app.
After that, hit enter, and then wait for Angular CLI to set up your new project.
Step 2. Prepare Your First Test
Your new project comes with Angular’s built-in testing tool ready. Because of that, we can dive into writing the first test without any further configuration.
We’ll be testing for how app.component.ts integrates with todo.service.ts in our app. Hence, we’ll test to check that the task list fetched by the todo service class contains the same data as the task list in the app component class.
By default, Angular auto-generates test files for TypeScript files created using the Angular CLI. For example, open the folder app > components > todo. You will find a file named todo.component.spec.ts. The todo.component.spec.ts file houses tests for todo.componet.ts. Alternatively, you can explore your project and you will notice this pattern in other files. We will be writing our test in the app.component.spec.ts file.
Step 3. Create and Set up a Test Suite
Open the app.component.specs.ts (the file is located in the root of the app directory) and create a new test suite using the describe keyword like this:
describe('TodoList in AppComponent', () =>  {

});
Our describe method has two parameters. The first parameter describes the test suite, while the second one is an arrow function. We’ll be writing the rest of our test inside the arrow function.
Now that the describe method is set up, create the fields required for your test inside the arrow function.
describe('TodoList in AppComponent', () =>  {

let appComponent: AppComponent;

let fixture: ComponentFixture<AppComponent>;

let todoService: any;

});
The appComponent field will hold a reference to the component to be tested, which is the todo.component.ts component of our app. And todoService holds the service providing data to appComponent.
To complete the setup, initialize the fields using the beforeEach function.
beforeEach(async(() => {

TestBed.configureTestingModule({

imports: [FormsModule],

declarations: [AppComponent, TodoComponent],

providers: [ {

provide: TodoService,

useValue: {

// pass dummy data to TodoService getTasks method

getTasks: () => of(todoData )

}

} ]

}).compileComponents(); }));
In the code sample shown above, we used todoData, which is a variable that holds dummy data. The dummy data is the data we’ll be checking to verify that its value in our service and component are the same. Below is the data used in the example app:
const todoData: Todo[] = [

{

userId: 1,

id: 1,

title: 'delectus aut autem',

completed: false

},

{

userId: 1,

id: 2,

title: 'quis ut nam facilis et officia qui',

completed: false

}

];
Step 4. Write a Test to Verify That the Service and Component Integrate Well
Using the it keyword, write a test to verify that the list returned by the todoService is identical to the list in appComponent.
it('should have todo item from service in component', () => {

fixture.detectChanges();

expect(appComponent.todoList).toEqual(todoData);

});
Let’s look at two interesting things in the code sample above: the detectChanges() method and the actual check, expect().toEqual(). Without calling detectChanges(), the todoList from appComponent will return undefined. And using expect(), we can check that the list from appComponent is identical to the dummy data we passed to the mock to-do service.
Step 5. Run the Test
With everything set up, you’re ready to run your test. Open your terminal/command prompt, and then type ng test from your project root to start the test. Angular will set up and run your test. The result will be displayed in your terminal and on a browser.
Pros and Cons of Using the Built-In Angular Test Tool
Let’s take a look at some of the strengths and weaknesses of the test we just wrote.
Pros
- Runs 100% offline: Because we hard-coded our mock data using an array and passed it to the mock to-do service, our test runs offline.
- Actual to-do service not used: We used a mock to-do service provided by Angular TestBed. The mock to-do service removed some of the issues that could occur when using the actual service and helps us focus on the test.
Cons
- No actual HTTP request involved: Our to-do app sends an HTTP request to a back end, which returns data and the status of the request. Because we are using a mock service and dummy data stored in-memory, we cannot check for most common behaviors that may occur in a real HTTP request.
- Boilerplate code: Our current test contains much boilerplate code. We just want to test that our to-do service returns valid data to the app component. However, in the current solution, we first had to set up fields, fixtures, and TestBed mock services.
In the next section, we will look at a much simpler way to perform Angular integration testing.
Angular Integration Testing With Testim’s API
Testim’s API testing provides a flexible tool for testing HTTP requests. In order to use Testim, you will need a user account. You can create one for free here. With the Testim editor, you can create tests using a graphical user interface (GUI). In other words, you don’t have to code your test. However, you have the ability to do so in cases where you find it necessary.
Also, you can export the code for your Testim test into an integrated development environment (IDE) and edit it to your taste. To demonstrate this testing tool, we will be testing the same API used in our to-do app.
Prerequisites
For this part of the tutorial, you will need
- The Testim Chrome extension
- A web browser (Google Chrome recommended)
Step 1. Create a New Test
The first thing you need to do is log in to Testim via a web browser and create a new test. Specify your app URL and test name in their respective fields.
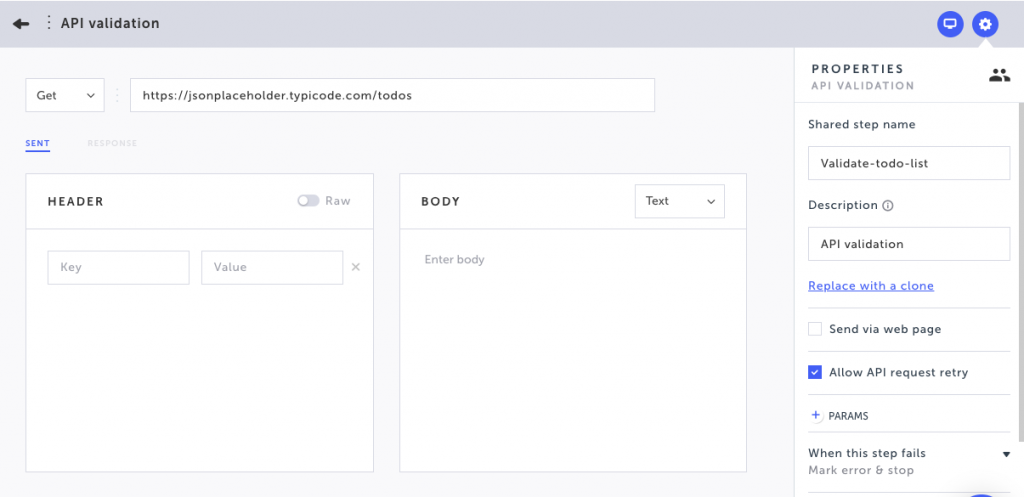
Step 2. Add API Validation
Ensure that the setup card for your test is ready. After that, click on the blue plus (+) button to add a new API validation step. Complete the next form, and then hit the back icon. You’re ready to run your test.
Step 3. Run Test
Install the Testim extension for Chrome. After that, hit the Play button to start running your test.
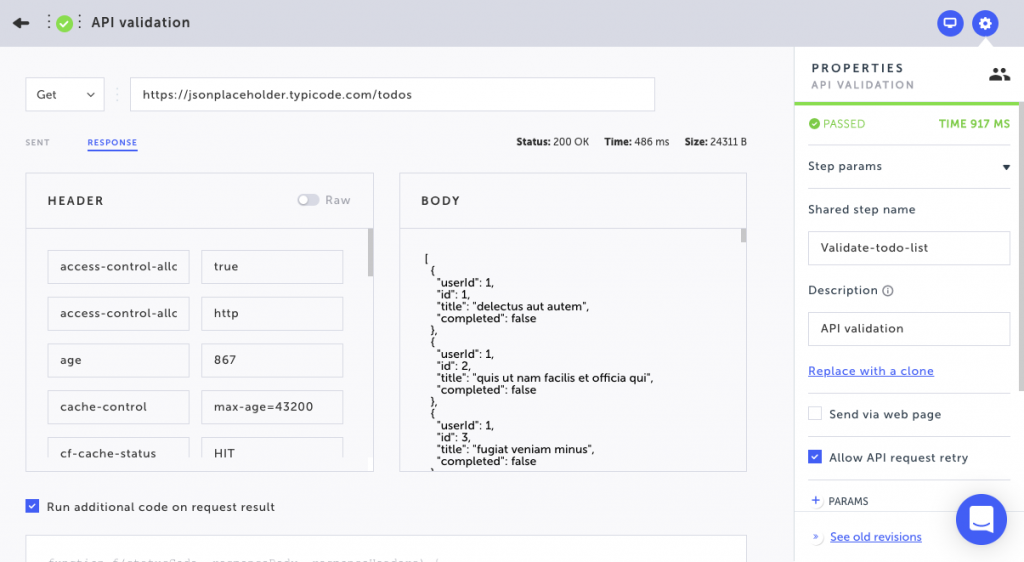
Above is a screenshot showing results for the API validation request. You get data such as status code, request time, and request body. Furthermore, you get a response header with a lot of useful information.
Pros and Cons of Testim’s API Testing
Pros
- Less boilerplate code: Using Testim, we wrote fewer lines of code to test our API. We literally wrote no code. Likewise, if we export the test code to an IDE, it will contain less code.
- A rich tool for testing HTTP requests: With the Testim editor, you can view HTTP requests response, edit headers, use the response in custom JavaScript code, and so much more.
Cons
- Blackbox test: Our Testim test checks if our API behaves as expected. Because of that, we did not test the actual code for the to-do service or app component.
Conclusion
To conclude, let’s take an overview of what we’ve covered. In both sections, the goal of our integration test was to check that todo.service.ts and app.component.ts behave as expected when integrated. So, we tested the API that returns todo items to app.component.ts.
As a front-end developer, you may not have control over the behavior of an external API. However, you can improve the quality of your app through API testing. For example, you can test for when an API returns an empty list or an error code like 404. Then, adjust your code to handle errors better. In addition, you can display a more helpful error message to users.
In summary, we have covered how to write tests using Angular’s built-in testing tool and using the testing API provided by Testim. However, this post covered only a small amount of helpful features and services available with Testim’s API testing. Hence, we recommend you continue exploring the API. Also, check the official documentation here and play around with the tool to discover more.


