


Older web applications were simple. They were static and included a couple of headings and paragraphs. But as web applications progressed, it became a different game altogether. As web applications get upgraded with new features, they become more complex. Modern web applications contain different kinds of elements and functions. And whether you want to test a web application or want to automate some action on the application, with variety comes extra labor.
In this post, we’ll discuss handling dropdowns on a webpage. First, we’ll understand why we need dropdowns, then try a Python code to select a value from a dropdown with Selenium. This would include finding the dropdown element and selecting a value we need from a list of values. While doing this exercise, you might get the feeling that the process could be easier. So lastly, we’ll see how using Testim makes things easier.

The Need for Dropdowns
Dropdowns are a way to get user information. Then why not simply use a textbox? One of the most important things web developers need to take care of is valid data from users. If a user provides invalid data, the application should discard it. For example, some of the most popular values for the field “Gender” are “Male,” “Female,” and “Other.” If you build a textbox to let a user enter their gender, they could enter an invalid value, say “Tree.” And such invalid data needs to be discarded.
In cases where you have predefined possible values for a field, dropdowns are a great way for you to restrict the value the user selects. With dropdowns, you let users select one option among the valid data. Considering the above example for gender, you’ll only give the users three options to select from, i.e., “Male,” “Female,” and “Other.” This restricts the user to always select valid data.
There are tools like Burp Suite that let users manipulate data, so there’s still a chance you could get invalid data. Therefore, using dropdowns isn’t a foolproof way of getting valid data, but it increases the probability that the data you’ll get is valid.
That being said, now let’s look at how we can use Selenium to select a value from a dropdown.
Expand Your Test Coverage
Python Example: Select a Value From Dropdown With Selenium
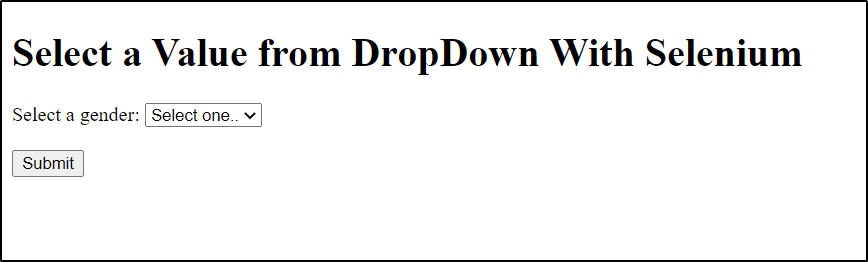
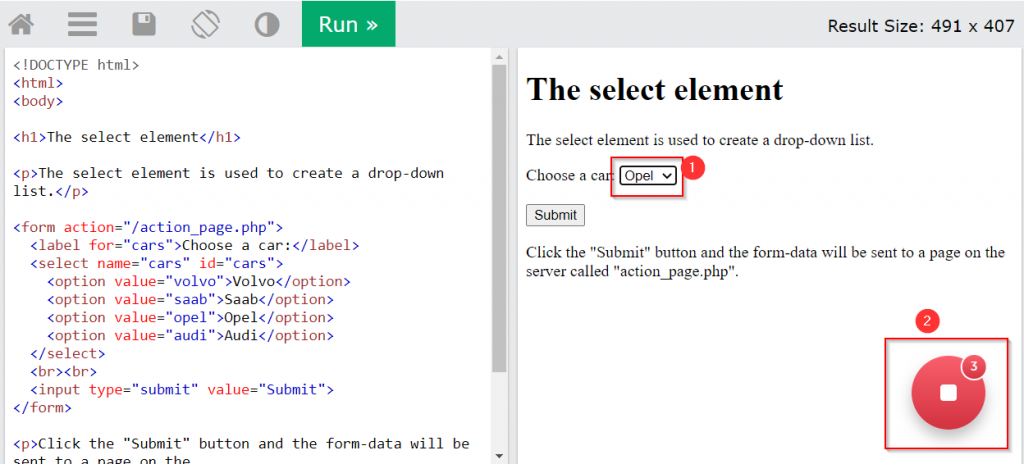
Firstly, we need a webpage we can use the script on. Here’s the HTML file for a simple webpage with a dropdown:
<!DOCTYPE html>
<html>
<body>

<h1>Select a Value from DropDown With Selenium</h1>

<form action="#">
<label for="gender">Select a gender:</label>
<select name="gender" id="gender">
<option value="" disabled selected>Select one..</option>
<option value="Male">Male</option>
<option value="Female">Female</option>
<option value="Others">Others</option>
</select>
<br><br>
<input type="submit" value="Submit">
</form>


</body>
</html>
Open any text editor and paste the above into it. Save the file with the “.html” extension. If you open the HTML file on a browser, it should look like this:
Python
Now that we have our webpage ready, let’s start with Python. To use Selenium with Python, you need a webdriver. I’m using Python 3 and Chrome, so I’ll use the Chrome webdriver. The next step is to install the Selenium Python library if you don’t already have it. You can install Selenium by running the following command in your command prompt or terminal:
pip install selenium
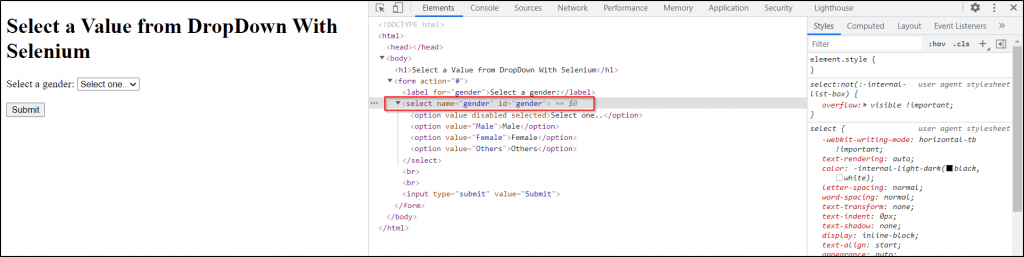
Before we write the Python script, we need one more piece of information. We need to know the element name (or ID). We’ve written the HTML page so we know that the dropdown element name is gender. But if you want to find it for a website you didn’t build, you can use the browser for it. Open the website in your browser, then right-click on the dropdown and click Inspect. You’ll find the name in the Inspect tab.
Now we have everything we need for our little experiment. The Python script to open the above webpage and select a value from the dropdown is as follows:
# importing requirements
from selenium import webdriver
from selenium.webdriver.common.keys import Keys
import time

driver = webdriver.Chrome(executable_path=r"D:\New folder\chromedriver.exe") #chrome webdriver path
driver.get("file:///D:/New folder/sample.html") #path to HTML file
time.sleep(3) #pauses execution for 3 seconds
driver.find_element_by_xpath("//select[@name='gender']/option[text()='Male']").click() #select value Male from dropdown
time.sleep(5) #pauses execution for 5 seconds
driver.quit() # close browser
Before executing the above script, make sure you change the Chrome webdriver path to the location where you have your Chrome webdriver and change the path to the HTML file.
When you execute the above script, the script will open the webpage, wait for three seconds, and then select the value “Male” from the dropdown. It’ll then wait for five seconds and then close the browser. This is how you can select a value from the dropdown with Selenium.
Logic Behind the Python Script
Python needs a way to interact with a web application; hence we use a webdriver. A webdriver is basically a collection of APIs used to interact with a web application. Next, we need to send a request to the server to get the webpage. The webpage can include a lot of different elements, but our focus is on the dropdown element. Therefore, we need to focus the Python script’s control on the dropdown element. To do this, we find the element using an attribute that’s unique to the element. You can use name, ID, XPath, etc. to identify an element. In the above example, we’re using the element’s name. As we know that a dropdown can have multiple values, we use the object of the element to select a value from the dropdown.
All this logic converts into 10 lines of code. In complex web applications, we need to understand the structure of the application to identify the element. So the more complex the application, the more complex the process of writing the script becomes.
How to Handle Multiple Select with Selenium?
The select HTML tag comes with another feature where it lets you select multiple values from the dropdown. Let’s see what this looks like and how you can use selenium to select multiple values.
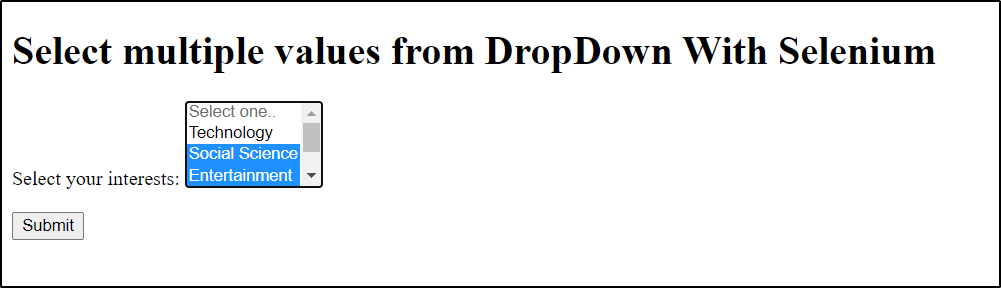
Here’s what the HTML file would look like:
<!DOCTYPE html>
<html>
<body>

<h1>Select multiple values from DropDown With Selenium</h1>

<form action="#">
<label for="interest">Select your interests:</label>
<select name="interest" id="interest" multiple>
<option value="" disabled selected>Select one..</option>
<option value="tech">Technology</option>
<option value="social">Social Science</option>
<option value="enter">Entertainment</option>
<option value="sport">Sports</option>
<option value="travel">Travel</option>
</select>
<br><br>
<input type="submit" value="Submit">
</form>


</body>
</html>
The “multiple” keyword in the “select” tag lets the users select multiple values from the dropdown. You can try doing this manually by pressing the Ctrl/Command key and clicking on multiple values.
Now how selenium handles this is very simple. You can just use multiple select statements as follows:
from selenium import webdriver
from selenium.webdriver.common.keys import Keys
import time

driver = webdriver.Chrome(executable_path=r"E:\Downloads\chromedriver.exe")  # chrome webdriver path
driver.get("file:///C:/Users/DELL/Desktop/a.html")  # path to HTML file
time.sleep(3)  # pauses execution for 3 seconds
driver.find_element_by_xpath("//select[@name='interest']/option[text()='Travel']").click()  # select first value from dropdown
driver.find_element_by_xpath("//select[@name='interest']/option[text()='Sports']").click()  # select second value from dropdown
time.sleep(5)  # pauses execution for 5 seconds
driver.quit()  # close browser
You can also use a loop to iterate through and select multiple values.
Selenium Select Methods
In the above examples, you might have observed that we are selecting the value from the dropdown based on the value displayed on the browser by using the elements XPath. This is known as selecting value by visible text. Selenium for python also provides some methods to select values from the dropdown:
- select_by_index: Select based on the index associated with an entry in the dropdown.
- select_by_value: Select based on the value attribute of an entry in the dropdown.
- select_by_visible_text: Select based on the text that is displayed in the dropdown on the browser.
The Bottleneck in Using Selenium
Selenium is the most popular application testing framework out there. Using Selenium is easy, and it’s flexible. It provides almost everything you need for application testing. But like anything else, it’s not perfect.
Applications these days get updated frequently. And when the structure of the application changes, you need to change the script accordingly. But doing this very often can get frustrating. Another problem with modern applications is that their structure is complex. Many applications have recurrently nested elements, and finding and selecting these elements can be difficult. And last but not least, there’s dealing with dynamic elements. Modern applications mostly use dynamic elements. The content keeps changing, even while using the web application, and might be different under different conditions. Using Selenium on these applications is not easy.
These issues might not make a lot of difference for simple use cases like the example we used in this post. But with complex and large applications, they can get troublesome. Now the question is, what if not Selenium?
Testim as a Solution
Testim is an automated testing platform for fast authoring of AI-powered stable tests and tools. Testim will record your actions and create steps using its smart logic. You don’t need to know programming to use Testim, but if you want customization, Testim provides an option to use code as well. All in all, Testim is a complete package for testing.
To use Testim on a web application hosted locally, you need to configure a couple of things. But I’m not going to get into that in this post. So, for this example, I’ll simply use Testim on an online website.
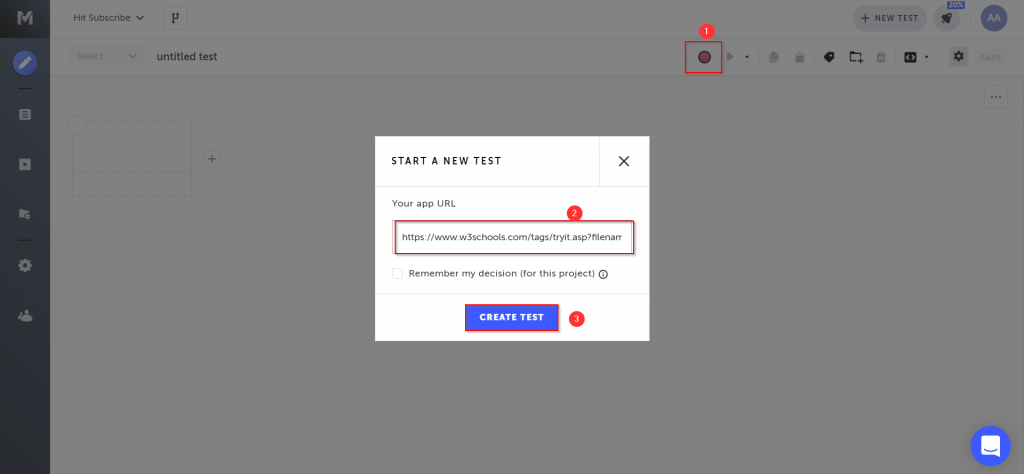
Firstly, you need to log in to Testim. If you don’t have an account, you can sign up here. Once you log in, click on the NEW TEST button. If you don’t have the Testim browser extension installed, you will be asked to install it. This extension helps in recording your actions. To start recording, click on the record button. Enter the URL of the website you want to test and click CREATE TEST. I’m going to use a webpage built by w3schools: https://www.w3schools.com/tags/tryit.asp?filename=tryhtml_select.
When the recording starts, select a value from the dropdown and click on the stop recording button.
Your actions will be recorded and saved in the test window.
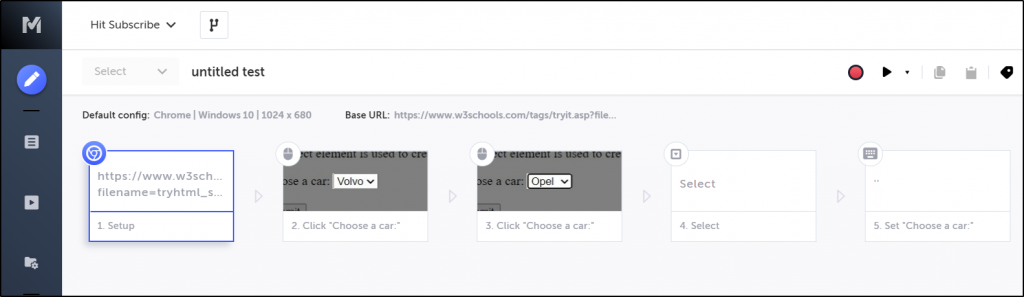
That’s how easy it is to use Testim for testing. You can save this test and replay it as many times as you want. And because it just needs you to perform actions that you want to test, creating tests is a lot faster than using Selenium.
Conclusion
Application testing and automation have become a major part of IT today. With modern applications becoming more complex, we need a solution that can keep up with the complexity but also keep it simple and easy for users. Testim is an automated testing solution that has a smart AI behind it but also has a simple interface for users. We saw the difference between selecting a value from a dropdown using Selenium and Testim. It was clear how easy Testim made it. And Testim makes it easy for other application testing cases as well. If you want to make your testing easy, I suggest you try out Testim for free or schedule a demo.


")