


Introduction
The React testing library is a powerful library used for testing React components. The library helps generate mock events to simulate user input and helps query the DOM as a normal user would. It also provides functionalities such as finding form elements by their label text and links and buttons from their text. The testing library can fire events such as a button click or a form submit using the fireEvent function. We’ll get into that more later.
This tutorial assumes you have a working knowledge of React, the MERN stack( MongoDB, Express.js, React and Node.js), and of course, JavaScript. Don’t worry if you’re not super familiar with the MERN stack; I try to give as much detail as you’ll need.
Building a To-do List App Using the MERN Stack
We’ll try to build a simple to-do list app that stores to-do list. Here’s a brief idea of what it will look like.
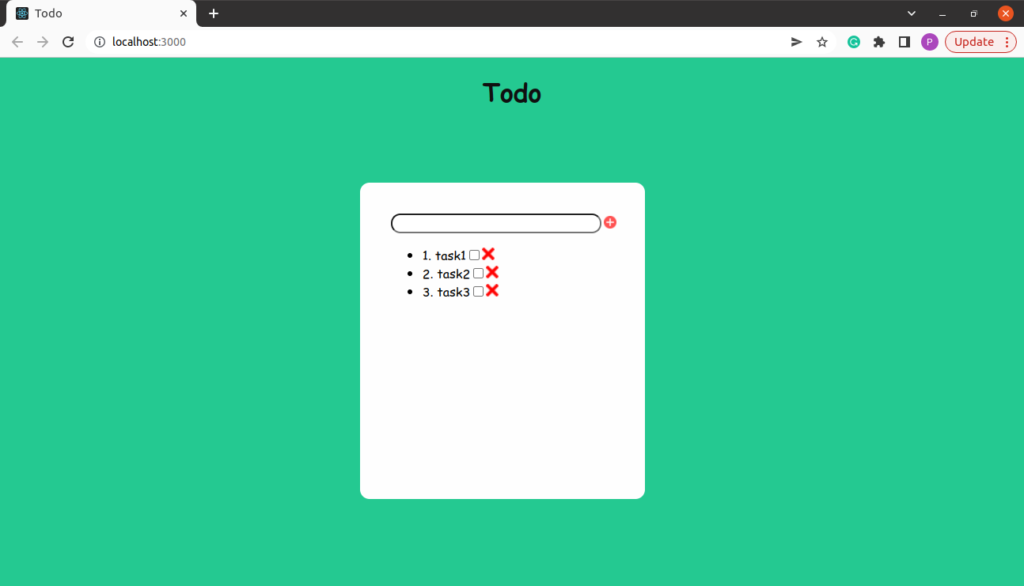
It consists of an input textbox at the top of the to-do area, with an add button that allows you to add tasks. Each task has a checkbox and a delete button. The checkbox helps you update the status of your to-do list. The delete button helps delete a to-do item from the database.
The application will perform CRUD operations, including Create, Read, and Update. We’ll first briefly go through the server-side code, in Express.js and MongoDB, and then the front-end code, in React.
You have to install Mongoose, Express and CORS (cross-origin resource sharing) libraries. Mongoose connects with your local MongoDB server, and it requires you to start your MongoDB server before running Server.js. If you’re new to MongoDB, this guide on setting up and running MongoDB on your computer should help.
Server.js
var mongoose = require('mongoose');
var mongoDB = 'mongodb://127.0.0.1:27017/test';
var schema = mongoose.Schema;
var express = require('express');
const app = express();
const cors = require('cors');
const port = 5000

app.use(cors());

mongoose.connect(mongoDB, {useNewUrlParser: true})

var todo = new mongoose.Schema({
index: Number,
data: String,
isTrue : Boolean
});

var todo_model = mongoose.model('todo_model', todo);

app.get('/', (req, res) =>{
todo_model.find({},{"_id":0, "__v":0}, function (err, users) {
if (err) {
console.log(err);
} else {
res.send(users);
}
});
});

app.get('/listener', (req, res) => {

if (req.query.del!== undefined){
todo_model.deleteOne({index: req.query.del}).then(()=>{res.send('Successfully Deleted')})
}
else if (req.query.add_data !== undefined){
var data_descr = req.query.add_data;
todo_model.find({},{"_id":0, "__v":0}, function (err, users) {
if (err) {
console.log(err);
} else {
var new_index = users.length;

new_index = new_index + 1;
var bool_value = false;
todo1 = new todo_model({index: new_index,data:data_descr,isTrue:bool_value});
todo1.save(function(err,result){
if (err){
console.log(err);
}
else{
}
});
res.send('data added succesfully! ')
}
});

}

else if (req.query.bool !== undefined){
var filter = {index: req.query.bool};
var todo_data = todo_model.findOne(filter).then(data => {
if (data?.isTrue != undefined){
if (data.isTrue == false){
todo_model.findOneAndUpdate(filter, {isTrue: true}).then(res.send('isTrue Updated!'));
}
else {
todo_model.findOneAndUpdate(filter, {isTrue: false}).then(res.send('isTrue Updated!'));
}
}
else{}
})
}
else {
res.send('no args sent')
}
})

app.listen(port, () => {
console.log("todo_app server listening on port" + port);
});`
The file above uses Express.js to handle requests and responses and uses Mongoose to connect to the database. Then we set up CORS to allow our react application to access the server API. Next, we define the schema, which is the structure of the database so that MongoDB know to expect documents with the a specific structure. We also define routes, which we use to associate a URL with a certain function. You can use the index route for API communication with the React application and the /listener route to listen to GET requests from the React application. Lastly, with app. listen(), we run the server on port 5000 and listen to requests. To run the server, type node server.js. On successful execution, it displays: “todo_app server listening on port 5000.”
Index.html
<!DOCTYPE html>
<html>
  <head>
    <title>Todo</title>
    <link rel="stylesheet" href="../src/index.css">
  </head>
  <body>
  <h1>Todo</h1>
    <div class="flexbox-container" id="root">
    </div>
  </body>
</html>
index.css
body {
background-color: #24c991;
}

.flexbox-container{
display: flex;
border-radius: 12px;
margin-top: 7.25%;
margin-left: 35%;
height: 25em;
width: 22.5em;
background-color: #fefefe;
flex-direction: column;
overflow: auto;
}

h1{
font-family: "Comic Sans MS";
text-align: center;
color: #101010;
}
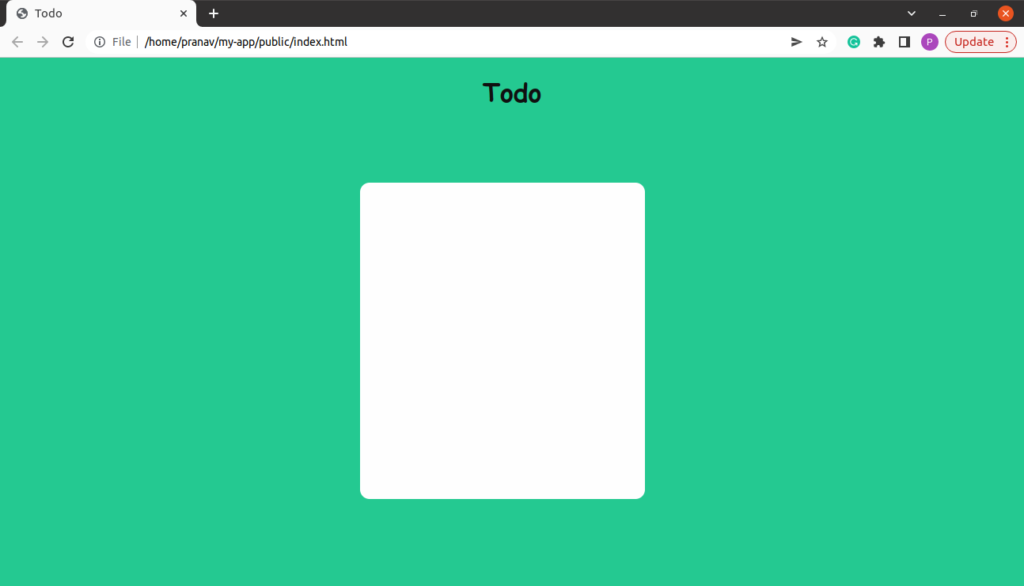
This is the code for the index.html and index.css programs. If you click on index.html, it should look something like this:
Now we start building our front end in React. We’re running React using npm, as recommended by the React team. Let us jump right into it.
App.css
.div_wrapper {
display: inline-flex;
}

li {
margin-left: 12%;
font-family: "Comic Sans MS";
}

.iptext{
text-align: center;
border-radius: 12px;
font-family: 'Comic Sans MS';
width: 300px;
margin-left: 12%;
margin-top: 12%;
}

.img_ip{
margin-top: 13%;
margin-left: 1%;
}`
We added the CSS component to React elements, which we’ll render in App.js. The iptext class corresponds to the input textbox element, where we’ll enter our to-do task. The img_ip class is the submit element; clicking it sends data to the server and the /listener route then handles the data.
App.js
import React, {useEffect, useState} from 'react';
import './App.css';

function App() {
const [data_output, setData] = useState(0);
const myref = React.createRef();

useEffect(()=> {
fetch('http://127.0.0.1:5000').then(data1=>data1.json()).then(data=>{
var op_data = {};
var temp_data = {};
for (var i=0;i<data.length;i++){
temp_data[data[i].index] = [data[i].data, data[i].isTrue]
op_data = Object.assign(temp_data);
}
setData(op_data);
})
}, []);
function add_data(){ var descr = myref.current.value;
fetch('http://127.0.0.1:5000/listener?add_data='+descr).catch(err=>console.log(err))
.finally(console.log('Data Added successfully!'));
window.location.reload();
}

function bool(checkbox_id){
fetch('http://127.0.0.1:5000/listener?bool='+checkbox_id).catch(err=>console.log(err))
.finally(console.log('Boolean value updated!'));
window.location.reload();
}

function del(index_id){
fetch('http://127.0.0.1:5000/listener?del='+index_id).catch(err=>console.log(err))
.finally(console.log('Document deleted!'));
window.location.reload();
}

return (<div>
<div className="div_wrapper">
<input alt="iptext" type="text" className="iptext" ref={myref}/>
<img alt="img1" src="https://cdn.pixabay.com/photo/2017/01/10/23/01/icon-1970474_1280.png"
width="16" height="16" className="img_ip" onClick={()=>add_data()}/>
</div>
<ul id="obj_list">
{Object.entries(data_output).map(([key, value]) => {
return ( <li key={key}>{key}. {value[0]}<input type="checkbox" defaultChecked={value[1]}
onClick={()=>bool(key)}/>
<img alt="img2" src="https://freesvg.org/img/milker_X_icon.png" height="16" width="16"
onClick={()=>del(key)}/></li>
)
})
}
</ul>
</div>
);
}
export default App;
Here, we import React, useEffect and useState from the React library. We also import the App.css file. After that, we initialize useState to receive data from the fetch function; later, we iterate data_output at return by mapping the keys and values. We also create a reference object to get data from the input textbox with the className iptext. Next, we initialize the useEffect function and write our main fetch function inside it. The output has the form of an array of JSON documents. We convert the array into a single object and pass it to the useState object setData, which is later parsed from data_output. Then we declare subfunctions add_data, bool and del to communicate with the server. Lastly, we return the elements. the li tag is parsed inside the object iteration.
Now we have finally finished our simple MERN to-do application. To see it in action we’ll run both Server.js and React together. You can run them from multiple command prompt instances. Server.js displays an empty array and React displays nothing. You can add to-do lists in your application and see the updated data in the database by running http://localhost:5000. You’ve now successfully built a MERN to-do application. Let’s move on to the testing part, using the React testing library.
App.test.js
`import { render, screen, fireEvent } from '@testing-library/react';
import App from './App';

test('we create a entry', async() => {
render(<App />);
const iptext = await screen.queryByAltText('iptext')
const add_button = await screen.queryByAltText('img1')
// First we create a dummy todo by entering text in the input textbox and firing the add button
fireEvent.change(iptext, {target: { value: "testip" } });
fireEvent.click(add_button)
})`
Here, we run a simple test to see if our application can add to-do items to our React application without any errors. To run the test, run npm test at your command prompt.
import { render, screen, fireEvent } from '@testing-library/react';
To do this, we first import the ReactDOM.render function, render. This function renders your application inside the test case. The screen function gives you access to the rendered DOM and fireEvent mimics user input to click events. We import this from the React testing library, which comes preinstalled with React.
test('message' ()=>{function goes here
Next, we initialize the test function. We used an async function in our test so that we can use await in our test function.
render(<App />);
Then we render our application by passing App to render
const iptext = await screen.queryByAltText('iptext')
const add_button = await screen.queryByAltText('img1')
We define the DOM elements iptext and add_button and use queryByAltText to query the DOM for the tag and return the DOM elements. Now we can use fireEvent by referencing iptext and add_button.
fireEvent.change(iptext, {target: { value: "testip" } });
The code above simulates user input by changing the value of the input text box to testip.
fireEvent.click(add_button)`
Now we trigger the onClick event by simulating a click in the image img1. This sends the input textbox data to the server using the fetch function declared in App.js and the database gets updated with our previous fireEvent text. Notice that the test passed successfully.
Congrats! You made a MERN to-do application and tested if you can add to-do tasks to your application.
You can find the files from the tutorial here on Github.
Conclusion
As you build more complicated applications, the test cases will also become more complex. Keep learning and experiment with different and more complex test cases. I wish the best to everyone reading this! Have a great day ahead! If you want to learn more about React Native testing, check out this blog.


