


Writing unit test cases is an import task for a developer. With proper unit testing, you’ll have fewer bugs in the final product. This post will compare two popular testing libraries for React applications: the React Testing Library and Enzyme. We’ll also go through some code examples and show you the strengths and weaknesses of each.
What Is the Enzyme Testing Library?
Enzyme is a JavaScript testing library mainly used for React unit testing. It’s a small testing library often combined with Jest to create test cases. Enzyme was released back in 2015, so the ecosystem is quite developed. All the issues you’ll face when creating Enzyme test cases are covered. We will show you some test cases using Enzyme later in this post.
What Is the React Testing Library?
The React Testing Library was released in 2018 and quickly became popular. Per the official site, it’s built on top of the DOM Testing Library. The developer can write test cases for real events. These events are like a user clicking on a button. The React Testing Library is, therefore, very equivalent to real user interaction. We’ll also show you some test cases using the React Testing Library later in this post.
Expand Your Test Coverage
React Testing Library vs. Enzyme: Differences
Since Enzyme was released three years before the React Testing Library, you’ll get more Stack overflow solutions when you’re stuck in Enzyme. The React Testing library is considered closer to real user interactions. We have something like fireEvent, which emulates the firing of any event when a user clicks on a button.
Enzyme follows a different approach. The code consists of props and states, which are key React concepts. So, you’ll create Enzyme test cases more or less from a developer’s point of view.
Basic Code Setup
You can create a new React app with the command below. You’ll need to have rpm and node installed on your system to create a React app.
npx create-react-app testing
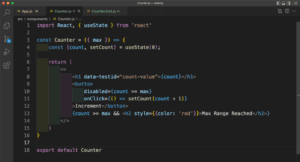
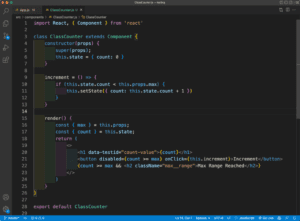
Using the code below, create a components folder inside the src folder. You’ll then create a file named Counter.js inside it. In this file is a functional component where you get a prop of max. There’s also a state of count created through the useState hook.
Inside the return statement is an h1 with a data property of testid. We created this because it’s easier to target data properties in test cases. Here, you can see the count. A button also increments the count and is disabled once the max is reached.
Lastly, we’ll show text that reads “Max Range Reached” if the count exceeds the max.
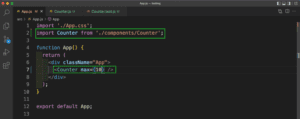
In the App.js file, remove the boilerplate code and import and show the Counter component. In the code below, we’re passing max props in it with a value of 10.
Starting the app with npm start will show the counter in localhost. The button will be disabled once it reaches the count of 10. You’ll also see a warning in red telling you that the max range has been reached.
![]()
Testing With React Testing Library
Next, we’ll test our Counter.js file with the React Testing Library. For this, we need to install some packages as dev dependencies. Run the command below in the terminal to install the same:
npm i -D @testing-library/jest-dom @testing-library/react @testing-library/user-event
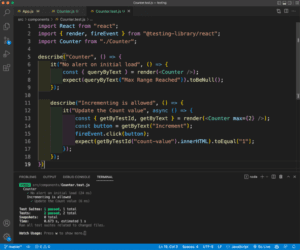
Now create a file Counter.test.js inside the components folder and add the content below. Here, we’re importing React, render, and fireEvent from the React Testing Library. We’re also importing the Counter component.
We have two test cases inside our main describe block. In the first one, we’re testing whether there’s an alert when the component is loaded. Here, we’re first rendering the Counter component. After that, using the expect query, we’re checking to make sure the text of Max Range Reached is null.
In the next test case, we’re checking whether incrementing is allowed when we have a max value of less than 10. Here, we’re first rendering the Counter component with a max of 2. Next, we’re selecting the button with getByText(). After that, with the React Testing Library fireEvent, we’re emulating a click on the button. Lastly, in an expect query, we’re getting the count value with the test ID of count-value. This value is present in our Counter.js file. Here, we’re checking whether its value is 1. It will be one after the first click of the button.
Notice that these test cases are pretty similar to JavaScript DOM programming.
We need to run the test cases with the npm run test command. Notice that in the integrated terminal, all of our test cases passed.
Testing With Enzyme
Next, we will create a new file of ClassCounter.js inside the components folder for our Enzyme testing. It’s similar to our Counter.js file in functionality. The difference is that it’s a class-based component.
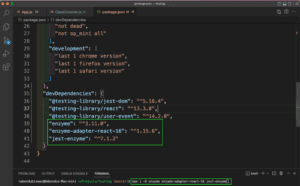
We’ll need to install the npm packages below as dev dependencies to get started with Enzyme testing.
npm i -D enzyme enzyme-adapter-react-16 jest-enzyme
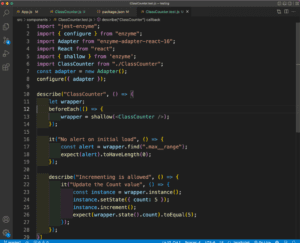
Now create a file ClassCounter.test.js and add the content below to it. Here, we’re first doing the required imports. After that, we create a wrapper. With the wrapper, we’re rendering the ClassCounter component. Next, we’re using the same two tests that we used earlier.
In the first test of the initial load, we’re using the wrapper to find the h1 with the max__range class. Since it won’t be shown during the initial load, we’re using expect to check its length. Here, the length is 0, and it will be tested correctly.
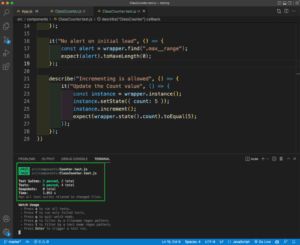
In the following test case, incrementing is allowed, so we’ll first create an instance of the class. After that, we’ll use the setState just like in React. Here, we’re making the count variable 5. Next, we’re using the increment function from our ClassCounter component. Finally, we’re checking to see if the state is 5.
These test cases are similar to React code, as are many of the concepts.
Now, open the integrated terminal and run the command rpm run test. These two new test cases should also pass.
Is the React Testing Library Better Than Enzyme?
The answer to this question is, “it depends.” Sometimes the React Testing Library is better. Other times, Enzyme is better. If you want mimic real-world user interactions, the React Testing Library is the way to go because you can do the same with fireEvent functions.
Meanwhile, Enzyme is better suited to situations where you have to match the state of React or some other function with state. Here, you can even use the setState function of React.
React Testing Library vs. Enzyme: Conclusion
In this post, you learned about Enzyme and the React Testing Library. First, we covered them briefly, then showed you the differences between them. Next, we created a functional component in React for incrementing count and tested it with the React Testing Library. Finally, we made the same component with a class and tested it with Enzyme.
Both libraries have pros and cons, and it’s best to use them accordingly.


