


The React Testing Library is made on top of the DOM testing library. It has become popular quickly because most unit test cases written in it resemble real user interactions. Writing test cases for asynchronous tasks like API calls are often complicated.
This post will look into the waitFor utility provided by the React Testing Library. It is used to test our asynchronous code effortlessly. First, we’ll create a complete React app, which will perform asynchronous tasks. After that, we’ll test it using waitFor.
Before jumping into the tutorial, let’s look at the waitFor utility and what problems it can solve.
What Is waitFor?
As mentioned, the utility waitFor is used when you have some async code to check. The most common async code is when we do an API call to get data in a front-end ReactJS application. The data from an API endpoint usually takes one to two seconds to get back, but the React code cannot wait for that time. In these scenarios, we use the Fetch API or Axios in ReactJS, which waits for the data to get back from the API. But it also continues to run code after the async task. This kind of async behavior is needed because JavaScript is a single-threaded language.
This code is common in almost all modern web apps, like social media or e-commerce. To test any web app, we need to use waitFor, or else the ReactJS/JavaScript behavior will go ahead with other parts of the code. We’ll also look into this issue in our post.
Expand Your Test Coverage
Step 1: Initial Setup
We’ll create a new React app named waitfor-testing using the below command:
npx create-react-app waitfor-testing
Now, remove everything from the App.js file and just keep a heading tag containing waitFor Testing:
import './App.css';

function App() {
return (
   <div className="App">
     <h1>waitFor Testing</h1>
   </div>
 );
}

export default App;
Now, run the React application with npm start, and we’ll see the text at http://localhost:3000/.
![]()
Step 2: Simple Asynchronous Component
We’ll create a components folder inside the src folder. Next, create a file AsyncTest.js inside it. Here, we’ll first import a getUser function from the API file, which we will create next.
Inside the component, we have a state of data created through the useState hook. Next, from a useEffect hook, we’ll pass the props name to getUser function. This getUser function, which we will create next, will return a resolve, and we’ll catch it in the then statement. Here, we’ll be setting it to setData.
Now, inside a return, we’ll first check if the data is null. If it’s null, we’ll see the Loading text. Or else we’ll be showing the data.
import React, { useEffect, useState } from 'react'
import { getUser } from './api';
const AsyncTest = ({ name }) => {
    const [data, setData] = useState(null);
    useEffect(() => {
        if (!name) {
            setData(null)
            return
        }
        getUser(name).then(setData)
    }, [name])

    return <>{data === null ? <div>Loading...</div> : data}</>
}

export default AsyncTest
Now, create an api.js file in the components folder. Here, we have created the getUser function. It’s using async and returning a Promise type. We’re just changing the provided name to uppercase, using the JavaScript function of toUpperCase().
export const getUser = async name => name.toUpperCase();
Back in the App.js file, we’ll import the AsyncTest component and pass a prop of name to it.
import './App.css';
import AsyncTest from './components/AsyncTest';
function App() {
return (
   <div className="App">
     <h1>waitFor Testing</h1>
     <AsyncTest name="nabendu" />
   </div>
 );
}

export default App;
Now, in http://localhost:3000/, we’ll see the text nabendu in uppercase.

Step 3: Simple Testing
Now, we’ll write the test case for our file AsyncTest.js. React comes with the React Testing Library, so we don’t have to install anything. First, create a file AsyncTest.test.js in the components folder.
Here, we’ll first import render, screen from the React Testing Library. After that, we’ll import the AsyncTest component too.
Inside a describe block, we have our only test case in an it statement. The second parameter to the it statement is a function. First, we render the component with the render method and pass a prop of bobby.
Next, we have the usual expect from the React Testing Library. Here, we’ll check whether the text BOBBY is rendered on the screen.
import { render, screen, waitFor } from '@testing-library/react'
import AsyncTest from './AsyncTest'

describe('should pass with correct case', () => {
       it('should make user Uppercase', () => {
         render(<AsyncTestname="bobby"/>)
         expect(screen.getByText('BOBBY')).not.toBeNull()
   })
})
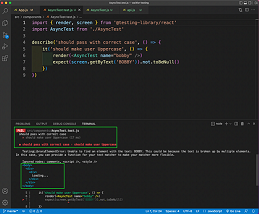
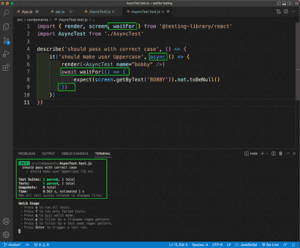
We need to use waitFor, which must be used for asynchronous code. First, we’ll add the import of waitFor in our import statement. Notice that we have marked the function as async because we will use await inside the function.
Now, for the component to be rendered after performing an asynchronous task, we have wrapped expect with waitFor. Since this component performs asynchronous tasks, we have to use waitFor with await in front of it.
import { render, screen, waitFor } from ‘@testing-library/react’
import AsyncTest from ‘./AsyncTest’
describe('should pass with correct case', () => {
       it('should make user Uppercase', async () => {
         render(<AsyncTestname="bobby"/>)
         awaitwaitFor(() => {
         expect(screen.getByText('BOBBY')).not.toBeNull()
      })
   })
})
Step 5: Complex Asynchronous Component
We’ll create a complex asynchronous component next. So create a file called MoreAsync.js inside the components folder. It’s very similar to the file AsyncTest.js. The only difference is that we call the function of getUserWithCar here instead of getUser.
import React, { useEffect, useState } from 'react'
import { getUserWithCar } from './api';
const MoreAsync = ({ name }) => {
    const [data, setData] = useState(null);
    useEffect(() => {
        if (!name) {
            setData(null)
            return
        }
        getUserWithCar(name).then(setData)
    }, [name])

    return <>{data === null ? <div>Loading...</div> : data}</>
}

export default MoreAsync
Now, in the api.js file, we’ll add the getUserWithCar function. It’s using async and returning a Promise type. From inside the function, we’ll call the getUser function with the name. Notice that we have to use await here since the getUser function returns a Promise.
After that, we’ll use another await to check if the user is NABENDU and call a new async function getCar with nexon. Or else we’ll call getCar with Hyundai.
In the function getCar, we’ll make the first letter a capital and return it.
export const getUser = async name => name.toUpperCase();

export const getCar = async car => car[0].toUpperCase().concat(car.slice(1))

export const getUserWithCar = async name => {
   constuser = awaitgetUser(name);
   constcar = await(user === 'NABENDU' ? getCar('nexon') : getCar('hyundai'));
   return`${user} drives a ${car}`;
}
Back in the App.js file, we’ll import the MoreAsync component. We’ll call it two times, one with props as nabendu and another with props as bob.
import './App.css';
import AsyncTest from './components/AsyncTest';
import MoreAsync from './components/MoreAsync';

function App() {
return (
    <div className="App">
      <h1>waitFor Testing</h1>
      <AsyncTestname="nabendu"/>
      <MoreAsyncname="nabendu"/>
      <MoreAsyncname="bob"/>
   </div>
 );
}

export default App;
Now, in http://localhost:3000/, we’ll see the two following sets of text.

Step 6: Complex Asynchronous Testing
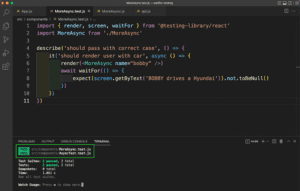
Now, we’ll write the test case for our file MoreAsync.js. So create a file called MoreAsync.test.js in the components folder. Again, it’s similar to the file AsyncTest.test.js.
Here, again, we’ll import render, screen, waitFor from the React Testing Library. After that, we’ll import the MoreAsync component. Inside the it block, we have an async function.
We’ll also need to add waitFor in expect again because our complex asynchronous component does asynchronous tasks twice. If we don’t do this, we’ll get the error because React will render Loading text. It will not wait for the asynchronous task to complete and return the result.
import { render, screen, waitFor } from '@testing-library/react'
import MoreAsync from './MoreAsync'

describe('should pass with correct case', () => {
   it('should render user with car', async () => {
     render(<MoreAsyncname="bobby"/>)
     awaitwaitFor(() => {
     expect(screen.getByText('BOBBY drives a Hyundai')).not.toBeNull()
    })
  })
})
Now, run the command npm run test from the terminal, and both test cases will run successfully. It will run tests from the earlier AsyncTest.test.js and also the current MoreAsync.test.js.
Conclusion
In this post, you learned about the React Testing Library asynchronous testing function of waitFor. First, we created a simple React project. Then, we made a simple component, doing an asynchronous task. While writing the test case, we found it impossible to test it without waitFor.
This is required because React is very quick to render components. And it doesn’t wait for asynchronous tasks to complete.
After that, we created a more complex component using two asynchronous calls. We tested it successfully using waitFor.
You can find the code for this project here.


