


There are many libraries available to write unit tests for your JavaScript code. One popular option is QUnit. Let’s look at how you can get started with QUnit.
But let’s not stop there. Measuring code coverage of your tests is a useful metric to gain insights and improve your test suite.
We’ll open the tutorial with a brief overview of QUnit itself, so we’re on the same page in regards to this tool. After that, we’ll talk a little bit about code coverage, explaining why it’s such an important test metric. Finally, we’ll get to the “tutorial” part of the post, in which we’ll actually walk you through how to get started with QUnit. Let’s begin.
What Is QUnit?
If you’re already familiar with QUnit, you can skip to the next section.
QUnit is a JavaScript library to test your JavaScript code. You can write your tests using certain functions provided by QUnit and then have QUnit run them. QUnit can run your tests in the browser or in a plain Node.js process.
Which way of running your tests depends mainly on where your code will run. If your JavaScript code will run in the browser (i.e. you’re using the DOM), you might want to run your unit tests in the browser as well. You can run QUnit with Node.js if you’re writing a Node.js application.
If you’re testing logic that will run in the browser but doesn’t interact with the DOM, I recommend running your tests in a Node.js process. It will also be easier to integrate with a CI/CD pipeline.
What is Code Coverage and Why It Matters?
Code coverage is an important metric related to testing and quality. It indicates the ratio of source code that is covered—that is, exercised by—at least one automated unit test.
Expand Your Test Coverage
The simplest type of code coverage is line coverage, which it’s calculated just by getting the number of lines covered by a least a single test and dividing by the total number of lines in the application. So, if an application has 100000 lines of code and just 45 thousand of them are covered by tests, we can say the line coverage of this app is 45%.
However, there are more involved—and more useful—forms of coverage, such as branch coverage, which determines the ratio of logical branches in the code that have been exercised by tests.
Code coverage lets you know the extent to which your source code is tested. Having a code coverage that’s too low is a bad sign; it means your test suite is unable to act as a safety net to developers, allowing them to refactor code fearlessly, or add new features at a fast pace without fear of introducing regressions. A great way to achieve high code coverage is to use TDD (test-driven development.)
Before we move on, you must keep in mind an important pitfall of code coverage. This metric, alone, can’t really guarantee quality. That’s because code coverage doesn’t say anything about the quality of your unit tests. It’s totally possible to have 100% coverage with your tests still being insufficient or not effective.
In other words, while low code coverage is definitely bad, high coverage isn’t necessarily good. In order to achieve great tests, you need to couple code coverage with practices or tools that ensure quality. TDD is a great practice for that since it encourages you to write simple tests. Mutation testing is also a practice you can adopt to verify the quality of your test suite.
With that being said, it’s time to roll up our sleeves and get started with QUnit.
The Code We’ll Test In This Tutorial
Before we can write a unit test, we need some code that we want to test. Let’s assume we’re loading a page and providing it with some data. This data contains names that we want to display.
We want to display it in a readable way, so we’ll prepend the last element with “and”.
This is our HTML file:
<!DOCTYPE html>
<html>

<body>
    <h1 id="pageTitle"></h1>
    <p>Lorem ipsum and so on</p>
    <script src="./index.js"></script>
</body>

</html>
And this is our JavaScript code in the index.js file:
// You could perform an AJAX call to get
// the data here
var data = ["John", "Faiza", "Stan"];

var last = data.pop();
var title = `${data.join(", ")} and ${last}`;
document.getElementById('pageTitle').innerText = title;
This gives us the following result:

Now let’s write a test.
Our First QUnit Test
We’ll start by running our QUnit tests in the browser. To do this, we need a webpage where QUnit is loaded and where it can run:
<!DOCTYPE html>
<html>

<head>
    <meta charset="utf-8">
    <meta name="viewport" content="width=device-width">
    <title>People Title Tests</title>
    <link rel="stylesheet" href="https://code.jquery.com/qunit/qunit-2.9.2.css">
</head>

<body>
    <div id="qunit"></div>
    <div id="qunit-fixture"></div>
    <div id="pageTitle"></div>
    <script src="https://code.jquery.com/qunit/qunit-2.9.2.js"></script>
    <script src="../src/index.js"></script>
    <script src="./tests.js"></script>
</body>

</html>
Basically, we’re
- loading the QUnit script and CSS files
- providing two divs for QUnit
- a div for our script to manipulate
- loading our index.js script
- and a script containing our tests
Now, for our tests.js file. We’re going to call the QUnit.test function and provide it a test name and a callback. It’s in the callback that we’ll verify the results of our index.js script:
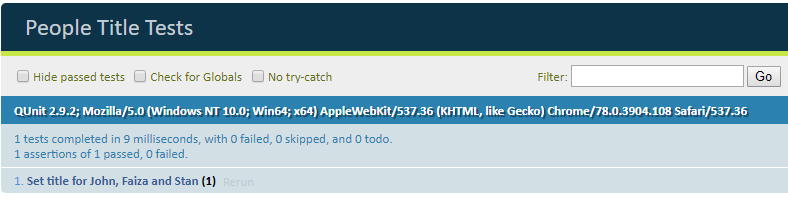
QUnit.test('Set title for John, Faiza and Stan', function(assert) {
    var title = document.getElementById('pageTitle').innerText;
    assert.equal(title, 'John, Faiza and Stan');
});
When we load our tests.html page now, we see the results:
But this example is too simple. The data is hard-coded and we want to run it for different sets of data. We need a way of providing our code with other data.
Improving the Code
Let’s extract our code into a function first:
function setTitle(names) {
    var last = names.pop();
    var title = `${names.join(", ")} and ${last}`;
    document.getElementById('pageTitle').innerText = title;
}
We’ll move the “production” code to retrieve the data to our index.html page:
<!DOCTYPE html>
<html>

<body>
    <h1 id="pageTitle"></h1>
    <p>Lorem ipsum and so on</p>
    <script src="./index.js"></script>
    <script>
        // You could perform an AJAX call to get
        // the data here
        var data = ["John", "Faiza", "Stan"];
        setTitle(data);
    </script>
</body>

</html>
This way it won’t interfere with our tests.
Now, we can write multiple tests:
QUnit.test('Set title for John, Faiza and Stan', function(assert) {
setTitle(['John', 'Faiza', 'Stan']);
var title = document.getElementById('pageTitle').innerText;
assert.equal(title, 'John, Faiza and Stan');
});
QUnit.test('Set title for John and Faiza', function(assert) {
setTitle(['John', 'Faiza']);
var title = document.getElementById('pageTitle').innerText;
assert.equal(title, 'John and Faiza');
});
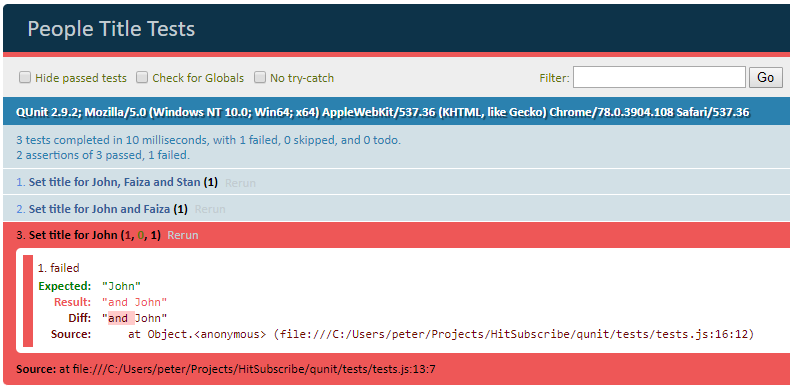
QUnit.test('Set title for John', function(assert) {
setTitle(['John']);
var title = document.getElementById('pageTitle').innerText;
assert.equal(title, 'John');
});
One test fails however:
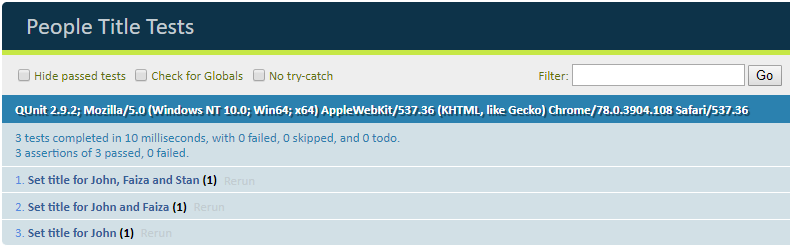
We can easily fix this by changing our code:
function setTitle(names) {
    var title = '';
    if (names.length === 1) {
        title = names[0];
    } else if (names.length > 1) {
        var last = names.pop();
        var title = `${names.join(", ")} and ${last}`;
    }

    document.getElementById('pageTitle').innerText = title;
}
Our tests now pass:
The nice thing is that I can add many tests to this suite, without having to load my application over and over again. This really improves my development speed.
There is another improvement we can make. We had to add a h1 tag to our HTML page.
But what if we have many tests that require different kinds of HTML tags? Our test page would quickly become a mess. It also means our tests could start influencing each other, i.e. a test that runs fine by itself fails when run as part of the larger suite.
Isolating Our Tests
It’s a best practice to have each unit test run in isolation. This is true for unit tests in every language or framework. QUnit has us covered with the qunit-fixture div. We can use this div to add the elements that we need. QUnit will clean up this div after each test has run.
This is what one test could look like:
QUnit.test('Set title for John, Faiza and Stan', function(assert) {
    var fixture = document.getElementById('qunit-fixture');
    fixture.innerHTML = '<div id="pageTitle"></div>';
    setTitle(['John', 'Faiza', 'Stan']);
    var title = document.getElementById('pageTitle').innerText;
    assert.equal(title, 'John, Faiza and Stan');
});
We’re adding a div tag to our qunit-fixture div and QUnit will reset the state of the qunit-fixture after every test. If we do the same thing for our other tests, we can see that our tests still pass:
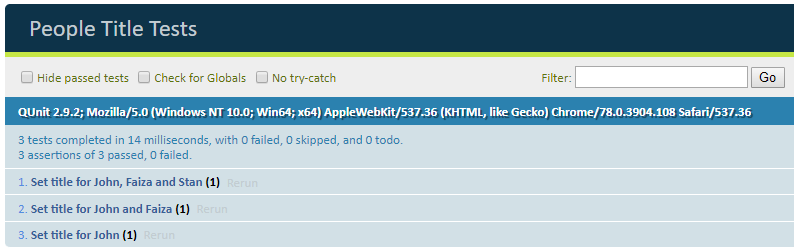
Notice how we have some duplicate code to add the pageTitle element to our qunit-fixture element? When your test suite really starts to grow, you’ll want to organize your tests into modules and reuse code that you keep repeating.
Organizing QUnit Tests With Modules
Creating a module in QUnit is easy. Just call QUnit.module and any test declared after that line will be added to the module. A better approach is to add a callback function to QUnit.module so that you can nest modules.
You can also use the beforeEach and afterEach functions to run code before (or after) each test. Let’s change our code to this:
QUnit.module("Set title", function(hooks) {
    hooks.beforeEach(function() {
        var fixture = document.getElementById('qunit-fixture');
        fixture.innerHTML = '<div id="pageTitle"></div>';
    });

    QUnit.test('Set title for John, Faiza and Stan', function(assert) {
        setTitle(['John', 'Faiza', 'Stan']);
        var title = document.getElementById('pageTitle').innerText;
        assert.equal(title, 'John, Faiza and Stan');
    });

    QUnit.test('Set title for John and Faiza', function(assert) {
        setTitle(['John', 'Faiza']);
        var title = document.getElementById('pageTitle').innerText;
        assert.equal(title, 'John and Faiza');
    });

    QUnit.test('Set title for John', function(assert) {
        setTitle(['John']);
        var title = document.getElementById('pageTitle').innerText;
        assert.equal(title, 'John');
    });
});
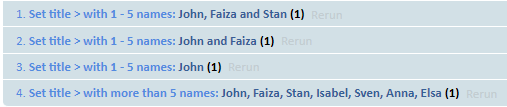
Our results page now include the module name:

Once you have a lot of tests, you can nest modules and really start to organize your tests. I’ve stretched our example a bit to the point of being unrealistic, but this should give you an idea of what’s possible:
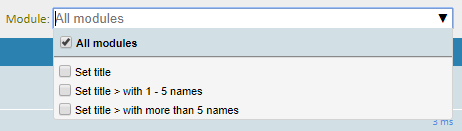
Once you have your tests organized in modules, you can use the filter in the top right to see only the tests you’re interested in:
Automating the Test Run
Instead of having to open the webpage in a browser each time, let’s create a script that can run the tests for us. Karma is a test runner that will spin up a browser for us. We can integrate it with QUnit and run our tests in a headless Chrome instance.
Let’s install the necessary dependencies first. Make sure you have npm installed and at the root of your project, run:
npm init
npm i karma karma-qunit karma-chrome-launcher qunit -D
Then initialize a Karma config file:
./node_modules/.bin/karma init karma.conf.js
You’ll get a series of questions to which most answers will be straightforward. This is what I answered:
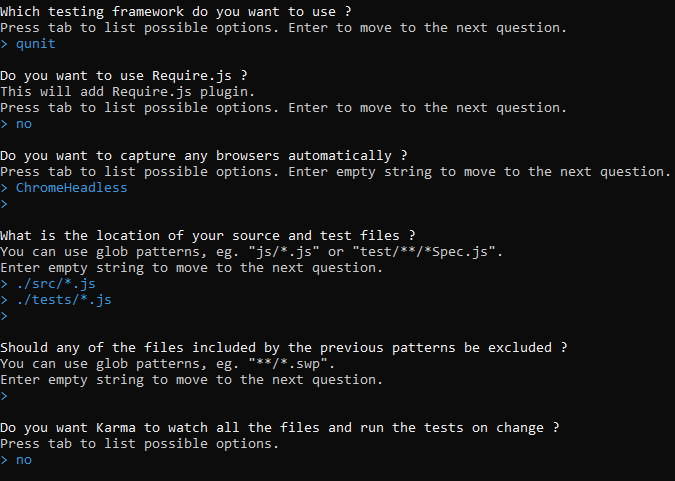
Karma will create the configuration file, but we still need to make one change. In the configuration file, change the singleRun value to true. You can now run your tests:
./node_modules/.bin/karma start karma.conf.js
Our tests have now run in a headless version of Chrome:

Code Coverage
Our code now looks like this:
function setTitle(names) {
    var title = '';
    if (!names) {
        return title;
    } else if (names.length === 1) {
        title = names[0];
    } else if (names.length > 1 && names.length <= 5) {
        var last = names.pop();
        var title = `${names.join(", ")} and ${last}`;
    } else if (names.length > 5) {
        var take = names.splice(0, 5);
        var title = `${take.join(', ')} and ${names.length} more`
    }

    document.getElementById('pageTitle').innerText = title;
}
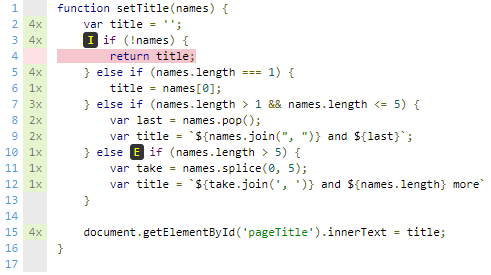
The tests enable us to easily add new features to the function without having to start the application each time to verify the results manually. But there is a small piece of code there that isn’t covered by tests:
if (!names) {
    return title;
}
We can easily see this now, but when you have a large body of tests, this isn’t always clear. This is where code coverage is useful. Code coverage will show you data on how many and which pieces of your code are covered by tests.
Let’s install code coverage for Karma:
npm i karma-coverage -D
Now when we run our tests (with the karma start command), a new folder coverage will appear, containing the results. Open the index.html page and you’ll see an overview:

You can click on the index.js link and you’ll see which parts aren’t covered yet:
We can now add a test to improve our code coverage.
Track Your Progress Going Forward
We’ve built a good basis to use QUnit for our tests and see where we need to add tests. If you want, you can check out the repository on GitHub.
Don’t focus on achieving 100% test coverage. That’s not necessary. But use the code coverage results to see where you’re missing tests that you feel should be present.
What should your next steps be? Well, there’s plenty you can learn about testing, be it related to QUnit or to other testing frameworks. For instance, you could read more about unit testing best practices. Or maybe you might want to educate yourself on the topic of code smells i.e. signs that indicate there might be problems with your JavaScript code.
Still on the topic of QUnit, you could learn more about how the tool handles asynchronous testing. In older versions, besides the QUnit.test() method, there was the QUnit.asyncTest() method, which allowed you to define an asynchronous test. Starting with version 1.16, the method QUnit.asyncTest() was deprecated. Nowadays, you can use only QUnit.test() to define an asynchronous test, with the help of the new assertion method assert.async().
You might also want to learn more about testing in general. For instance, understand the differences between unit tests and integration tests in more depth is certainly worthwhile. And the same can be said about how to integrate testing into your CI/CD pipeline.
What matters is that you never stop learning. Over time you’ll notice the quality of your production code improves, and you feel safer changing code. Have fun testing!
This post was written by Peter Morlion. Peter is a passionate programmer that helps people and companies improve the quality of their code, especially in legacy codebases. He firmly believes that industry best practices are invaluable when working towards this goal, and his specialties include TDD, DI, and SOLID principles.


