


When testing web apps through their UI, you must ensure you’re locating elements on the page in a safe and stable way. Otherwise, you might end up with fragile tests that hurt everyone involved. For instance, modern web apps will often load elements at different times, so to avoid errors, you need to wait until the element you want is visible before interacting with it.
That’s what this post is about: teaching you how to wait until an element is visible using Selenium WebDriver. You can think of WebDriver as an API you can use to drive a browser, and you can interact with that API using any of the supported languages. We’ll use the C# bindings to drive Google Chrome for this tutorial.
Basic Requirements
Let’s start by getting the requirements ready.
- Make sure you have Google Chrome installed.
- You’ll also need .NET 5 installed.
- Get a text editor or IDE. I’ll use the free Visual Studio Code, but feel free to use what makes you comfortable.
- Finally, you’ll need Node.js installed since the sample app we’ll be testing is a React app.
These are the basic requirements; they have nothing to do with Selenium, per se. In the next section, we’ll start walking you through the Selenium testing bit, which will involve downloading and installing more things (if you don’t already have them).
Getting the Sample Application to Test
You can find the sample app we’ll be testing at this GitHub repo. Clone it using Git or download its contents as a zip file and extract them to a folder.
Using your terminal, access the cloned/extracted directory and run the following commands:
npm install
npm start
Open your browser at http://localhost:3000, and you’ll see the app running. It’s quite simple: It features a text field and a button. After typing something into the text field and pressing the button, the app displays a new component containing the number of typed characters. However, I deliberately introduced a delay before showing the component, so we could practice waiting for the element to be visible.
Getting Chrome WebDriver Ready
You can skip this section if you already have Selenium WebDriver installed—including the bindings for the Java language. Otherwise, read on.
You can think of WebDriver as being composed of two components:
- the actual executable that can drive a browser
- the language bindings you must use so you can write code in your favorite programming language to interact with said executable
Let’s get both working, starting with the executable. Go to the Chrome driver downloads page. Click on the correct link according to the version of Google Chrome installed on your system. You’ll then reach another page where you’ll have to choose between macOS, Windows, and Linux versions.
After downloading the correct zip file, extract its content to an easy-to-find location and add that location to the system path.
To check whether everything worked, go to your terminal and run:
chromedriver --version
You should see the current version of the ChromeDriver you have installed:

Getting the C# Bindings Ready
The next step is getting things ready on the C# side. We’ll start by creating a .NET console project using the CLI (command-line interface):
dotnet new console -o dotnet-visible-element
cd dotnet-visible-element
code .
This will create the project and open it on Visual Studio Code. For the next step, we’ll need to install the WebDriver bindings for .NET. Back in the terminal, run the following command:
dotnet add package Selenium.WebDriver
dotnet add package Selenium.Support
dotnet add package DotNetSeleniumExtras.WaitHelpers
Now, let’s create the simplest Selenium automation to make sure the setup we have is functional. Inside your IDE or editor, go to the Program.cs file. Add the following two using statements:
using OpenQA.Selenium;
using OpenQA.Selenium.Chrome;
Now, add the two following lines to the Main method:
IWebDriver driver = new ChromeDriver();
driver.Navigate().GoToUrl("http://localhost:3000");
If you now run the application—either by executing dotnet run on the terminal or by pressing F5 inside VS Code—you should see a new Chrome window opening and, without your intervention, navigate to your React app.
Everything looks fine with our setup, which means we’re ready to start testing.
Writing the First Selenium Automation
Back in the Program.cs file, add the following lines to the Main method:
IWebElement input = driver.FindElement(By.ClassName("text-input"));
input.SendKeys("hello world!");
IWebElement button = driver.FindElement(By.TagName("button"));
button.SendKeys(Keys.Return);
Here’s the explanation of the lines above:
- We instantiate a new variable of type IWebElement, representing the text input we locate via CSS class name.
- Then, we use the method SendKeys to enter the phrase “hello world!” into the element we just fetched.
- We find another element, the button, which we locate using the tag name.
- Finally, we send the return (or ENTER) key to this element.
If you now run the code, you’ll see that, besides opening the page, the automation also writes “hello world!” to the input text field and presses the button, causing the result to be displayed a few seconds later.
In a real test, a helpful assertion would be to verify whether the displayed result is what we expected, including the length of the entered text. To do that, you’d need to locate the element which displays the result, so let’s try to do that.
I know the result is displayed inside a div element with a class called “display-length.” So, let’s try to locate the element using that:
IWebElement div = driver.FindElement(By.ClassName("display-length"));
Oops…It looks like this time things didn’t work that great:
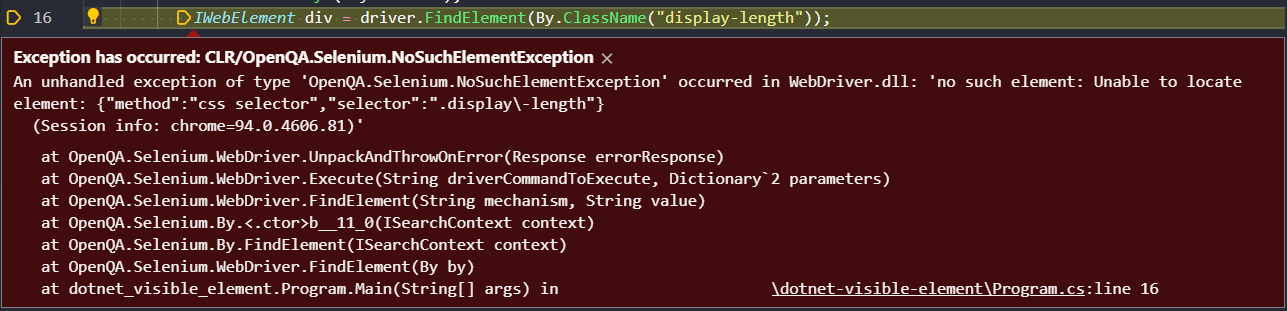
This is the start of the error message:
An unhandled exception of type ‘OpenQA.Selenium.NoSuchElementException’ occurred in WebDriver.dll: ‘no such element: Unable to locate element: {“method”:”css selector”,”selector”:”.display\-length”}
This error is, of course, expected. Selenium can’t find it since the element deliberately takes its time to show up. So, what’s the solution to this problem?
Selenium: Waiting Until the Element Is Visible
The solution is, of course, to instruct Selenium to wait until the desired element is visible before trying to interact with it.
First, add yet another two using imports to the top of your Program.cs file:
using OpenQA.Selenium.Support.UI;
using SeleniumExtras.WaitHelpers;
Next, add a line to the Main method, creating a new WebDriverWait object:
var wait = new WebDriverWait(driver, TimeSpan.FromSeconds(20));
As you can see, we give the WebDriverWait object two parameters: the driver itself and a TimeSpan object that represents the timeout for trying to locate the element. In our case, we’ll give up after trying for 20 seconds.
Now, use the wait object and try to locate the element. Selenium will try until the element becomes visible or the timeout expires:
var div = wait.Until(ExpectedConditions.ElementIsVisible(By.ClassName("display-length")));
Finally, display the text of the div to verify everything is working correctly:
Console.WriteLine(div.Text);
In a real test, by this point, you would probably use the unit testing library of your preference to write assertions against that retrieved value to ensure everything is as expected.
Life Beyond Selenium
Selenium is a popular browser automation tool. And though you can use its power for pretty much anything your heart desires—including automating boring administrative tasks, for instance—people typically use it for automated testing.
When performing the kind of tests you do with Selenium, you might run into some trouble. One of the most common problems people face is failing to locate elements on the page. That may happen for several reasons, but a common one is simply trying to interact with an element before it exists or before it’s visible and ready to be used. In this post, you’ve seen how to code around that problem, ensuring that Selenium waits until the element is visible.
Before parting ways, here’s a final tip. There are plenty of other test automation tools out there that offer easier and more flexible ways to wait during web apps testing. Testim is such a tool. You’d be wise to give it a try.


")