


Today’s post aims to answer a pretty straightforward question: How do I find an element by XPath in Selenium? So, why is this a question worth tackling? What is XPath, and why should you care about it?
Here on this blog, we’re all about software testing. Selenium is one of the most popular tools for testing web applications. Well, that’s not completely correct. Selenium isn’t an automated testing tool per se, but a web browser automation tool.
With it, you can automate a lot of different tasks you can do with browsers. But who are we fooling, right? Its most common use is indeed testing.
One of the most important aspects of using Selenium is how you locate elements to interact with them. You can find elements by their ID, text content, the text of their links, and many more. Today, we’ll cover another important way in which you can locate elements, showing you how to find an element by XPath in Selenium.
XPath (XML Path Language) is a World Wide Web Consortium (W3C) standard. It is a query language used for selecting nodes from an XML document. So, what does that have to do with testing webpages? Everything, since XPath is the language used to navigate through the tag structure of a webpage.
Because of that, we’ll start the post by covering XPath, its definition, and its types. Only then will we proceed to show you how to use Selenium to find elements via XPath.
Let’s get to it.
Understanding XPath
As promised, let’s start by covering XPath in more detail. You’ll learn XPath’s definition, its types, and its syntax. We’ll also show you how to quickly and easily perform XPath queries using Google Chrome’s developer tools. Let’s get started.

What Is XPath?
As mentioned before, XPath is a query language you can use both on XML and HTML documents. You can use XPath to navigate through the elements of a webpage and find them. That’s why XPath is relevant in the context of Selenium testing: It’s yet another way of locating elements, which is essential when trying to interact with them in an automated manner.
What Are the Different Types of XPath?
XPath comes in two different flavors: absolute XPath and—you’ve guessed it!—relative XPath. Let’s now see how the two compare.
Absolute XPath
The absolute variation of XPath has this name because it starts from the root element of a document. When writing an absolute XPath, you start with a single forward-slash (/) and walk your way until you find the desired element.
Absolute XPaths have a serious downside. Any automation that relies on one will fail if something changes in the path, leading to fragile tests.
Let’s now see an example of what an absolute path looks like. Head to the example.com website using the Chrome web browser. Take a look at the source code of the page. It should look like this:

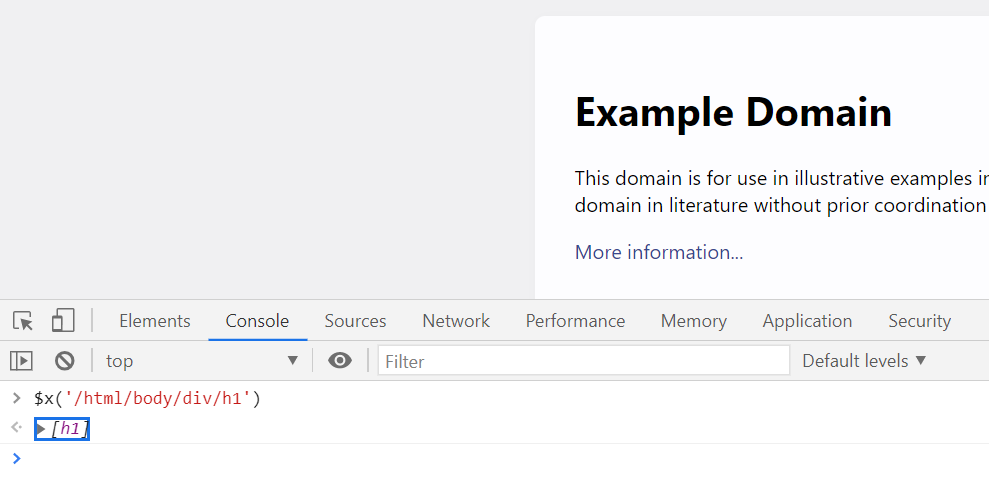
As you can see, it’s not a lot, which makes it perfect for our purposes. Now, press the F12 key to fire up the developer tools. Head to the Console tab and paste the following on it:
$x('/html/body/div/h1')
Then, press Enter, and you should see that the correct element is correctly identified:
Let’s now learn about the relative XPath properties and see how it compares to the absolute variant.
Relative XPath
As its name suggests, the relative XPath isn’t a single hierarchical path from the root element of the HTML document object model (DOM) structure. Instead, you can use a relative path to find an element in any part of the DOM. Let’s see what that looks like in practice.
Unlike its absolute counterpart, the relative XPath starts with a double forward-slash (//). Then, you can use the XPath syntax to find the element you’re searching for. The complete relative XPath expression to find the h1 element from the previous example would be //h1. Since there’s just one h1 element on the whole page, that’s all that is needed.
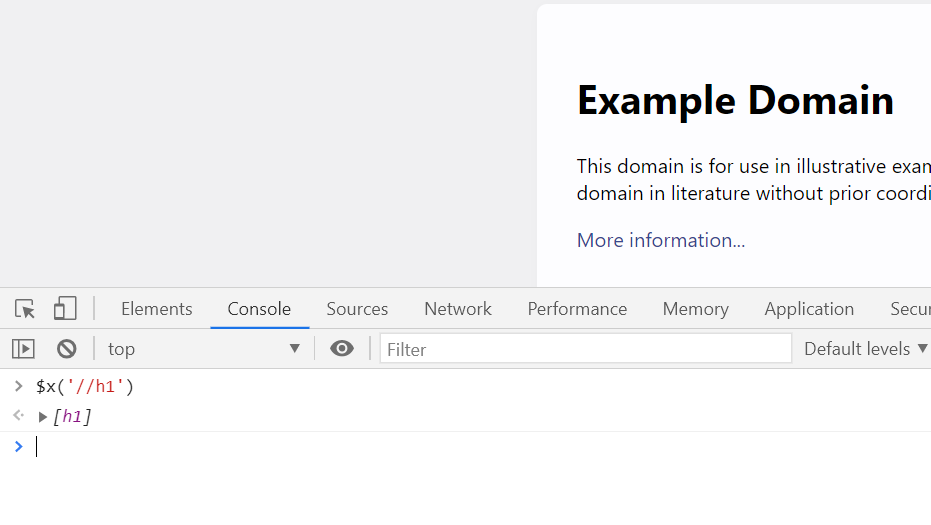
So, let’s go back to Chrome’s developer tools. Head back to the console and paste the following command on it:
$x('//h1')
Then, press Enter. As before, you’ll see the element is shown in the result:
Selecting Between Elements Using Attributes
In the previous example, we had just a single h1 element. But what if there were many of them? A solution would be to perform additional filtering by using the element’s attributes—such as the ID, class name, link text, and more—and applying the following syntax:
//tagname[@attribute='value']
Consider the following HTML document:
<!DOCTYPE html>
<html lang="en">
<head>
    <meta charset="UTF-8">
    <meta name="viewport" content="width=device-width, initial-scale=1.0">
    <title>Document</title>
</head>
<body>
    <div id="div1">first div</div>
    <div id="div2">first div</div>
    <div id="div3">first div</div>
</body>
</html>
As you can see, we have three div elements. Let’s say you want to select the second one. You could do it by using the ID attribute, like this:
//div[@id="div2"]
The equivalent absolute XPath would be:
$x('/html/body/div[@id="div2"]')
Selecting Between Elements by Index
What if the div tags from the previous example didn’t contain IDs? How could we tell them apart using XPath? The answer is simple: we can use an index. Here’s the XPath code to select the third div using relative XPath:
//div[3]'
Remember that, unlike most programming languages you’re used to, indexes in XPath start with 1.
How To Write XPath In Selenium?
The most basic syntax for writing XPath in Selenium is as follows:
XPath = //tagname[@Attribute=’Value’]
The following example selects an input whose name is “phone”:
//input[@name=’phone’]
It’s also possible to use the Contains() method in order to find a list of the elements that match the search predicate. This is particularly useful regarding elements whose values can change dynamically. Here’s the syntax:
//tagname[contains(@attribute,constantvalue)]
Now, an example:
//div[contains(@class,'section')]
XPath also supports logical operators. For instance, it’s possible to ask for elements that match a given predicate and then meet another one (for that, we’d use the logical AND operator). You could also use the logical OR operator to verify that any of the two conditions is true.
How to Find an Element by XPath in Selenium
You’ve just learned about XPath and how it works. But how can you leverage XPath in Selenium? That’s easy. With your favorite programming language, you have to use the By.xpath method on the web driver object. The following example was written in JavaScript:
const element = driver.findElement(By.xpath('/html/body/h1'));
The example above finds the h1 element from the example.com website, using an absolute XPath. The following example retrieves the same element, but this time using the relative XPath:
const element = driver.findElement(By.xpath('//h1'));
The Pros and Cons of Using XPath to Locate Elements
Selenium has its pros and cons, as any tool does. XPath is certainly no exception to that.
The main pro of finding elements via XPath is that it allows you to interact with dynamic elements, which are impossible or hard for you to locate via IDs or other attributes.
The main cons of using XPath in testing relate to the robustness of test cases. Since XPath relies on attributes of the elements that can be changed, tests that use XPath for element location can suddenly fail when those elements are updated. This causes a scenario where test maintenance is a burden.
findElement vs findElements: What’s The Difference?
Before parting ways, let’s briefly clarify a common misconception/question related to this topic. In this post, we’ve covered the findElement method. There’s a similarly named method called findElements. So, what are the similarities and differences between the two?
Right off the bat we can say—just by their names—that findElement returns a single element while its counterpart returns more than one element. Not really rocket science, right?
If more than one matching element is found, findElement will return the first element, while findElements will return a zero-based indexed array with all elements. What if no element is found? The singular method throws an error—NoSuchElementException—while findElements return an empty list.
Finally, the verdict. Which one is better? Which one should you use? It all boils down to what you’re trying to achieve.
If you need to retrieve a collection of elements, then you’ll obviously need to use findElements. Alternatively, you might be searching for a single element, but it’s OK if it isn’t found. In this case, you can also use the findElements version and check for the length of the resulting list.
On the other hand, let’s say you’re trying to locate an element that you know it’s supposed to be there. In other words, this element not being found means something very wrong has happened. In this case, you’re probably better off using findElement and letting the resulting exception bubble up.
If you’re using Selenium along with a test framework (such as JUnit, NUnit, and so on) the unhandled exception will result in the test case failing.

Feeling Lost? Find Your Way Around With Selenium and More Great Tooling
In the context of testing web applications, locating elements on the page is one of the most fundamental tasks you need to perform.
As we’ve mentioned, Selenium does offer several different ways in which to find elements. In this post, we’ve covered how to find elements in Selenium using XPath—and why do it. You’ve learned about absolute and relative XPath and how they compare to each other.
Finally, you’ve learned about the downsides of XPath in Selenium, especially how it can lead to brittle tests. Is there a way out of this problem?
As it turns out, there is. And the answer is to leverage better tools. Sure, “better” can be highly subjective, but we have a straightforward definition. For us, better tools mean smarter tools—tools that use more resilient approaches for locating elements so that test cases don’t break easily when those elements have their attributes changed.
One such tool is Testim. Testim makes sure your tests remain robust with its AI-based locators and don’t fail with each small change to the application. Testim accomplishes this by inspecting the complete DOM structure of the web app.
When doing that, Testim identifies many different attributes it uses to uniquely identify each element from the webpage. That way, it can detect when one or more of the element’s attribute changes while still keeping the test valid.
We invite you to take a look and give Testim a try today. Thanks for reading, and until the next time.


")