


Single-page applications developed with JavaScript libraries such as React are becoming the standard for front-end apps. The barrier to entry is low, and they provide the user with a more responsive experience. However, testing user interfaces hasn’t always been easy. Testing libraries such as Selenium have been popular, but these tests are notoriously slow and can be very fragile. So, how can front-end developers improve the quality of their apps and ensure the UI behaves as expected? Test-driven development, or TDD, is a very good approach to this problem.
This post will guide you through TDD, discuss some of its benefits, and show you how to test-drive a React app in no time. I’m going to assume you have some basic knowledge of React, but let’s take a look at TDD before we dive into the example.
What Is Test-Driven Development?
TDD is an iterative and incremental approach to software development that follows a process that can be summarized as “red, green, refactor.” Let’s break down and define the steps of this process.
Red
TDD starts off in a red state, which means you write a failing test. And yes, I really do mean it’s the very first step in the development process, even before any code is written. This may not seem intuitive if you’re new to TDD. Why would I write a test if I don’t have any code? This forces you as a developer to think about the problem you’re trying to solve instead of the code. It also helps you divide the problem into smaller pieces.
Green
Now that you have a failing test, the next step is to make the test green. In other words, make the test pass. You should write the absolute bare minimum of code to get this test to pass. This leads to a smaller codebase, which means less code to maintain over the lifetime of the app. Also, don’t worry about writing the most beautiful, elegant code that applies the best software patterns. We’ll worry about that in the next step. It’s good practice to commit your changes in source code control once your failing test passes, which can be very helpful in the refactor step, as you’ll see next.
Refactor
Remember that ugly code you wrote to get the test passing? This is where you get to clean it up. Refactoring is the technique of restructuring code by modifying its internal functionality, but without changing its external behavior. Feel free to rename variables, extract logic to functions, or even introduce a software pattern as the code matures. Don’t forget to run your tests to ensure that you didn’t accidentally break functionality while refactoring to the most eloquent code. Got a little carried away on refactoring, and now your tests are failing and you don’t know why? Simply revert your changes and start over. You’re back to a green state with all the functionality intact.
Let’s TDD React
Now that you know what TDD is, let’s get to an example of test-driving a React application. But first, you’ll need a few things before you get started.
Prerequisites
The first thing you’ll need is Node.js, which will also include the Node Package Manager (npm). You’ll use Node.js to install JavaScript packages that our app needs.
Next, you’ll need Create React App. Create React App is a command that does exactly what it sounds like it should do—create your React application. It includes a lot of powerful development tools out of the box, such as Webpack, Babel, and even a test runner. This will get your app up and running without you having to decide how to build and test your app.
Finally, you’ll need a way to edit the code. So, open up your favorite IDE or text editor. I’ll be using Visual Studio Code.
Now that you have all the prerequisites, let’s get to test-driving!
Create a New React App
As I mentioned above, you’ll use Create React App to lay the groundwork of your app. Simply run create-react-app tdd-react from a command prompt. This will generate a project folder called tdd-react and install all of the dependencies, including React. Your project should look something like this:
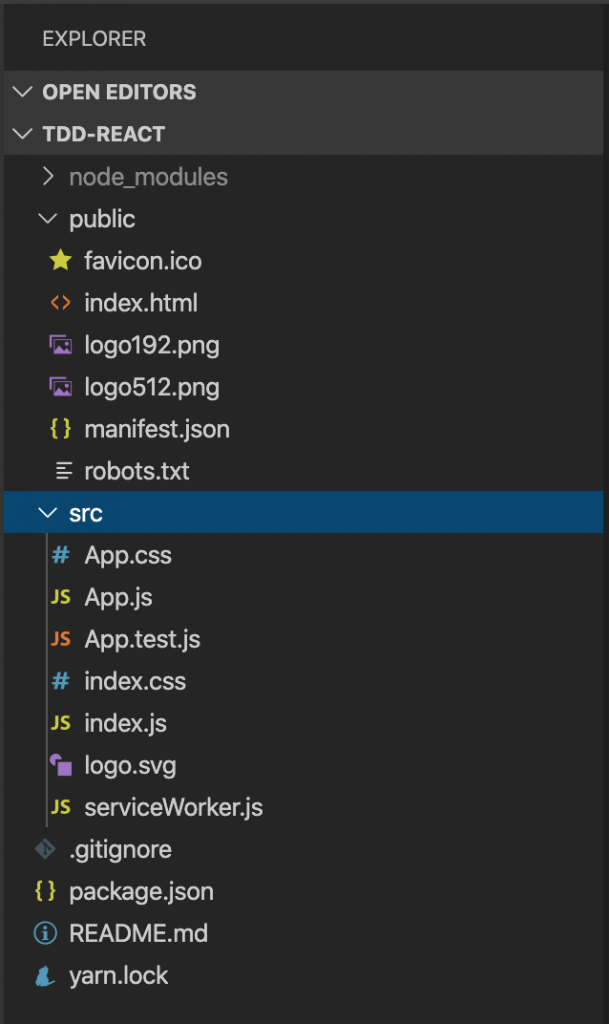
That was easy! Create React App initialized our package.json to manage dependencies and scripts. It also created a src folder that includes a fully functional React app. Don’t believe me? Run npm start. This command builds your React app and starts a local development server that’s capable of serving your app locally. The app is simple, but it includes everything you need to develop an app in React. Before we do that, let’s write a test! We are test-driving, after all.
Testing React
The official React documentation recommends using the React Testing Library for testing React apps, so we’ll use that. Enzyme is another popular testing library for React, so feel free to take a look at that, too. To install the React Testing Library, run the command npm install –save-dev @testing-library/react to save it as a development dependency in our project.
The React Testing Library is really powerful because your tests will work with actual DOM nodes. Why is this important? The React Testing Library has a guiding principle that states “the more your tests resemble the way your software is used, the more confidence they can give you.” Users of our app will be interacting with it in a browser, so it’s important that our tests focus on those interactions instead of implementation details.
Another benefit to using the React Testing Library as our test framework is the fact that we can write unit tests instead of end-to-end tests. If you’re familiar with the test automation pyramid, you’ll know that unit tests form the bottom of the pyramid and end-to-end tests cap the top. Therefore, there should be a larger number of unit tests in your test suite than end-to-end tests. Unit tests should run quickly, whereas end-to-end tests tend to be slower.
Enough about testing React! Let’s actually write a test.
Your First TDD React Test
Let’s add a feature to our React app. This feature should allow a user to enter their name and then display “Hello, [NAME]” after clicking a button. For this example, you can add the test to App.test.js or create a new component.
import React from 'react';
import App from './App';
import { render, fireEvent } from '@testing-library/react'
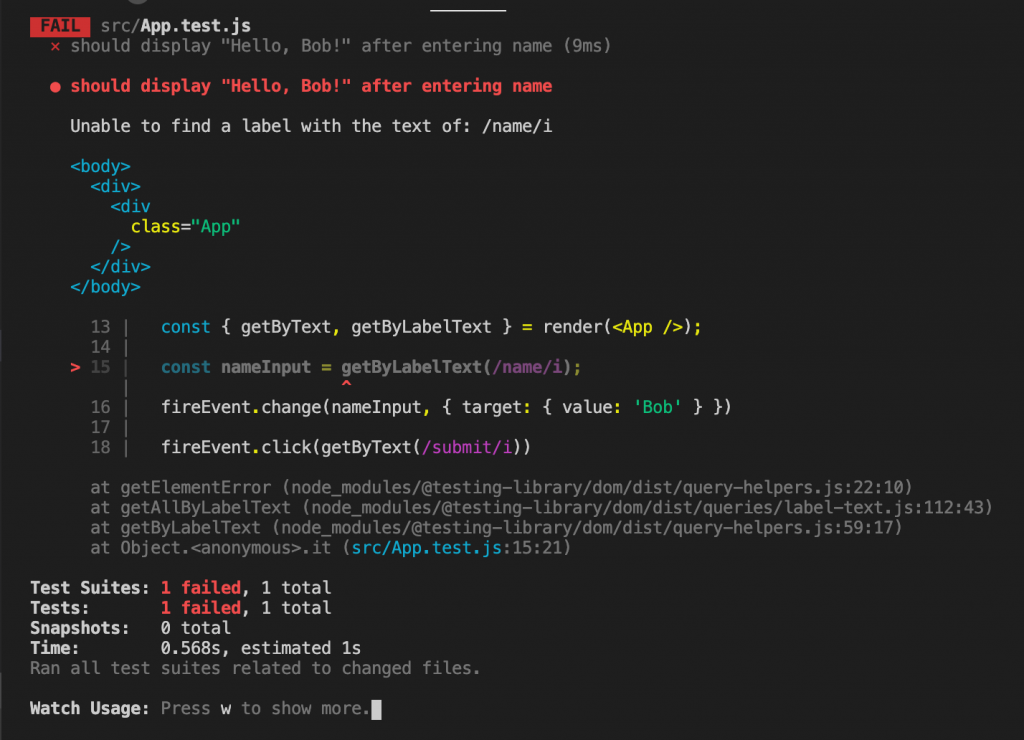
it('should display "Hello, Bob!" after entering name', () => {
const { getByText, getByLabelText } = render(<App />);
const nameInput = getByLabelText(/name/i);
fireEvent.change(nameInput, { target: { value: 'Bob' } })
fireEvent.click(getByText(/submit/i))
const expectedMessage = "Hello, Bob!";
expect(getByText(expectedMessage)).toBeDefined()
});
Let’s break down this test. The first thing to note is the use of the render function provided by the React Testing Library. This lets you render a React component in the DOM provided by jsdom. The render function returns an object, which is destructured into the getByText and getByLabelText variables. These jsdom properties are functions that query for elements on the web page just as a user would. Next, the name input is queried for and the change event is fired. This behaves as if a user typed a value into the input. Now the submit button is clicked. Finally, we have the assertion of our test, which verifies that the correct message is displayed.
Run the tests to make sure the test does in fact fail. Create React App provides a script in the package.json called test, so run npm test. This command uses a test runner called Jest. You should see output indicating that the test runner called Jest is failing.
Now you’re ready to make the test pass! Remember, you need to write only the minimum amount of code to make the test green.
Get to the Green
Here’s an example of an implementation that satisfies the test:
import React from 'react';
import './App.css';

function App() {

  const [displayMessage, setDisplayMessage] = React.useState(false);
  const [name, setName] = React.useState("");

  return (
    <div className="App">
      <label htmlFor="name">Name</label>
      <input id="name" type="text" onChange={(event) => setName(event.currentTarget.value)} />
      <button onClick={() => setDisplayMessage(true)}>Submit</button>

      {displayMessage && <p>{`Hello, ${name}!`}</p>}
    </div>
  );
}

export default App;
And the test passes!
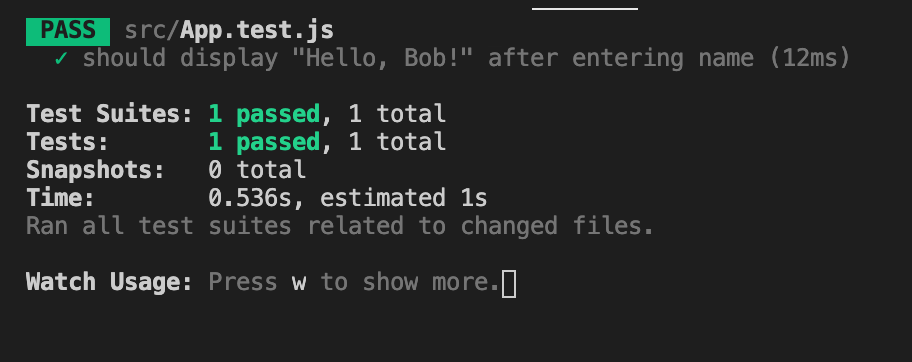
Now’s the time to commit the changes and make any changes to the internal functionality you find necessary as you move to the refactor step.
Summary
In this post, you learned what test-driven development is and some of its benefits. Then I showed you how to quickly create a new React project using Create React App. And finally, you saw how to test-drive a React app using the React Testing Library.
TDD can be somewhat challenging if you’re just starting to pick it up, but I encourage you to test it out because the benefits are huge. Applying TDD isn’t just for new applications. You can start test-driving new features on your existing React application today.
This post was written by JT Wheeler. JT got his start working as an engineer in the manufacturing industry. From there, he moved on to become a developer at a software consulting firm. He’s written software that spans a number of industries ranging from industrial automation to inventory control to financial systems, and he’s passionate about learning and teaching new technologies and software practices.


