


Defining BDD
BDD stands for behavior-driven development. It’s a software development methodology whose goal is to foster collaboration between developers and nontechnical people in a software project. In a nutshell, it consists of having the interested parties collaborate to define the requirements for the applications using a shared language, in the format of user stories and scenarios. Developers can then use those specifications to create automated tests and finally write the production code to fulfill the tests.
The end goal of BDD is to have an acceptance-testing suite that also works as documentation and a shared language for describing software requirements.
BDD Examples
Before we dive into the JavaScript specific part of the post, we’ll share some language-agnostic examples of BDD.
In BDD, it all starts with describing acceptance criteria for software requirements in the form of scenarios. The scenarios typically follow this template:
Given some initial context,
When an event occurs,
then ensure some outcomes.
Let’s say we’re designing the shopping cart functionality for an e-commerce web site. Probably the most obvious scenario one could think of is adding an item to an empty cart:
Given I have an empty shopping cart,
When I add an item to my cart,
Ensure the cart has one item.
The next step would be to make the scenarios executable by transforming them into templates developers can fill by writing the actual test code. That’s a job for BDD tools.
JavaScript BDD: How to Get Started
Time to roll up our sleeves and learn how to start using BDD on JavaScript. For this tutorial, let’s suppose we need to build a Roman numerals calculator. Here are some examples:
| 1st operand | 2nd operand | Operation | Result |
| I | I | + | II |
| V | IV | – | I |
| III | IV | * | XII |
| LIV | III | / | XVIII |
Let’s start by creating a new Node.js project:
mkdir bdd-demo
cd bdd-demo
node init -f
The -f parameter makes Node.js create the project using all of the default options. If everything went right, you should now have a package.json file. The next step is adding Cucumber.js as a dependency to our project. Run this:
npm install cucumber --save-dev
The –save-dev option installs Cucumber.js as a development dependency, rather than a runtime one. Now we need to edit your package.json file, setting Cucumber.js as the test tool.
So, locate the following line:
"test": "echo \"Error: no test specified\" && exit 1"
And then replace it with this:
"test": "cucumber-js"
Let’s now install Chai:
npm install chai --save-dev
The complete package.json file should now look like this:
{
  "name": "bdd-demo",
  "version": "1.0.0",
  "description": "",
  "main": "index.js",
  "scripts": {
    "test": "cucumber-js"
  },
  "keywords": [],
  "author": "",
  "license": "ISC",
  "devDependencies": {
    "chai": "^4.2.0",
    "cucumber": "^6.0.5"
  }
}
We can already run Cucumber.js. Just type npm test, and you should get an output that looks like this:
> bdd-demo@1.0.0 test C:\Users\carlo\demos\bdd-demo
> cucumber-js

0 scenarios
0 steps
0m00.000s
We have Cucumber ready to go, so let’s write our first scenario. First, create a folder called features at the root of your project. Inside this folder, create a text file with the following content:
Feature: Addition
  In order to perform roman numeral arithmetics
  As a developer
  I want to add two roman numbers together

  Scenario: basic addition
    Given I have the number "I"
    When I add it to the number "I"
    Then the result should be the number "II"
Let’s break that down.
The first line of the excerpt of the code above defines a feature. In our case, the feature is called addition. It’s a convention to use the same name as the file. After that, we have a description of the feature, for documenting purposes, using the classic user story template:
As a < type of user >, I want < some goal > so that < some reason >.
It’s not mandatory to follow this format, though, since Cucumber.js doesn’t execute the description.
After that, we have the name of the scenario. Finally, we have the three last lines that start with Given, When, and Then, respectively. They represent our scenario’s steps.
Save the file with the name addition.feature. Then, run npm test again. The result you’ll obtain this time should look very different from the first one:
> bdd-demo@1.0.0 test C:\Users\carlo\demos\bdd-demo
> cucumber-js

UUU

Warnings:

1) Scenario: basic addition # features\addition.feature:6
   ? Given I have the number "I"
       Undefined. Implement with the following snippet:

         Given('I have the number {string}', function (string) {
           // Write code here that turns the phrase above into concrete actions
           return 'pending';
         });

   ? When I add it to the number "I"
       Undefined. Implement with the following snippet:

         When('I add it to the number {string}', function (string) {
           // Write code here that turns the phrase above into concrete actions
           return 'pending';
         });

   ? Then the result should be the number "II"
       Undefined. Implement with the following snippet:

         Then('the result should be the number {string}', function (string) {
           // Write code here that turns the phrase above into concrete actions
           return 'pending';
         });


1 scenario (1 undefined)
3 steps (3 undefined)
0m00.000s
Cucumber.js lets us know that our scenario fails because none of its steps are defined. It goes a step further and provides the snippets we can use to start implementing the steps. So, let’s use them.
Create another folder inside features called support. Inside support, create a new file with the name steps.js. Paste the following content in it:
const { Given, When, Then } = require("cucumber");

Given('I have the number {string}', function (string) {
   // Write code here that turns the phrase above into concrete actions
   return 'pending';
 });

 When('I add it to the number {string}', function (string) {
   // Write code here that turns the phrase above into concrete actions
   return 'pending';
 });

 Then('the result should be the number {string}', function (string) {
   // Write code here that turns the phrase above into concrete actions
   return 'pending';
 });
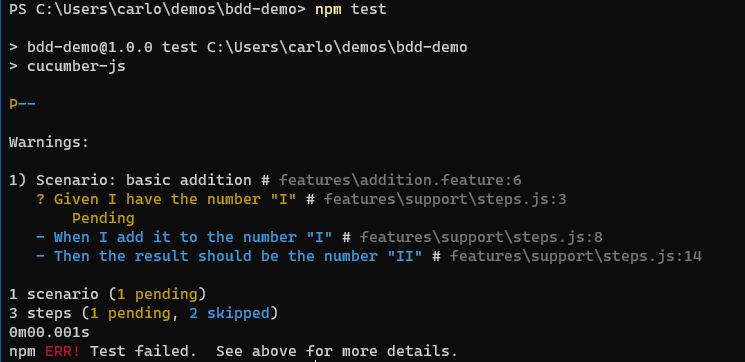
By this point, if we run the scenario again, Cucumber.js will tell us that the tests failed because the first step is pending, and the two subsequent ones were skipped:
The next step is writing the assertions, so our scenarios become executable tests. Start by creating a file called world.js inside of the support folder with the following content:
const { setWorldConstructor } = require("cucumber");

class CustomWorld {
  constructor() {
    this.firstOperand = '';
    this.secondOperand = '';
    this.result = '';
  }

  setFirstOperand(number) {
    this.firstOperand = number;
  }

  addTo(operand) {
    this.secondOperand = operand;
  }
}

setWorldConstructor(CustomWorld);
This file creates a World object, which allows you to handle isolated context for each scenario. Now head back to the file containing the step definitions. We’ll need to require Chai so we can write our assertions. Also, we’ll change the steps, so they assert against the world object. The complete file should look like this:
 const { Given, When, Then } = require("cucumber");
 const { expect } = require("chai");

 Given('I have the number {string}', function (string) {
   this.setFirstOperand(string);
 });

 When('I add it to the number {string}', function (string) {
   this.addTo(string);
 });

 Then('the result should be the number {string}', function (string) {
   expect(this.result).to.eql(string);
 });
Now we’re finally testing something. In the Given step, we set the first operand. “this” here allows us to access the World object.
In the When step, we add the second number to the first one. Finally, in the Then step, we use Chai’s expect style to assert that the obtained result matches the expected one.
If we run the tests now, we should see a message saying that the test failed because the result we got didn’t match what we were expecting:
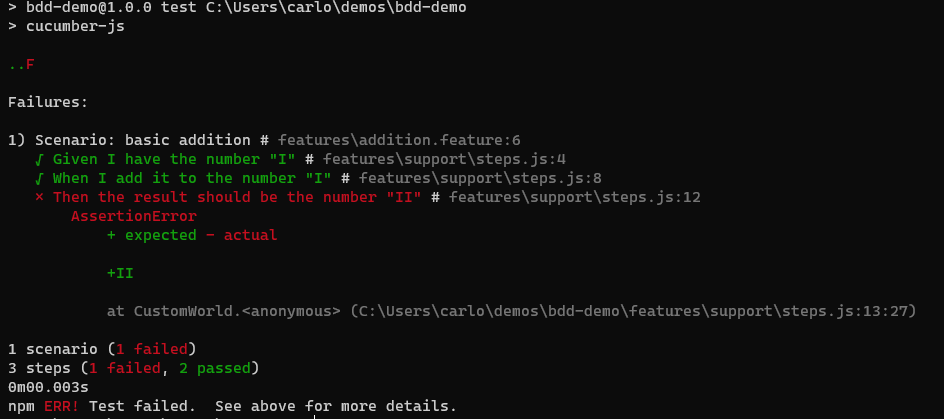
Great news! Now we have a failing test that is failing for the right reasons (e.g., a failing assertion.) In the same way we do in TDD, the next step should make the test pass. The easiest way to make the scenario pass would be simply cheating: let’s hardcode the expected returning value in the addTo method located in the World file:
addTo(operand) {
    this.secondOperand = operand;
    this.result = 'II';
}
If you run the tests now, you should see a message saying that the scenario passed:
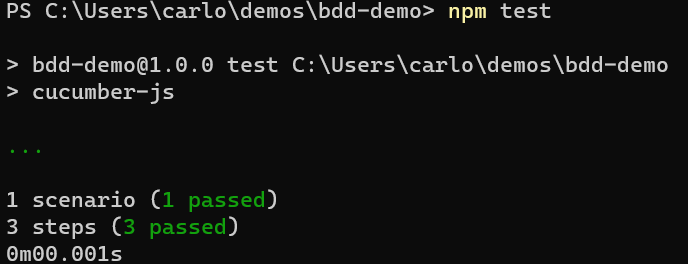
What now? The main idea is that, in a real-world project, you’d replace the code in the World object with the actual implementation.
So, the next steps now would be to add more scenarios and features until the functionality to be implemented is sufficiently documented. As an exercise, you can try and add more scenarios based on the examples table we’ve shown you at the start of the post.
Back to You
If you’re a regular reader of this blog, you’ll know that we’ve been covering many JavaScript and front-end testing related concepts. We’ve already covered topics like white-box and black-box testing and provided tutorials on end-to-end, UI, and unit testing. We shared our view on who performs testing in 2020 (spoiler alert: everyone) and even advised you to start testing in production if you don’t already do that.
Today we’ve added another entry to that list by covering JavaScript BDD. Sure, we’ve already covered Cucumber.js in the past, as well as a comparison between BDD and TDD. However, today’s post was different, since it offered a more hands-on and complete guide to the concept of BDD in JavaScript.
Stay tuned to the Testim blog in order to read more interesting posts about JavaScript and front-end testing related concepts.


