

")
Cucumber.js and BDD aren’t new kids on the block. But they’re still fairly unfamiliar for many developers. That’s unfortunate because the two can be very powerful tools for both business people and developers. Let’s have a short look at what BDD is, and then see how Cucumber.js can be used to your advantage.
What Is BDD?
If you’re unfamiliar with BDD, don’t worry. It’s not a difficult topic. BDD is short for behavior driven development. As far as I know, the term was coined by Dan North in 2003 as a reaction to TDD (test-driven development). The lines between TDD and BDD aren’t always clear, and you might even be doing BDD without knowing it.
Basically, BDD means writing automated tests in a language that is meaningful to business people. So where technical language is OK in TDD, you would want to avoid it in BDD. As an example, you could name a TDD-style test “getPremiumCustomerDiscountTest”, whereas in BDD you would name it something like “givenAPremiumCustomer_WhenWeGetTheDiscount_ItShouldReturnTenPercent.”
Wow! That’s quite a long name. But it does read more like a piece of documentation. A new developer can immediately understand the business rule behind it. You could even write it down as a real sentence and a non-technical user would understand it.
So is the only difference that we just use a readable sentence? Well, yes and no. The difference lies in the fact that we use the language of our end-users, the business or domain language.
BDD will often use a recurring structure in its tests, the given-when-then style of tests.
The “given” part is where you declare preconditions. In our example above we had a premium customer. Next, the “when” part contains the action you want to test. And finally, you verify the outcome in the “should” part.
Expand Your Test Coverage
When written in pure code, this can become quite a verbose sentence. For example, what if it’s the premium customer’s birthday and the discount should be higher? You’d have to write something like “givenAPremiumCustomerAndItsTheirBirthday_WhenWeGetTheDiscount_ItShouldReturnTenPercent.” As you can see, this becomes unwieldy when there are more and more preconditions and assertions.
Introducing Cucumber.js
Cucumber.js is a testing library that allows you to write your tests in plain language. It follows the given-when-then structure, but as you’ll see the tests are very readable. Even by business users. This allows your tests to be a point of communication and collaboration. They can even serve as documentation that is automatically up-to-date!
This can have far-reaching consequences. Whenever there is an issue or a feature request, both developers and business people can work on the same document. Developers can then translate this document into a test and implement the feature.
Cucumber.js (and similar tools in other languages) uses something called the Gherkin language. It’s a Domain Specific Language but it’s easily readable. Here’s what a test could look like:
Feature: Automatic discounts for premium customers
    Premium customers should automatically get a
    discount of 10% on purchases over $100.

    Scenario: Purchase over $100
        Given a premium customer
        And an order containing
            | item   | amount | price |
            | pencil | 100    | 1     |
            | paper  | 1      | 35    |
        When the customer checks out
        Then the total price should be 121.5
See how the words Given, When and Then structure our test? A test in the Gherkin language is called a scenario. And scenarios are organized into features. The sentence below the “Feature” part (“Premium customers should…”) is just an explanation for the reader. Cucumber.js will ignore this because the line doesn’t begin with one of the Gherkin keywords like Feature, Scenario, Given, When, or Then.
Also note how we can use tables in our tests. This can be a powerful feature when you need a lot of data in your tests. A regular unit test with QUnit or mocha won’t be very readable if it requires a lot of data.
A Sample Application
That’s all fine, but how do we actually get this scenario to run our code?
Let’s start with a sample application. I’ve (partly) followed the Angular Getting Started tutorial and it gives us an app that we can test. You can find the app here. All you need to do is follow the instructions in the readme and you’ll be able to serve it locally.
Of course, you can use Cucumber.js on any application, even applications without a UI. You don’t even have to run it against a full application. It’s entirely possible to test only specific modules, classes or files.
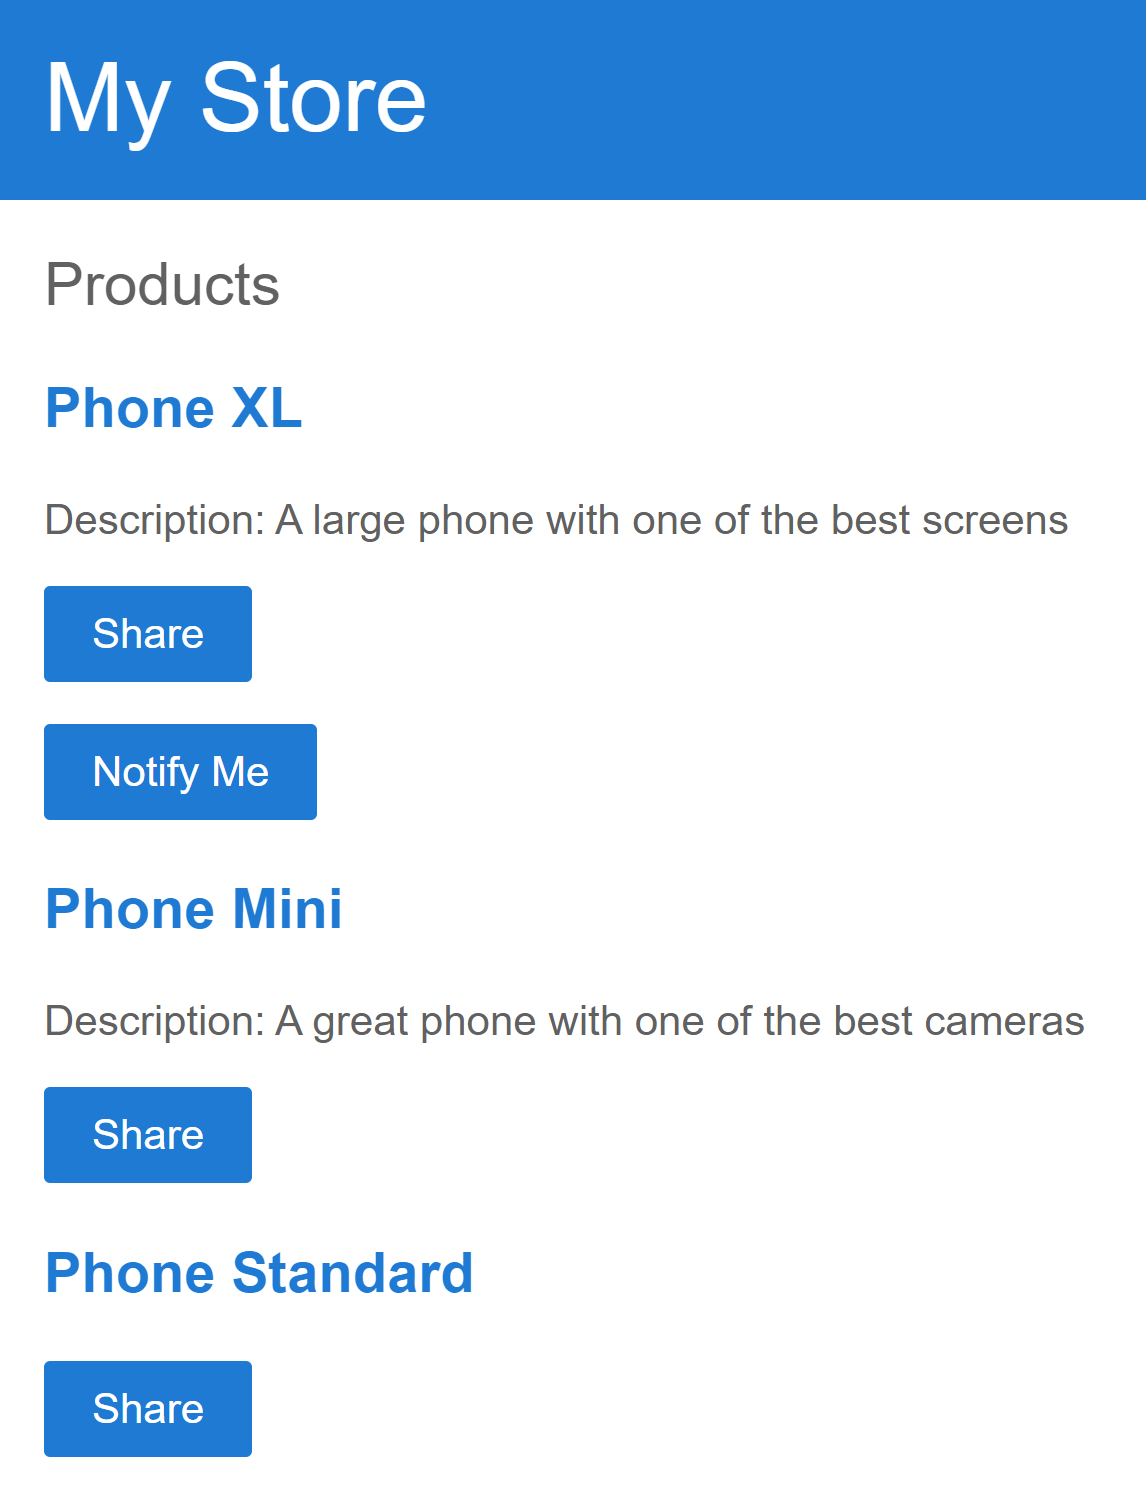
But we’ll be automating the browser and testing our application fully. When you run “ng serve”, you should see an application like this:
Writing and Running Your First Cucumber.js Test
Here’s what we’ll do. We’ll start by writing a scenario in a .feature file. Then we’ll serve our application and we’ll tell Cucumber.js to run the feature file. Cucumber.js will parse the file and call the matching pieces of code.
The Feature File
So let’s write a test first. This is a simple example that fits our sample application:
Feature: Products List

    Scenario: Load the products list
        When we request the products list
        Then we should receive
            | name           | description                                |
            | Phone XL       | A large phone with one of the best screens |
            | Phone Mini     | A great phone with one of the best cameras |
            | Phone Standard |                                            |
Notice how we don’t have a “Given” statement? That’s OK, we don’t need it for this test.
Simply save this in a “features” folder and give the file a name. In this case, “products-list.feature” would be a good choice.
Installing and Running Cucumber.js
To run this test, we’ll need Cucumber.js. You can install it as a development dependency by running:
npm i cucumber -D
Then, you can run the test by executing:
./node_modules/.bin/cucumber-js ./features/products-list.feature
You should see some warnings, because we haven’t told Cucumber.js how each step is actually implemented:
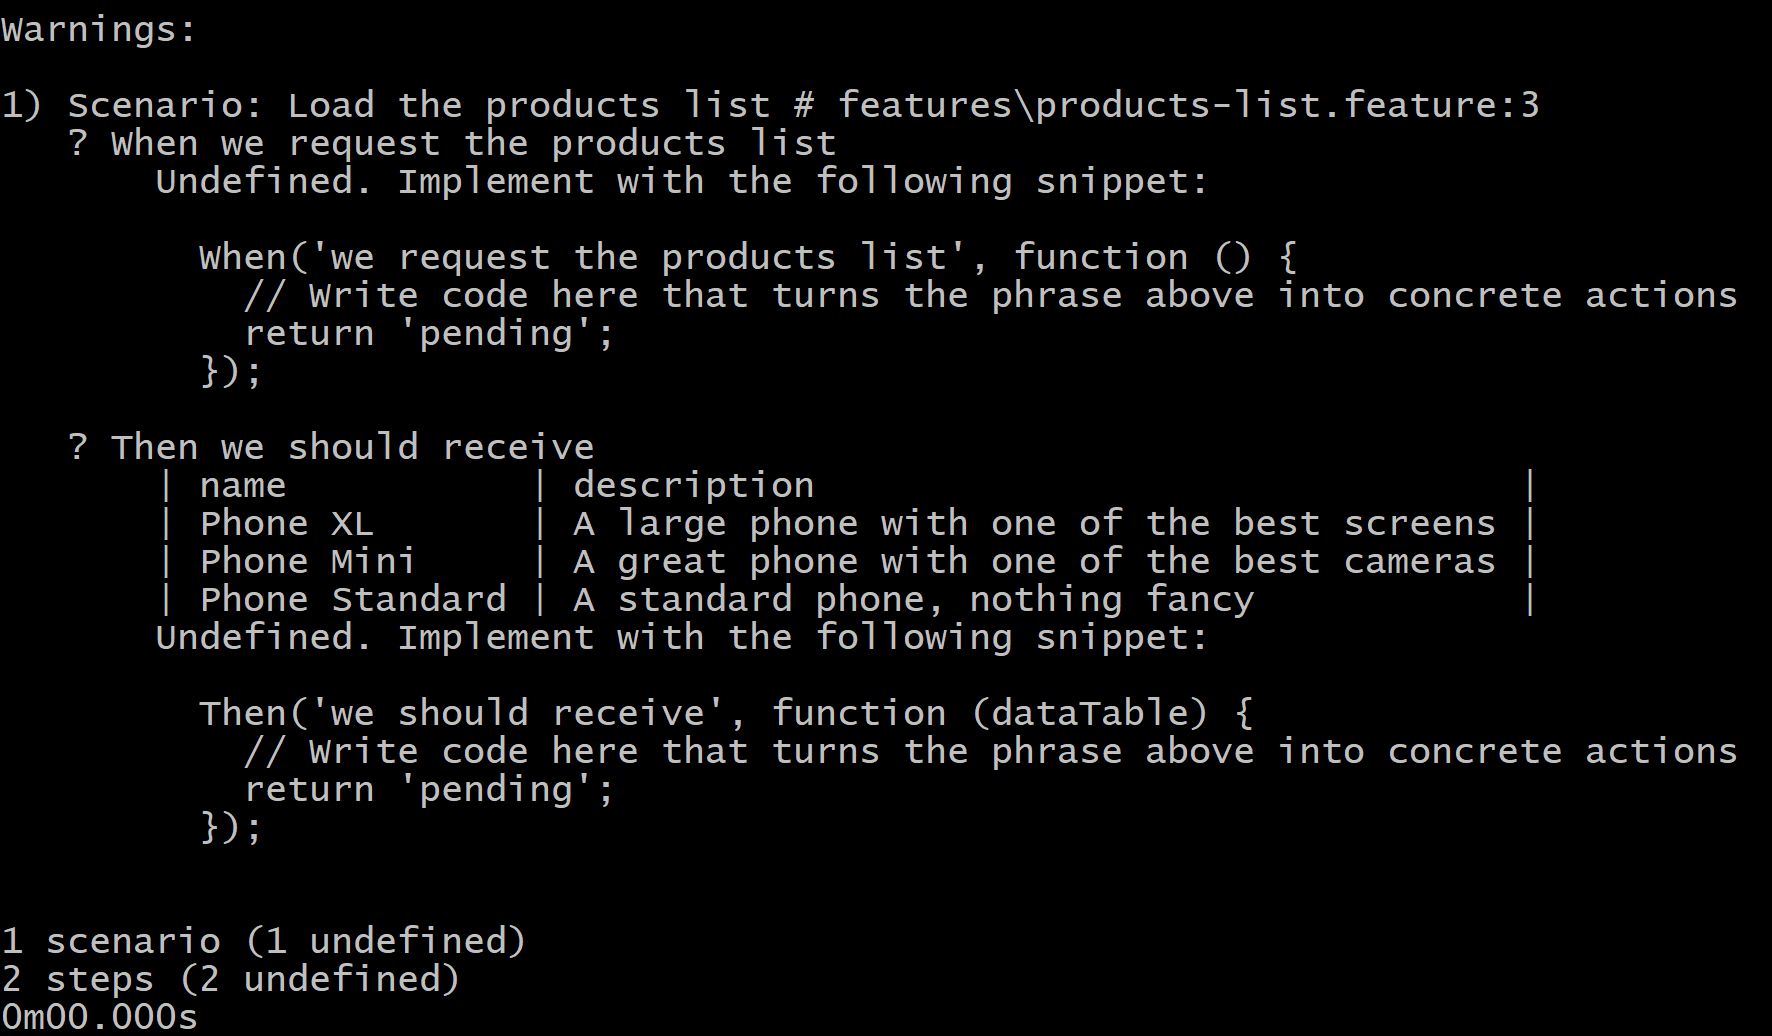
Adding Step Definitions
Luckily, Cucumber.js provides some helpful messages. We need to add some code. These are called “step definitions.” In the “features” folder, create a new “steps” folder. In that folder, create a new file called “productSteps.js”. You could write it in TypeScript, but you would have to transpile the files in the “steps” folder, which is out of scope for this article.
In the step definition file, add this code:
import { When, Then } from 'cucumber';

When('we request the products list', function () {
    // Write code here that turns the phrase above into concrete actions
    return 'pending';
});

Then('we should receive', function (dataTable) {
    // Write code here that turns the phrase above into concrete actions
    return 'pending';
});
As you can see, we now need to implement our steps. But as far as Cucumber.js is concerned, this is enough. If we tell it where our step definitions are located, it will execute these functions. What we do inside those functions, is entirely up to us.
Automating Our Browser
To automate the browser, we need to install Selenium:
npm i -D selenium-webdriver
You’ll also need to install a specific driver for the browser of your choice and add it to your PATH environment variable. You can find the links in the documentation. Be sure to download the version that matches the version of your browser.
Then, change the step definition code to:
const { When, Then, After } = require('cucumber');
const assert = require('assert');
const { Builder, By, until } = require('selenium-webdriver');

When('we request the products list', async function () {
    this.driver = new Builder()
        .forBrowser('chrome')
        .build();

    this.driver.wait(until.elementLocated(By.tagName('h1')));

    await this.driver.get('http://localhost:4200');
});

Then('we should receive', async function (dataTable) {
    var productElements = await this.driver.findElements(By.className('product'));
    var expectations = dataTable.hashes();
    for (let i = 0; i < expectations.length; i++) {
        const productName = await productElements[i].findElement(By.tagName('h3')).getText();
        assert.equal(productName, expectations[i].name);

        const description = await productElements[i].findElement(By.tagName('p')).getText();
        assert.equal(description, `Description: ${expectations[i].description}`);
    }
});

After(async function() {
    this.driver.close();
});
Let’s break this down.
The first block is the “when” block. It defines a function that can be used in a “when” statement in a feature file:
When('we request the products list', async function () {
    this.driver = new Builder()
        .forBrowser('chrome')
        .build();

    this.driver.wait(until.elementLocated(By.tagName('h1')));

    await this.driver.get('http://localhost:4200');
});
We’re building a driver first. This will “drive” our browser. It’s the point where we can control the behavior of our browser: find elements, enter text, click links and buttons, etc.
Next, we’re telling the driver to wait until the H1 element has loaded. This is necessary because Angular will need to finish rendering before we can start testing.
As the last step, we’re loading our web page, which we served with the “ng serve” command.
Let’s look at the “then” block:
Then('we should receive', async function (dataTable) {
    var productElements = await this.driver.findElements(By.className('product'));
    var expectations = dataTable.hashes();
    for (let i = 0; i < expectations.length; i++) {
        const productName = await productElements[i].findElement(By.tagName('h3')).getText();
        assert.equal(productName, expectations[i].name);

        const description = await productElements[i].findElement(By.tagName('p')).getText();
        assert.equal(description, `Description: ${expectations[i].description}`);
    }
});
Here, we’re receiving a Cucumber.js datatable. This is the table that you can see in the feature file. We then find the products in our web page and compare it to the corresponding items in the datatable.
The last piece of code in our step definition closes the browser:
After(async function() {
    await this.driver.close();
});
An “After” function will be run after a scenario has finished. This is called a hook. You can use hooks to run a code snippet before a scenario or after a scenario. And maybe sometimes that’s not enough. For example, you might want to run a code snippet after each step. So, you can use the AfterStep function. You can read about more hooks here.
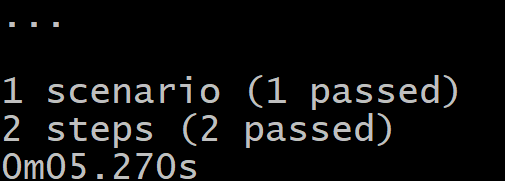
Make sure you start the web application first, and then run the test again:
./node_modules/.bin/cucumber-js ./features/products-list.feature
You will see a browser pop up, and the page load. The test will then assert the products and it will pass:
Moving Further
This was a simple example where we didn’t even interact with the web page. But the structure is clear now:
- write .feature files with scenarios and a given-when-then structure for each scenario
- write step definition files where you define functions that match the steps in your scenarios
- implement these functions as you wish (in our case we used Selenium to automate our browser)
- run the tests by executing the cucumber-js executable in the node_modules/.bin folder
There is much more Cucumber.js can do. For example, you can allow parameters in your step definitions, hook into the beginning or end of your scenario or test run, and tag scenarios.
The World
Cucumber.js has this concept of the “world“. As the word suggests, it means a collection of everything. That might sound vague without defining the scope for “everything”. In Cucumber.js, “world” is an isolated scope for each scenario. That means all the step definitions, hooks, etc., for a scenario, is a part of a world and this data can be accessed within the world. How is this helpful? Imagine you’re testing an application and using multiple steps for it. If the features of that application you’re testing have common data, you might have to use common data in different steps for testing. The concept of the world enables you to share data between different steps and keep things simple. And to help you with clean-up, all variables set in this context are concluded when the scenario concludes.
The Real Power of Cucumber.js
Cucumber.js is a powerful testing framework. You can use it for unit, integration or end-to-end tests. But its real power lies in the readable language that defines the test. This allows it to become a piece of collaboration and communication between all invested parties. The tests become the documentation and vice-versa.
Cucumber.js focuses mainly on making the collaboration between tech people and business people easy. No doubt Cucumber.js has proven itself and made it easier for business people to understand testing on a high level. But it doesn’t eliminate the coding part and still has a lot of code involved. The testing industry has gone to the next step now with codeless testing integrated with AI and smart logic. Frameworks like Testim allow you to create tests without using a single line of code using record and playback testing. But if you need to still use code for some reason, it also allows you to integrate your code into the test project.
The bottom line is that you have 3 options to choose from for testing:
- Traditional all-code testing.
- Code testing that’s also easy for business people to understand.
- Codeless AI-powered testing.
What suits you best depends on your use case. But it’s important to know about all these options to decide what suits you best. So good luck exploring!
This post was written by Peter Morlion. Peter is a passionate programmer that helps people and companies improve the quality of their code, especially in legacy codebases. He firmly believes that industry best practices are invaluable when working towards this goal, and his specialties include TDD, DI, and SOLID principles.


