


“Automated testing” used to be a phrase that caused developers to scratch their heads. Now, it seems to me that most developers are at least familiar with the notion of automated testing. Fortunately, many devs go beyond familiarity. They turn theoretic notion into practical action by actually employing automated testing on a day-to-day basis. And nowadays there’s immense variety in the types of automated tests that can help you achieve higher software quality. In today’s post, I want to focus on a very specific type of automated testing—UI testing.
We’ll start by briefly defining what UI testing is, and then explain how it can benefit you. Then we’ll proceed to show you, step-by-step, how to get started with UI testing using Testim.
UI Testing: What It Is and Why Do You Need It
As you surely know, UI stands for “user interface.” So, defining UI testing doesn’t sound that hard, at first sight—it’s just exercising the application through its user interface. But, is that all there is to it?
Actually, it’s not. First of all, some people seem to think that UI testing isn’t necessary if you already have other types of testing in place, such as unit tests. That couldn’t be farther from the truth. UI testing is not a replacement for other types of testing—instead, it’s a compliment. Unit testing exercises the application’s units in isolation. It’s an important verification to have, but it’s not enough. It’s also important to verify how those units fit together. You have to check how the whole system behaves, from the UI, passing through each layer and then back. So, UI testing can be thought of as more of an “end-to-end” type of testing.
Other people might think that, while UI testing has some importance, you can have one or more developers just click around and see if the application behaves correctly. But that isn’t true. Manual UI testing might work for very small and simple applications. But when it comes to applications with complex business rules and rich user interfaces, manually testing quickly becomes insufficient. It is a tedious, error-prone, expensive, and hard-to-scale process.
At this point, automated UI testing is the best choice.
UI Testing Guide: How To Get Started
It’s time to get your hands dirty. We’re going to offer you a brief guide on how to get started with UI testing. It’ll by no means be an exhaustive tutorial, but it should teach you to create a basic approach upon which you can build and evolve into a more sophisticated approach later.
For this guide, we’re going to use Testim to test a very simple web app. Let’s get started.
An Example of Manual UI Testing
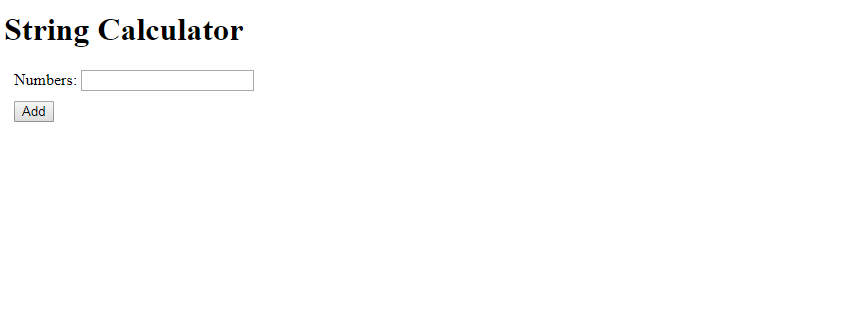
Before we start creating our tests, we need something to test, right? So, let’s create a toy application. It’s going to be a super simple web app, with just two controls—an input box and a button. It will allow the user to input numbers, separated by a comma. After clicking on the button, the application will add all the numbers and display the results. If the user types just one number, the result should be that number. If the input box is left empty, the result should be zero. Simple enough, right?
Creating a Toy Application
This application will consist of a single HTML page with a little bit of Javascript. Nothing too fancy. Open up your favorite text editor, create a new file, and add the following content to it:
<!DOCTYPE html>
<html>
<head>
<title>String Calculator</title>
<style type="text/css">
label { display:block; margin: 10px;}
</style>
</head>
<body>
<h1>String Calculator</h1>
<form id="form1">
<label for="numbers">Numbers: <input type="text" id="numbers" name="numbers"/></label>
<label for="addButton"><input type="submit" value="Add" id="addButton"/>
</form>
<script type="text/javascript">
document.getElementById("addButton").addEventListener('click', function(){
    var text = document.getElementById("numbers").value.trim();
    if (!text) {
        text = '0';
    }
    var integers = text
        .split(",")
        .map(x => parseInt(x));
    var result = integers.reduce(((a, b) => a + b), 0);
    alert(result);
});
</script>
</body>
</html>

After that, save the file with the “.html” extension. Then, double-click the newly saved file. You should see your default browser showing you something like this:
Performing Manual UI Testing
Now let’s do some (manual) UI testing. Click on the input box, type 0 and click on the Add button. You should see this:

Now, redo the test, but leave the input box empty. The result should also be zero:

Repeat the test a few more times, always using a single number. The result should always be the number itself. Then, perform some tests with more than one number, separated by a comma. The result should be the sum of the numbers, as the following example shows:

After this brief session of manual UI testing, I’d be convinced that our little toy app works as intended. But, is that testing enough? For this example application, I’d say yeah, probably. But keep in mind that this silly string calculator is just a placeholder for a much more complex application, closer to the ones you’re likely working on in real life.
Getting Started With Testim
Now it’s time to show you how to get started with Testim so you can see what automated UI testing looks like.
First Steps: Creating an Account and Installing the Testim Browser Extension
First, go to https://testim.io and click on “Start Trial.” You’ll be asked to sign up for an account. You can do that using your Google or GitHub account. If neither option is OK for you, sign up with an e-mail address and create a password.
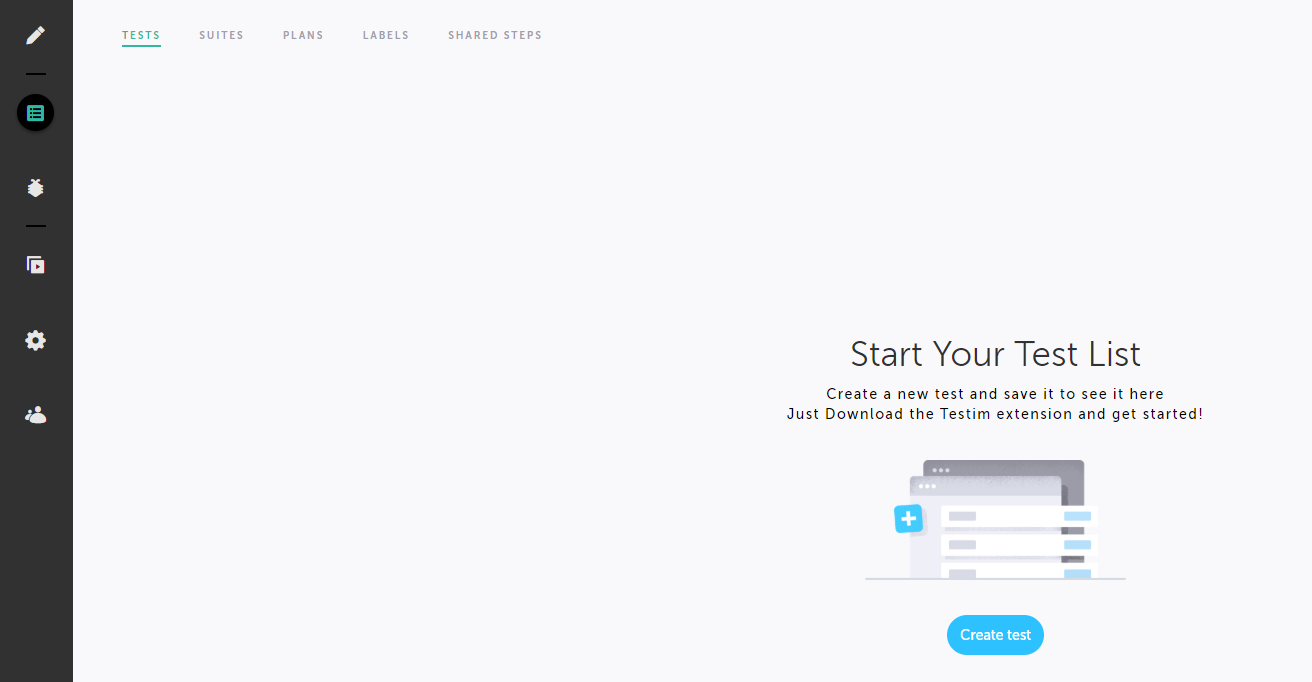
After successfully logging in, you’ll see a screen like the following image:
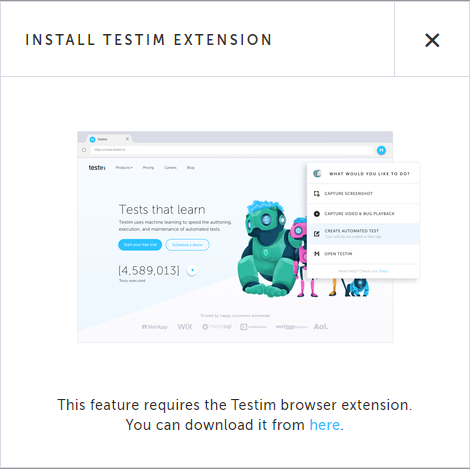
If you click on “Create test” button, you’ll see a message asking you to install the Testim Chrome extension:
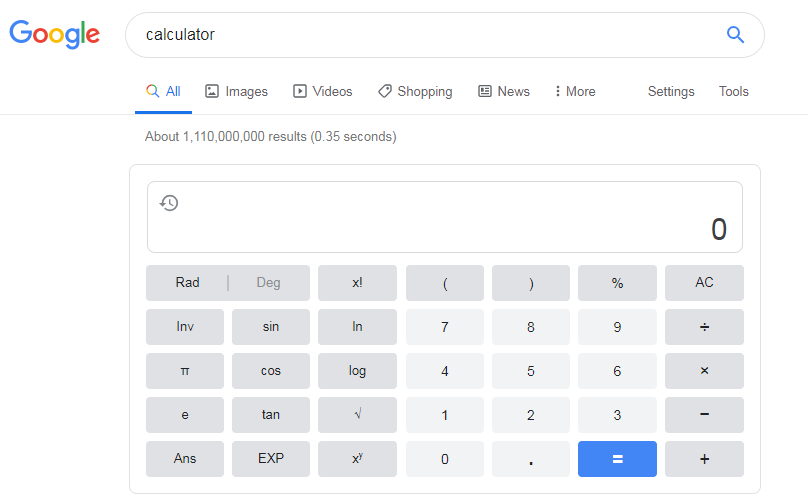
After downloading and installing the extension, you’ll be ready to start creating automated tests. This time, though, instead of testing our silly little string calculator, we’ll test a real one—the Google calculator.
Creating Your First Test With Testim
On Chrome, go to the address bar, type “calculator” and hit enter. You should see this:
Just a good old calculator. Now, we’re going to create a test for the “+” button. While still on the same tab, click on the Testim extension’s icon, as shown in the following image:

After clicking on the extension icon, you should see the following menu:
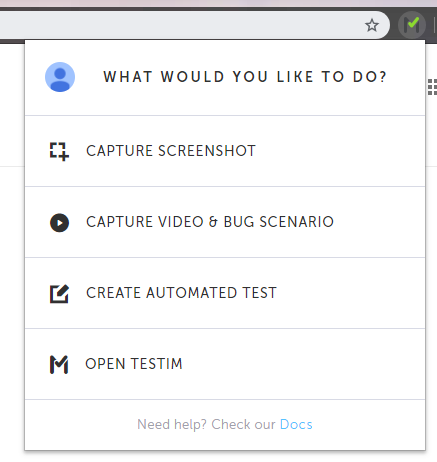
Click on “CREATE AUTOMATED TEST.” That will open Testim and attach the current tab to it. Then, you’ll return to the calculator tab and see the following message:

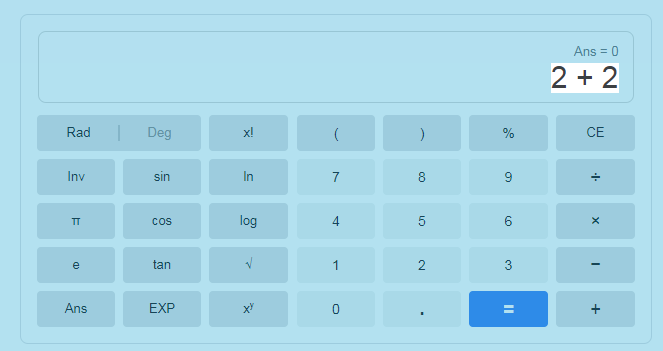
What you have to do now is very simple—just use the application and your actions will be recorded. Let’s create a test for the “2 + 2” sum. Perform the sum as you would normally do it. After clicking on the “equals to” button, go back to the tab where Testim is open. You should now see this:

Click on the “SAVE” button. You’ll then see a window asking you for a name and a description for your test:
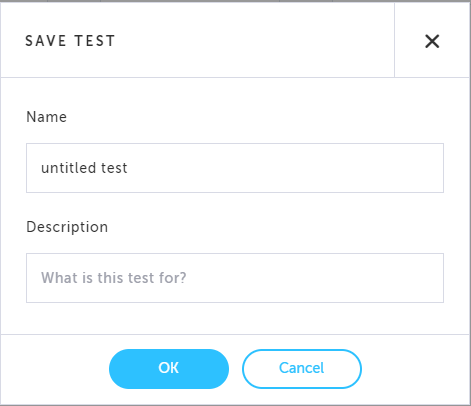
For the name, enter “Add test”. On “Description”, type “Verify the Add operation” Then click on “OK.” Congratulations, you’ve just created your first test with Testim!
Running Your Test
You’ve just created your first automated UI test using Testim. That’s nice, but how do you actually run the test?
On the left panel, click on the “Automate” button, like in the following image:

After doing so, you’ll see your test list which contains only the test you’ve just created:

To run the test, just mark its checkbox and click on the “play” button:

After clicking on the “Run Selected Tests” button, you’ll see a message warning you to avoid touching the mouse and the keyboard during the test execution:
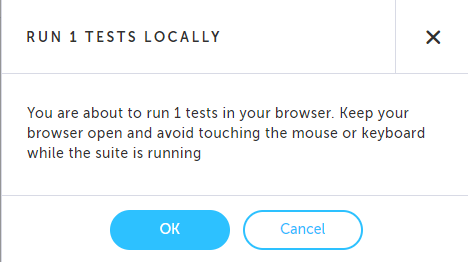
After clicking on “OK”, Testim will open up a new Chrome tab and run the test. Testim will execute the exact same steps you’ve recorded. After Testim finishes running the test, it’ll close the window. Go back to the Testim tab and see the test result:
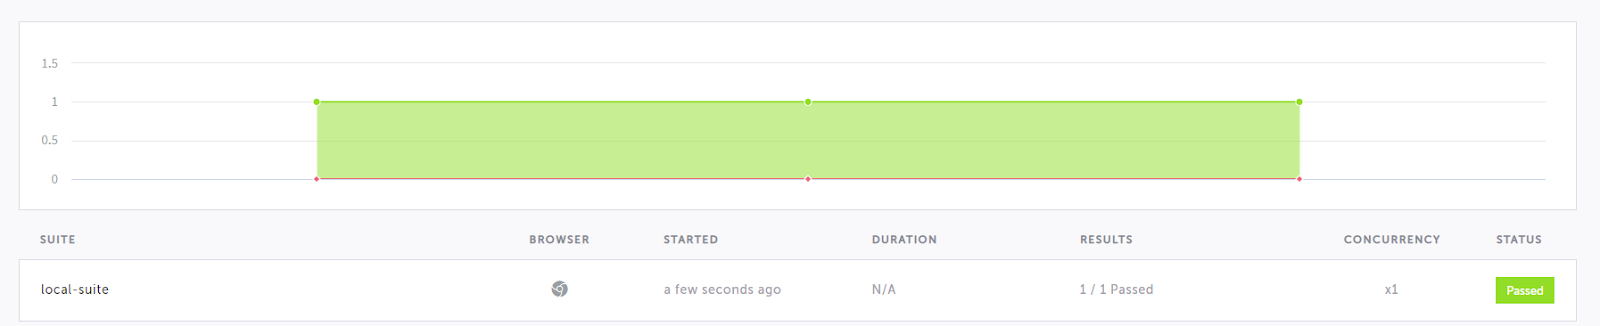
You’ve successfully run your first test using Testim. Congratulations! But…isn’t there something missing?
Adding a Verification
You’ve probably noticed that the test you’ve just created doesn’t really test anything. Yeah, the test passes but that doesn’t really mean much. In terms of unit testing, it’d be the same as having a test method with no assertions.
Our test lacks something, and that something is a verification. We need our test to check that the result of “2 + 2” is indeed four. How do we do that?
On the left panel, click on the “Automate” button. You’ll go back to the test listing. By clicking on the test name, you’ll reopen the test editor so you can change it:

You can see that the test has six steps, and the last step is clicking on the “=” sign. What we have to do now is add an extra step, whose goal is to perform the validation. To add a new step, click on the “+” button after the sixth step. You’ll see the following options:
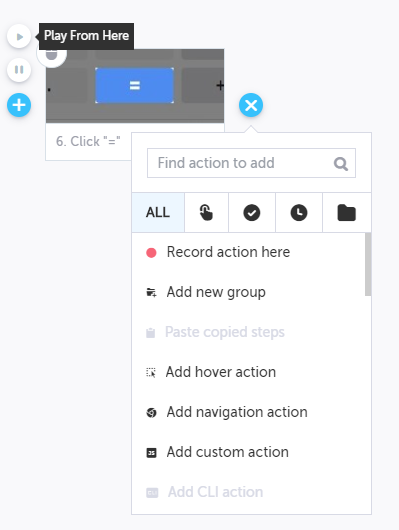
Click on the third option and you’ll see the menu change to this:
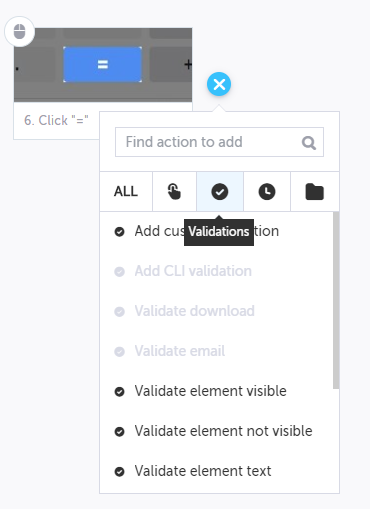
Now, click on “Validate element text.” Testim will take you back to the calculator tab. There, click on the result field:
After doing that, go back to Testim. Now, you should see that your test has a new step:

Hover over the newly added step and click on the engine icon to show the properties panel:
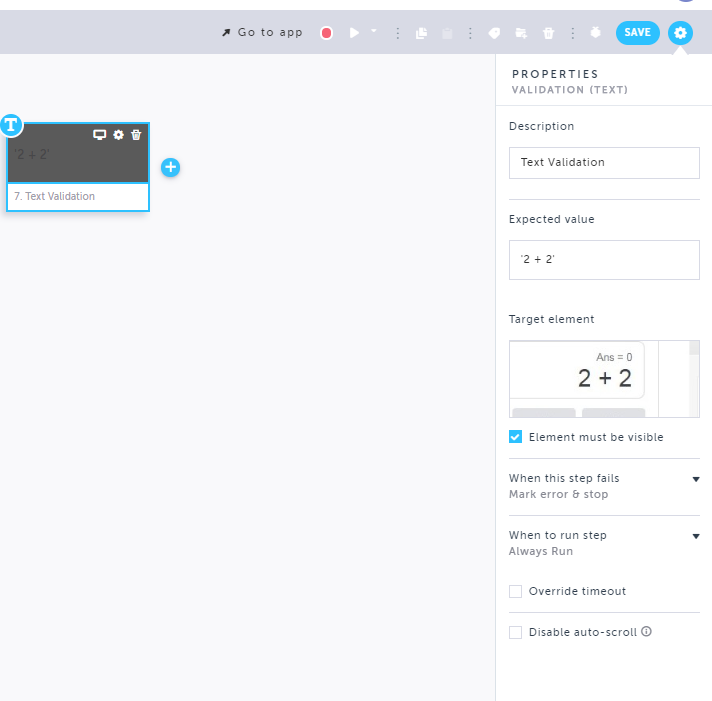
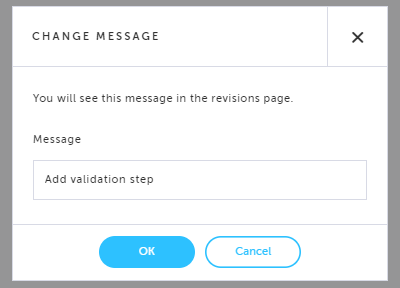
Now it’s just a matter of editing the “Expected value” field, setting it to ‘4’. After doing that, click on the “SAVE” button again. You’ll see a box prompting you for a message, explaining your change. Type “Add validation step” and click on OK:
If you run the test again after saving it, it will continue to pass. However, Testim is now comparing the expected result to the actual result, just like a unit test assertion does.
UI Testing Goes Way Beyond “Clicking Around”
There are still some misconceptions about UI testing out there. One of them is that UI testing isn’t needed if you already employ different categories of testing. Another myth is the belief that informal manual UI testing—a.k.a. just clicking around—is enough.
Neither of those beliefs is true.
We hope this post has shown you not only that UI testing is indeed necessary, but also that it isn’t hard getting started with it, especially if you employ a tool like Testim.
Thanks for reading, and see you next time!
Author bio: This post was written by Carlos Schults. Carlos is a .NET software developer with experience in both desktop and web development, and he’s now trying his hand at mobile. He has a passion for writing clean and concise code, and he’s interested in practices that help you improve app health, such as code review, automated testing, and continuous build.


")