


Testing is an important aspect of software development because it ensures that a given software is working correctly and as expected. This is no different in web development or, more specifically in our context, Vue applications. As such, there are various methods of testing Vue apps.
In this tutorial, we’ll briefly look at different types of tests that can be performed in a Vue application. Then, we’ll build a to-do app with Vue and dive into how to perform Vue end-to-end testing for our application.
Overview Into Testing Vue Applications
There are three common tests that are written for Vue applications: component testing, integration testing, and end-to-end testing. Before we explore Vue end-to-end testing, let’s look at component and integration tests.
Component Testing
Component testing involves testing individual components as single units independent of the rest of the application. This can be used to validate props and state, verify that the component tree is rendered properly, and ensure that methods work as expected.
Integration Testing
Another common type of testing in Vue is integration testing. As the name implies, the purpose of this testing is to ensure that components work together without breaking the app. This is because even though components work well in isolation, issues may arise when they are integrated together. As such, integration tests are written to make sure the components keep working even when integrated into the full system.
End-To-End Testing
End-to-end testing is basically a type of testing that mirrors how a user would use the application. The idea is to test the application as a whole, including components like databases, third-party services, analytics, etc.
Each test could be written as a user story. An example of a test could be searching an e-commerce store for a product, adding it to cart, proceeding to checkout, and paying for the product.
Building a To-Do App With Vue
Let’s build a small application to understand how to perform end-to-end testing in Vue apps. As we mentioned previously, we’ll build a to-do application that lets users add to-dos, delete to-dos and mark to-dos as completed. Let’s start by initializing a new Vue project.
To create a new project, run:
vue create hello-world
Select the default preset. Once that’s done, start the development server:
yarn serve
This will output a link that can be used to view the app in the browser. Hot reloading is enabled by default, so there’s no need to reload the browser to see new changes.
A Closer Look at Our To-Do App
Before we get into the code, let’s look at the structure of the to-do app:
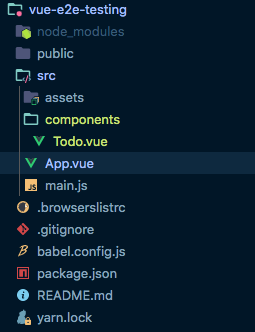
We have a single component, <Todo />, which is where all the logic of the to-do app will be. <Todo /> is imported into App.vue, which is the entry point of the Vue app.
Coding the To-Do App
The flow of the app is quite straightforward. The to-do app has an input field and a button to add new to-dos to the list. A list of to-dos is visible when to-dos have been added. Each to-do has a delete button and a checkbox to mark the to-do as complete. Let’s now add the code to implement these functionalities.
The to-do component <template> looks like this:
<template>

  <div class="hello">

    <h1>To-do Application</h1>

    <input v-model="text" type="text">

    <button @click="addTodo">Add</button>

         <ul>

      <li v-for="(item, index) in todos" :key="item.id">

        <p :class="{ 'todo-completed': item.completed }">

          <input :value="item.completed" @change="updateCompleted(index)" type="checkbox">

          <span>{{ item.text }}</span>

          <button @click="delTodo(index)">x</button>

        </p>

      </li>

    </ul>

  </div>

</template>
The block of code above defines the user interface of our to-do app. The state and methods are defined as follows:
<script>

export default {

  name: 'HelloWorld',

  data () {

    return {

      todos: [],

      text: ''

    }

  },

  methods: {

    updateCompleted (index) {

      this.todos.splice(index, 1, {

        id: this.todos[index].id,

        text: this.todos[index].text,

        completed: !this.todos[index].completed

      })

    },

    addTodo () {

      this.todos.push({

        id: Date.now(),

        text: this.text,

        completed: false

      })

      this.text = ''

    },

    delTodo (index) {

      this.todos.splice(index, 1)

    }

  }

}

</script>
We have two local states: todos, which holds the list of all to-dos and text, which binds to the <input /> field. Under that, we have the methods to add to-dos, delete to-dos, and mark a to-do as completed. To make our to-do app more pleasing to the eye, add the following styles:
// /App.vue

#app {
  font-family: Avenir, Helvetica, Arial, sans-serif;
  -webkit-font-smoothing: antialiased;
  -moz-osx-font-smoothing: grayscale;
  color: #2c3e50;
  margin-top: 60px;
  display: flex;
  flex-direction: column;
  align-items: center;
  justify-content: center;
}
// /components/Todo.vue
<style scoped>
.todo {
text-align: center;
width: 30%;
}
.todo button {
font-size: 18px;
}
.todo input {
border: none;
border-bottom: 2px solid black;
padding: 8px;
font-size: 18px;
margin-right: 10px;
}
.todo .btn-add {
border: none;
background-color: #33aa0f;
color: white;
outline: none;
padding: 8px 16px;
border-radius: 4px;
}
.todo input:focus {
outline: none;
}
ul.list {
padding-left: 0;
list-style: none;
margin-top: 60px;
text-align: left;
}
.list-item span {
font-size: 18px;
margin: 0 15px;
}
.list-item button {
outline: none;
border: none;
background: red;
color: white;
border-radius: 50%;
}
.todo-completed {
text-decoration: line-through;
color: #757575;
}
</style>
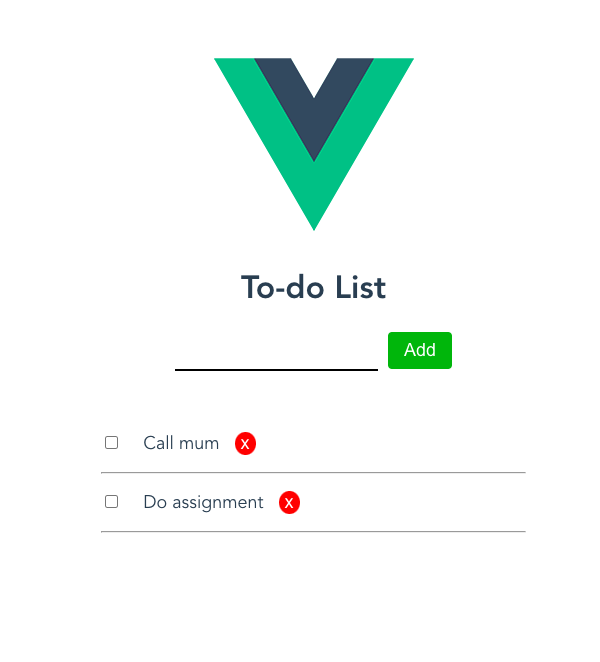
Reload your browser to see the results. The output should resemble something like this:
Now that we have our application set up, let’s see how we can go about adding end-to-end tests.
Vue End-To-End Testing: the Hard Way
End-to-end testing is focused on making sure the application and all supporting components are working together. So, how do we write end-to-end tests in Vue?
Since end-to-end testing is focused on testing the application from the user’s point of view, the basic approach would be by hand. This involves loading the website in the browser and running through the test cases. For instance, let’s write a test case for the to-do app we built in the previous section. This test case will cover the creation of to-dos and will look like this:
- Load web link in the browser.
- Enter to-do text in the input field.
- Click the Add button.
- Verify that the to-do is added to the to-do list.
- Verify that the input field is cleared for more to-dos to be added.
This is relatively straightforward and easy to run manually because this application is small. We can go further and add another test case for marking a to-do as completed and one more for deleting a to-do. It still won’t be much work to run the three test cases by hand.
The Problem With This Approach
Let’s extend this further and add some new features to our to-do app like authenticating users, integrating a database service to persist to-dos, and adding offline availability to ensure users can add to-dos when there’s no internet connectivity. Suddenly, we have more functionalities to test, making each test case significantly longer.
As you can see, end-to-end testing becomes more demanding as more features are added. This can be seen in our example to-do app, which is small in terms of functionality. For bigger applications like e-commerce stores, where there are a lot more features, conducting end-to-end tests by hand becomes tedious, inefficient, and error-prone. We can make this process more efficient by automating it. So, let’s see how to do that in the next section.
Automating Vue End-To-End Testing
As we saw in the previous section, manual end-to-end testing becomes more inefficient as the app scales, so automating this process will make it more efficient and less error-prone.
The first step to automating end-to-end testing is choosing a testing framework. We’ll be using Testim, which is a great tool for quickly setting up end-to-end tests.
Testim allows you to write tests without having to write a single line of code! It plays well with continuous integration tools, so it doesn’t alter your workflow if you already have CI/CD set up. It also provides access to log information and errors so you can inspect and track down errors that may have been missed during development.
Vue End-To-End Testing With Testim
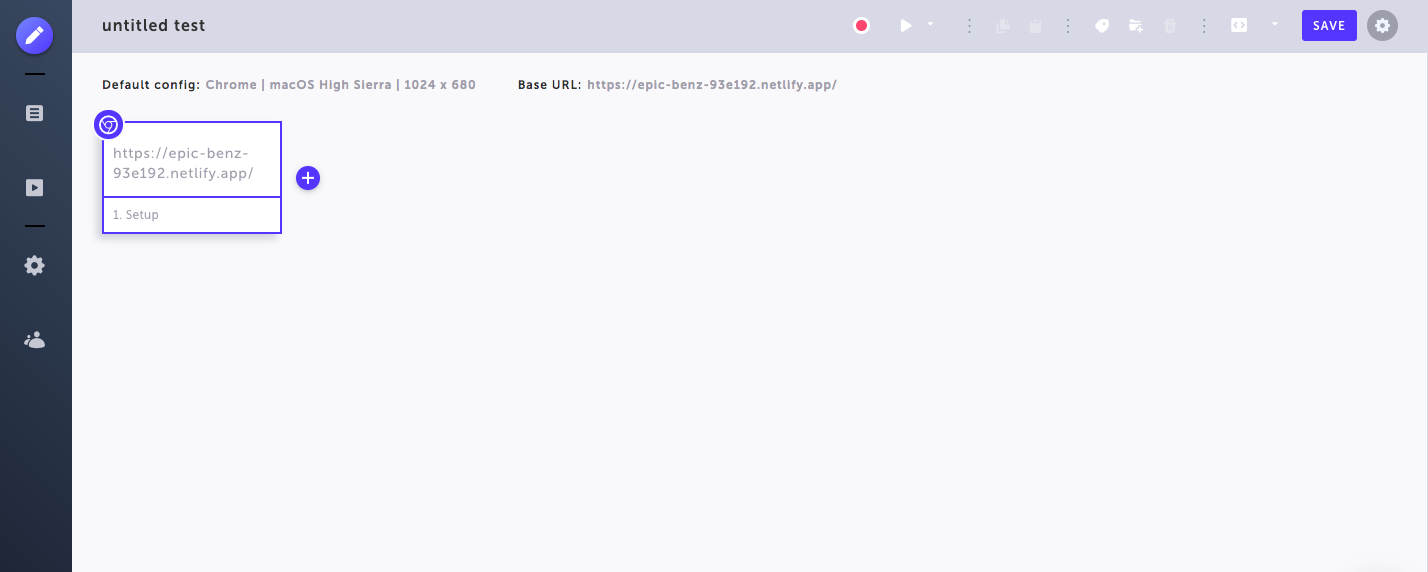
To get started with Testim, create an account on the website. Once your account has been created, you’ll be redirected to the dashboard. On the dashboard, click the +New Test button at the top right to create a new test:

A new “untitled test” is created. Click the gear icon next to the Save button to modify the test configuration:
Add a name, description, and other configuration details to the dialog that appears on the right:
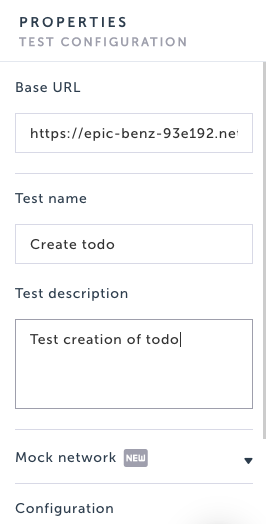
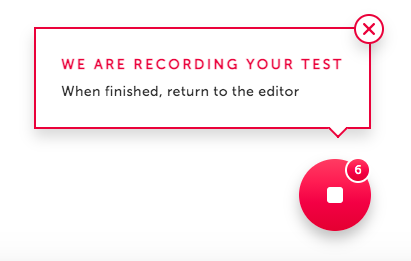
Add a test name and a description. The to-do app in our example has been hosted, so the link can be added as the base URL. Next, click on the red button to record the test. Testim launches your Vue app in a new window and records any actions performed by the user.
Generating Tests With Testim
For our test case to create a to-do, we’ll enter two to-do items to our list.
After entering the to-do items, end the recording by clicking the red button shown above. This takes you back to the dashboard, but this time, you’ll see a couple of new steps added to your test:
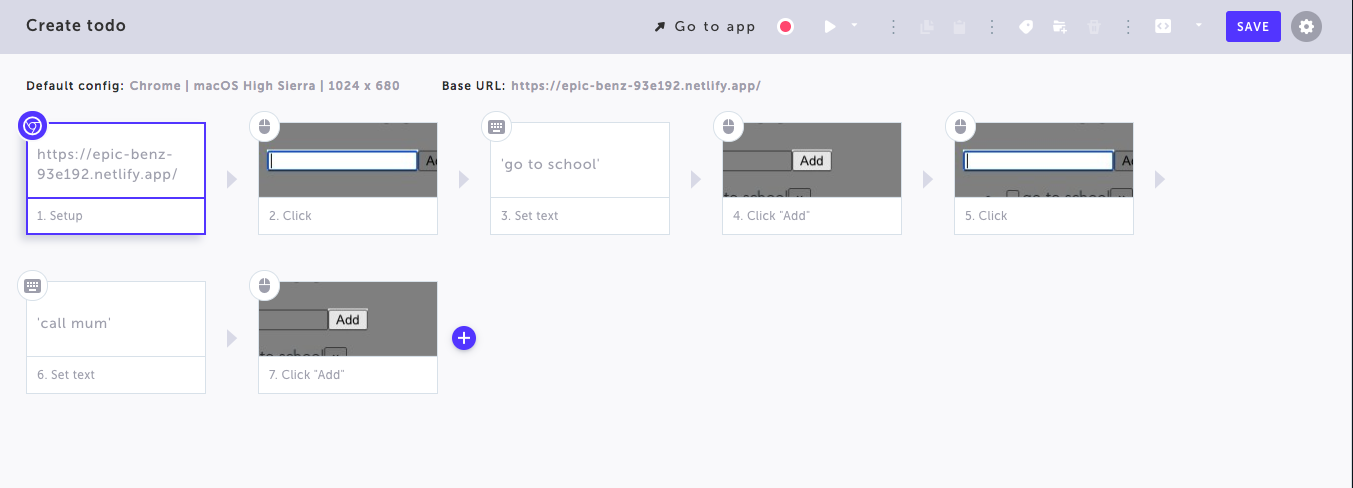
You’ll see click events, input events, and any other event that took place during the recording. You can click the play button to watch the recording again to make sure it covers the necessary actions.
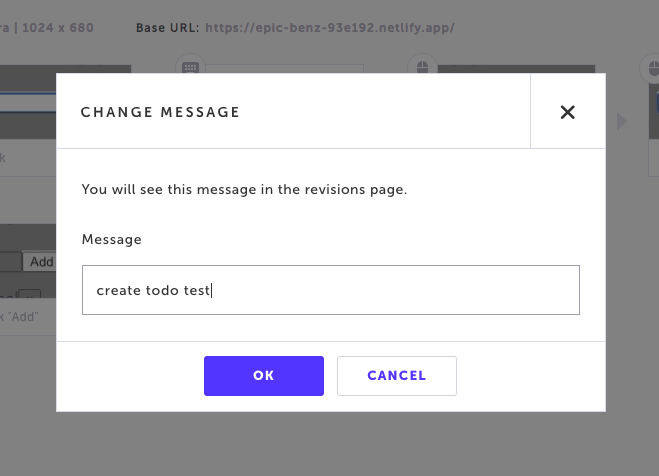
When you are satisfied with the test, you can save the test by clicking the Save button at the top right, which will pop open a dialog to enter a message. These messages make up a history for the current test case, which can be used to understand how a test has evolved over time.
With that, you’re done creating your end-to-end test without writing any code. You can go on to create more test cases for other user stories. Plus, once Testim is integrated with your CI, it will run every time there’s a new feature release or bug fix.
Speed Up End-To-End Testing With Automation
In this tutorial, we’ve looked at the different types of testing done in Vue. We’ve also seen why end-to-end testing is important and how Testim enables us to add end-to-end tests in a quick and intuitive manner.
Performing tests by hand is the most basic way to get started, as it requires very little overhead cost. But as your application grows with the addition of new features, this method becomes crude and inefficient. Automating tests is a great way to move quicker and guarantee the integrity of your tests.
Test automation tools often require upfront costs, either in terms of development or monetary value. Testim creates a fine balance, as it allows you to try it without any upfront payment as well as create test suites without writing any code. So, you can go ahead and try it for free.


