


Though most people probably think of Selenium as a test automation tool, it’s actually a solution for browser automation. Armed with such power, you can use it in whatever way best suits your needs. Selenium’s flexibility also shows in the several different flavors the tool offers. This post is a guide about one such flavor: Selenium Server Standalone.
For those with only passing familiarity with Selenium, it might sound odd that the tool needs a server, so that’s what we’ll address first. Then we’ll proceed to cover the fundamentals of Selenium Server Standalone: what is it, how it works, and how to install it.
Last but not least, we’ll walk you through how to get started with Selenium Server Standalone. Rather than a comprehensive treatise on the tool, this post is a solid but quick start guide. By the end, you’ll know enough about Selenium Standalone Server to start your learning journey. Let’s dig in.
Does Selenium Need a Server?
Selenium comes in different editions, so it’s possible that you’re not familiar with a server in Selenium even if you have experience working with it. Whether you need or don’t need a server when working with Selenium depends on what you’re trying to accomplish.
If you want to use Selenium WebDriver to write and run tests on a single machine, you don’t need a Selenium server. In such a scenario, you can use the appropriate version of Selenium WebDriver to drive the browser directly.
However, you might need to use a more elaborate setup. For instance, if you wish to perform grid testing, that will involve driving browsers across different machines, and thus you will need a server. More specifically, you will need Selenium Grid, which is the edition of Selenium that allows the execution of automations in remote machines.
Selenium Server Standalone: The Fundamentals
Now you know that, sometimes, Selenium does need a server. The next step is to understand the “standalone” part.
What Is Selenium Server Standalone?
The classical way of running a grid with Selenium is by using a server-client architecture. You’d have a hub (server) and one or more nodes (clients) responsible for actually executing the tests.
However, things are different with the latest version of Selenium Grid, which is Selenium Grid 4. This version offers several ways to run a grid, and one of them is the standalone mode. With the standalone mode, you can run a complete grid on a single machine.
The standalone mode, thus, is the easiest way to spin up a grid using Selenium Grid.
How Do I Install Selenium Server Standalone?
Technically speaking, you don’t install Selenium Server Standalone. Instead, you download the executable for Selenium Grid and run it in standalone mode. Doing that just takes running a single command. However, some requirements need to be in place. We’ll cover that in detail next.
Selenium Standalone: How to Get Started
We’ll now walk you through how to get started with Selenium Server Standalone in the easiest possible way.
Getting the Requirements
Let’s start by obtaining the requirements.
To start a grid using Selenium, you need to download an executable .jar file. So, you need to have Java installed. If you still don’t have it, go to the Java download page and install it. After you’re done, run the following command to verify the installation:
java --version
Make sure the path to the Java executable is added to your PATH environmental variable.
In order to run the actual automations, you’ll need Selenium WebDriver. In the classical mode, you’d need the driver in each of the nodes. Since you’ll be using the standalone mode, just an installation will suffice.
In order to automate a browser, you need the specific driver for that browser and a specific operating system. For this guide, we’ll be driving Chrome under Windows. So, start by going to this page. When you’re there, download the adequate version of the Chrome WebDriver, according to the version of Google Chrome you have installed.
For instance, the version of Google Chrome I currently have installed is 103.0.5060.66, so I’ll download WebDriver 103.0.5060.53. Notice that the version numbers don’t match perfectly, but it doesn’t matter. What counts are the major versions.

After downloading the ChromeDriver executable, put it somewhere where it’s easy to find and make sure to add that path to your PATH variable as well.
Downloading Selenium Server
Now that you have the requirements in place, the next step is downloading Selenium Server. Go to the download page and locate the Selenium Server section:

As you can see, at the time of this writing, the latest stable version for Selenium Server is 4.3.0. Click on the link and download the file. It’s possible that your browser will show an alert saying the file is potentially dangerous. If this happens, simply click on “Keep file” or whatever option states that the file is safe.
Starting Selenium Server in Standalone Mode
As we’ve said earlier, starting Selenium Server Standalone is just a matter of running a single command once you have all of the requirements. You simply execute the .jar file, passing the mode—in our case, standalone—as an argument. Here’s the complete command:
java -jar selenium-server-4.3.0.jar standalone
Again, remember that 4.3.0 is the latest version at the time of this writing. If there’s a new version by the time you’re reading this, make sure to replace that with the appropriate version number. After running the command, in case everything worked fine, you’ll see some logs like these:

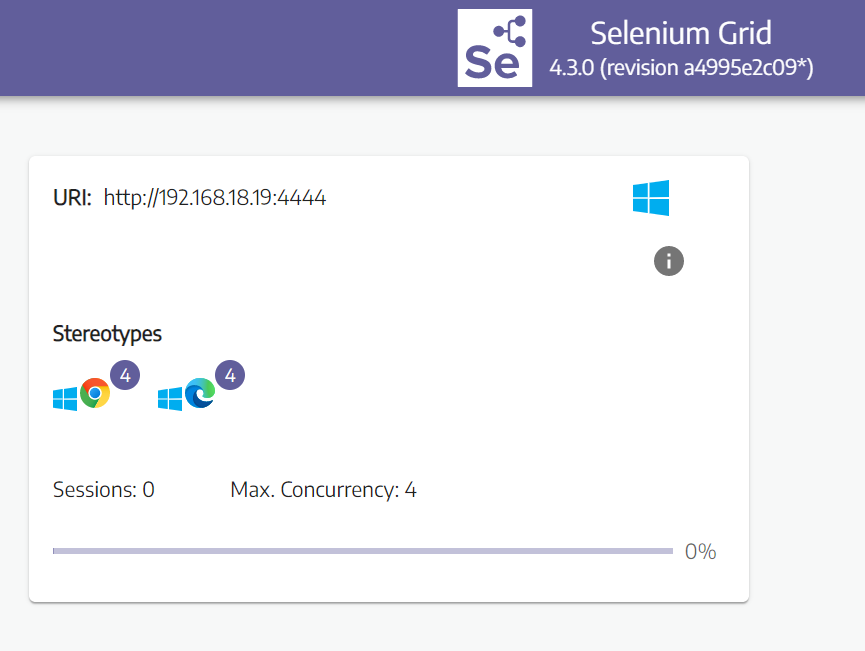
By default, Selenium Server runs at port 4444. So, head to localhost:4444 and you’ll see something like the following:
Starting Selenium Server with a Custom Configuration
After running Selenium Server for the first time, press CTRL + C to halt execution. You’ve just executed Selenium with all the default options. However, there are many configuration options, which you can choose from either via CLI or a config file. Let’s see an example using a config file.
Selenium Server Standalone uses .TOML files for configuration. Using your preferred text editor, create a new text file and paste the following content in it:
[node]
drivers = ["chrome"]
max-sessions = 3
Save the file as config.toml. Now execute the command again but this time with the –config option followed with the complete path to the config file:
java -jar selenium-server-4.3.0.jar standalone --config config.toml
You should now see that Selenium Grid is running with a maximum of three sessions as defined by our config file.
Conclusion
Selenium Server Standalone is the most straightforward way to spin up a grid using Selenium. By using the standalone mode, you’ll be able to run all the components of a grid using a single machine. That way, you can get started with grid testing and testing a single application against several different browsers without having to actually manage several machines.
As a next step, you might want to read our complete tutorial on how to get started with grid testing, which will walk you through the details of how to write a simple yet realistic browser automation using the C# bindings for the Chrome WebDriver.
This post was written by Carlos Schults. Carlos is a consultant and software engineer with experience in desktop, web, and mobile development. Though his primary language is C#, he has experience with a number of languages and platforms. His main interests include automated testing, version control, and code quality.


")