


Selenium is a tool for browser automation. It can perform actions like clicking on a button or a link, typing texts into an input field, and just about any operation a real user can do manually. Selenium is used for automated testing and so much more. What you do with Selenium is up to you and in this post, you’ll learn how to select elements from a dropdown menu and how to use the HTML select tag in Selenium.
Prerequisites
Before we get started, it’s necessary that you have
- knowledge to write basic JavaScript code,
- the ability to work with a command line interface (CLI) tool, and
- Node.js installed on your computer.
Procedures
Now let’s walk through the steps from installing Selenium to writing JavaScript code that controls a browser. Then we’ll look at the three examples using Selenium, listed below:
- selecting using an HTML select tag,
- selecting multiple items, and
- selecting an item from a dropdown.
But first, you must complete the following four steps.
1. Create a Working Directory for Your Project
To enable you to follow along, we’ll begin by setting up a directory where you’ll store your code and files. To do this, create a new folder somewhere on your computer. For this example, the full path for the folder is: “/Users/username/development/dropdown-example“.
2. Install Selenium
If it’s not already installed, you’ll need to install Selenium on your machine. To install Selenium, open a command prompt or terminal and set the working directory to the folder you created earlier, by typing the following command:
cd /Users/username/development/dropdown-example
Replace “/Users/username/development/dropdown-example” with the full path to your folder.
After that, enter the following command at the command prompt or in terminal to install the Selenium Node.js package:
npm install selenium-webdriver
Run the following command to generate a package.json file for your project directory:
npm init -y
Expand Your Test Coverage
3. Set Up WebDriver
In order to control your browser and run your automation code, Selenium requires WebDriver. Goto the following urls here to download the correct version of WebDriver for your operating system and your specific browser.
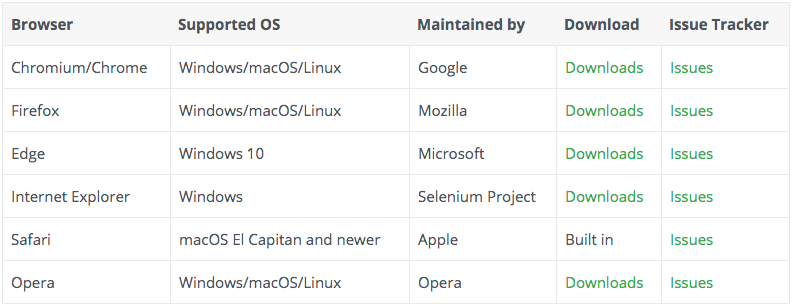
Screenshot from WebDriver download page showing supported browsers and operating systems.
The procedures for setting up WebDriver for Chrome and Firefox on Mac OS and Windows are explained below.
Extract the content of the downloaded zip file to a folder on your computer. For our example, we’ll extract the content to /Users/username/development/WebDrive.
Next, you’ll need to add the WebDriver executables to your system path.
To do that on Mac OS, enter the following command in the terminal:
export PATH=$PATH:/Users/ea/development/webDriver >> ~.profile
For Windows users, open a command prompt and run the following command:
setx /m path "%path%;C:\webDriver\bin\"
Remember to change the paths to the correct path for where you extracted WebDriver binaries.
To test what we have done so far, let’s create a new file in the project’s working directory you created earlier, paste the following code into the file, and save the file as index.js.
const {Builder, By, Key, until} = require('selenium-webdriver');

async function example() {
    let driver = await new Builder().forBrowser('firefox').build();
    try {
// Navigate to Url
        await driver.get('https://www.google.com');

// Enter the text "Testim" in the search input field
        await driver.findElement(By.name('q')).sendKeys('Testim', Key.ENTER);

        let firstResult = await driver.wait(until.elementLocated(By.css('h3>div')), 10000);

        console.log(await firstResult.getAttribute('textContent'));
    }
    finally{
        driver.quit();
    }
}
example();
Then enter the following command in your terminal window to run index.js.
node index.js
The expected behavior is as follows:
- First, Selenium opens a new instance of Firefox (or Chrome if you downloaded the Chrome driver and changed the parameter in forBrowser() from firefox to chrome.
- Second, the new browser instance loads google.com.
- Once the page loads, Selenium types Testim in the search field.
- After that, Selenium simulates hitting the Enter key, which submits the search query.
- Lastly, the search result page opens.
At this point, we have Selenium and WebDriver all set up and we’re ready to start writing the code that will interact with dropdowns. Now Let’s look at the three examples listed earlier.
Example 1: Selecting Options From an HTML Select Tag
To achieve this, you’ll create an HTML document that contains a select tag with some options. In your project’s working directory, create a new HTML file, paste the following code into the file, and save it as page.html.
<!DOCTYPE html>
<html>
<head>
    <title>Page</title>

    <!-- Latest compiled and minified CSS -->
    <link rel="stylesheet" href="https://maxcdn.bootstrapcdn.com/bootstrap/4.5.2/css/bootstrap.min.css">

    <!-- jQuery library -->
    <script src="https://ajax.googleapis.com/ajax/libs/jquery/3.5.1/jquery.min.js"></script>

    <!-- Popper JS -->
    <script src="https://cdnjs.cloudflare.com/ajax/libs/popper.js/1.16.0/umd/popper.min.js"></script>

    <!-- Latest compiled JavaScript -->
    <script src="https://maxcdn.bootstrapcdn.com/bootstrap/4.5.2/js/bootstrap.min.js"></script>
</head>
<body>
<div class="container py-5">
    <div class="mb-4">
        <select name="numbers" id="numbers" class="form-control">
            <option>1</option>
            <option>2</option>
            <option>3</option>
            <option>4</option>
        </select>
    </div>

    <div class="mb-4">
        <select name="cities" id="cities" multiple class="form-control">
            <option>London</option>
            <option>Rio</option>
            <option>Lagos</option>
            <option>Doha</option>
        </select>
    </div>

    <div class="dropdown">
        <button class="btn btn-secondary dropdown-toggle" type="button" id="dropdownMenuButton" data-toggle="dropdown" aria-haspopup="true" aria-expanded="false">
            Dropdown button
        </button>
        <div class="dropdown-menu" aria-labelledby="dropdownMenuButton">
            <a class="dropdown-item" href="#">Action</a>
            <a class="dropdown-item" href="#">Another action</a>
            <a class="dropdown-item" href="#">Something else here</a>
        </div>
    </div>
</div>

</body>
</html>
Open index.js in a text editor and update the content (delete previous content) to the following:
const {Builder, By, Key, until} = require('selenium-webdriver');

async function example() {
    let driver = await new Builder().forBrowser('firefox').build();

    try {
// Navigate to Url
        await driver.get('file:///Users/ea/development/dropdown-example/page.html');

        await driver.findElement(By.name('numbers')).click();
        await driver.findElement(By.xpath("//*[@id=\"numbers\"]/option[4]")).click();

    }
    finally{
        driver.quit();
    }
}
example();
The code sample above launches Firefox and loads the page.html file we created earlier, locates the numbers select tag from your page, and simulates a click on the element. The third line of code in the try block locates the fourth option inside the select tag and performs a click on that element.
Example 2: Selecting Multiple Options From a Select Tag
In the last example, we looked at how to select a single option from an HTML select tag. Now let’s take a look at how we can select multiple options from a multi-select tag.
We already included the HTML code required for this example in page.html. The second select element in the HTML document has the multi-select feature enabled. You can see this in the following line from the code:
<select name="cities" id="cities" multiple class="form-control">
The new property in the code above is multiple. You can try loading the document manually in a browser to see how the multi-select element behaves.
To select options from the select element, open index.js and find the following line:
await driver.findElement(By.xpath("//*[@id=\"numbers\"]/option[4]")).click();
Add the code sample below just after that line:
await driver.findElement(By.xpath("//*[@id=\"cities\"]/option[1]")).click();
await driver.findElement(By.xpath("//*[@id=\"cities\"]/option[4]")).click();
Save the file and run index.js using the node index.js command one more time.
You should see the first and fourth options selected.
To unselect an option in the multi-select tag, perform another click operation on an already selected option. For example, add the following code below the lines we added in the previous step:
await driver.findElement(By.xpath("//*[@id=\"cities\"]/option[1]")).click();
The above code will cause the browser to unselect option 1.
Example 3: Selecting a Dropdown Menu Item
Our final trick with Selenium will be clicking and selecting an item from a dropdown menu. Our example code makes use of Bootstrap 4 Dropdown. The code for this example is already included in the page.html file.
Open index.js in a text editor and find the following line:
await driver.findElement(By.xpath("//*[@id=\"cities\"]/option[4]")).click();
Just below that line, insert a new line with the following code:
await driver.findElement(By.xpath("//*[@id=\"dropdownMenuButton\"]")).click();
await driver.findElement(By.xpath("/html/body/div/div[3]/div/a[2]")).click();
Once you’re done, save the file and run index.js using the node index.js command again.
Selenium should perform a click on the dropdown menu button and select the second menu item.
The GIF below captures all 3 examples in action:

XPath
In all three examples, we used XPath to locate specific HTML elements. XPath is short for XML Path. It provides a syntax for locating elements in a webpage or XML documents. For example, the following XPath points to an option tag nested inside a select tag:
//*[@id=\"numbers\"]/option[4]
The particular element, in this case, is the fourth option tag inside a select tag with the id numbers.
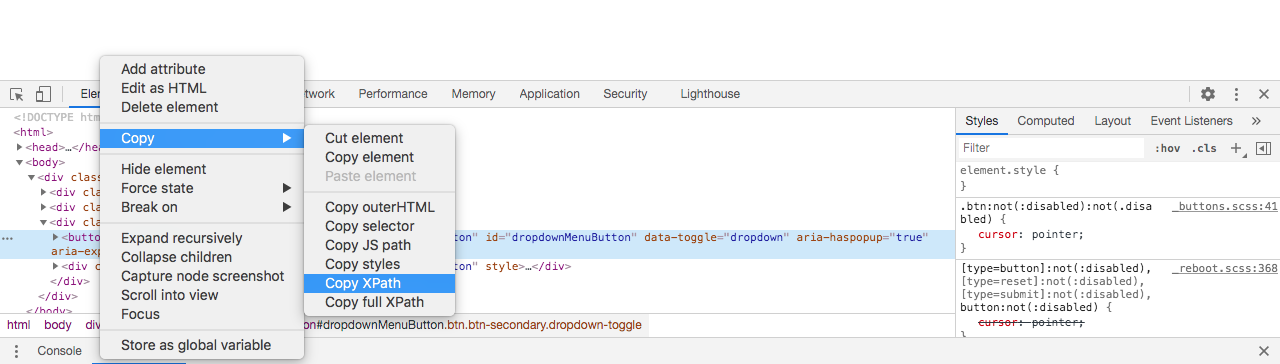
To get the XPath value for an element on a webpage using Chrome, right-click anywhere on the webpage and select Inspect to open the inspector window. Navigate to the element you wish to get the XPath for, right-click on it and select Copy > Copy XPath. The process for Firefox is similar.
Selenium can locate HTML elements using the built-in By.xpath() method. Once the element is located, Selenium can perform actions like clicking on links or buttons and typing text into input fields.
Summing Things Up
We’ve completed our objective of selecting elements in select tags and in a dropdown using Selenium. We’ve achieved this objective using an example webpage that contained two distinct types of select tags and a dropdown.
In the first part of this post, we set up Selenium and WebDriver. Without the initial setup, our JavaScript code wouldn’t have run as desired. But there’s an easier way. If your main concern is to automate tests that involve dropdowns and select tags on a website, you should try Testim. Testim lets you perform all the actions covered in this post without the stress of manually setting up Selenium.
What to read next
How to check if an element exists with Selenium
How to fix Selenium’s element is not clickable at point error


")