


On this blog, we’re all about testing, and that’s why we sometimes publish posts teaching you how to perform some task in Selenium—such as this one, where we show you how to find an element by text, or another in which we teach you all about Selenium’s waits. In today’s post, we provide yet another contribution to your Selenium journey by showing you how to get an HTML element attribute using this tool.
Table of Contents
- What Is Selenium, and What Do People Use It For?
- The Different “Flavors” of Selenium
- Selenium IDE
- Selenium Grid
- Selenium WebDriver
- What Is An HTML Attribute?
- What’s the Use of Getting an Attribute in Selenium?
- getAttribute() vs getText(): What’s The Difference?
- getAttribute() vs getCssValue(): What’s The Difference?
- Getting an Attribute Using Selenium
What Is Selenium, and What Do People Use It For?
Many people would define Selenium as an automated testing tool. There’s more to it than that, though. Selenium gives you the ability to automate interactions with a browser. What you do with this power is up to you and your imagination.
Of course, most Selenium users use it as a testing tool. You could use it to automate all sorts of tasks, though. For instance, you could use it to automate some tedious administrative tasks such as, download a file from a given site each Tuesday.
The Different “Flavors” of Selenium
We keep saying Selenium is “a” tool, but rather than being a single thing, Selenium comes in different options. Which “flavor” you’ll end up using depends mostly on the type of browser automation you’re trying to perform and on your own knowledge and experience.
Selenium IDE
Selenium IDE is a browser extension available for Firefox and Chrome. It allows users to record their interactions with the browser by manually performing the actions. It’s possible to replay those interactions later.
Selenium Grid
Selenium Grid is the flavor of Selenium specifically targeted at grid testing. By performing grid testing, you can test your web app simultaneously across a large combination of browsers and operating systems. That way, you can ensure it works as expected for the vast majority of users.
Selenium WebDriver
Last but not least, Selenium WebDriver is what most people probably think when they refer to Selenium. Rather than being a specific tool, WebDriver is an application programming interface that allows you to automate—or “drive,” hence the name—a web browser.
Unlike IDE, which primarily supports basic interactions, WebDriver allows you to create much more complex actions. Another advantage of this version of Selenium is that you can use several different programming languages to talk to it—JavaScript, Ruby, Java, Python, and C# being the main ones.
WebDriver is the flavor of Selenium we’ll use for the rest of this post. We’ll use the terms, Selenium, and WebDriver interchangeably.
What Is An HTML Attribute?
Before learning how to get an HTML attribute using Selenium, let’s take a step back and learn what an attribute is in the first place.
An attribute is an additional property of an HTML element. It gives more information or defines a characteristic of said element. You’ll often see attributes in the form of key-value pairs. Here’s an example:
<input type="checkbox">
In the example above, the attribute is “type,” and its value is “checkbox.”
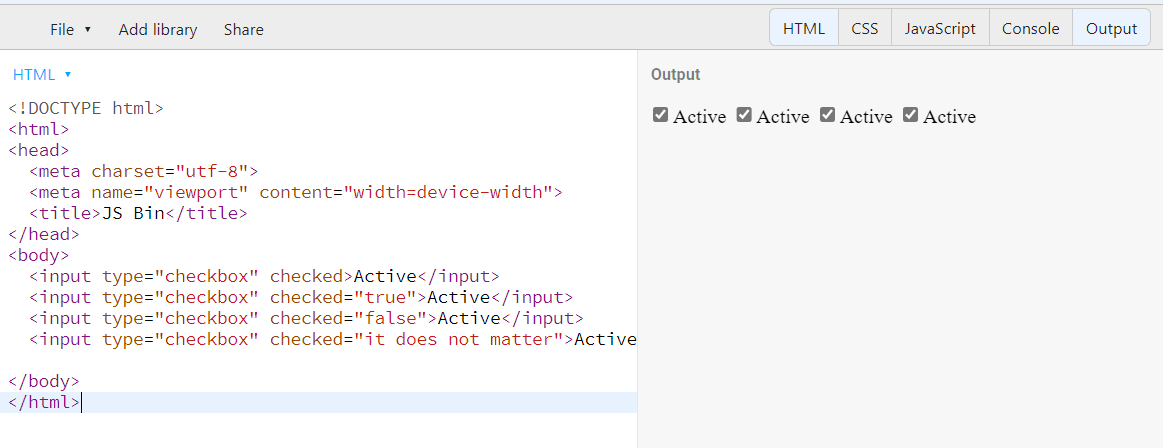
However, there are attributes for which you don’t provide any value. The mere presence of them indicates their value is true. So, all of the following examples generate the same outcome (the attribute you should care about is “checked”):
<input type="checkbox" checked>Active</input>
<input type="checkbox" checked="true">Active</input>
<input type="checkbox" checked="false">Active</input>
<input type="checkbox" checked="it does not matter">Active</input>
These attributes are called boolean attributes. Go to JSBin to check out the result from the example above. For completeness’ sake, this is what the result looks like:
What’s the Use of Getting an Attribute in Selenium?
Well, people build web pages using the HTML language. After receiving the HTML code from the server, the browser parses it into an in-memory representation and then renders it visually. An HTML document is made of elements, and those elements can have attributes. Attributes are additional properties elements can have that change them in some way to meet a specific need.
When performing testing using Selenium, you might need to check whether a certain element has an attribute with the value you expect. That’s the reason getting attributes—or, more specifically, the value of the attributes—is valuable when doing front-end testing.
getAttribute() vs getText(): What’s The Difference?
As you’ll soon see, to get an attribute you use Selenium you should the appropriately named getAttribute() method. However, people often mix up this method with a similar one, getText(). What’s the difference between the two?
As the name suggests, the getAttribute method gets the value of a given HTML attribute. On the other hand, getText() returns the inner text of a given element. The term “inner text” means the text located between the opening and closing tags of the element. Also, the text returned has to be visible—i.e. not hidden by CSS.
getAttribute() vs getCssValue(): What’s The Difference?
Yet another Selenium method can confuse people: getCssValue(). So, what’s this method, and how it differs from getAttribute()?
As the name makes it clear, getCssValue() is all about CSS, or Cascading Style Sheets, the language we use for formatting and styling web page elements. This method gets the value of the specified CSS property for a given element.
For instance, the following line gets the value of the background-color property:
element.getCssValue("background-color");
Getting an Attribute Using Selenium
Step #1: Getting the Requirements Ready
Our first requirement is to get ChromeDriver, the necessary executable, to control the Google Chrome browser via Selenium. Go to the download page for the ChromeDriver, and follow the link according to the version of Chrome you have installed. Then, select the right version for your platform. Download the executable, and put it in an easy-to-find location. Since I’m on Windows, I’ll put the executable on C:webdriver. Additionally, you’ll have to add the location you’ve chosen to your system’s path so that it can be located afterward.
The language we’ll use to write our Selenium automation is JavaScript. We’ll create a Node.js project and install the necessary Selenium bindings using npm. So, get those installed and ready to go if you don’t already have them.
Step #2: Starting Our Toy Project
Let’s create a Node.js project so that we can use the JavaScript bindings for Selenium.
Using the command line, create a new directory, and access it. Then, execute the following command:
npm init
Node.js will ask you many questions. Just press ENTER to go with the default for each one of them. After you’re done, you’ll have a package.json file containing the configuration for your new project.
Step #3: Adding the Selenium WebDriver Bindings
This step is super easy: we’ll install the Selenium bindings to write our automation. Just run the following command:
npm install selenium-webdriver
Step #4: Verifying That the Setup Works
Let’s do a quick smoke test to verify our setup works as expected. First, inside your project’s folder, create a file called index.js. Paste the following content in it:
const { Builder, By, Key } = require("selenium-webdriver");
async function search(value)
{
    let driver = await new Builder().forBrowser("chrome").build();
    await driver.get("https://amazon.com");
    let element = await driver.findElement(By.id("twotabsearchtextbox"));
    await element.sendKeys(value);
    await element.sendKeys(Key.RETURN);
}
search('software testing')
What the code above does is straightforward. It defines a function that takes a value and searches for it on the Amazon U.S. website. The function instantiates a driver for the Chrome browser. Then, it uses the driver to navigate to amazon.com and find an element by its ID. The element is the search box.
After finding the element, we send it the value received as an argument by the function, followed by the RETURN key. Then, the function is called, with “software testing” passed as an argument.
To execute this simple automation, use your terminal to run the following command:
node index
If everything is correct, you should see a new Chrome window open. Navigate to amazon.com, and search for “software testing”:

Step #5: Getting the Attribute Using Selenium
We’ll now make a small change to the previous code to get the value of the attribute “autocomplete” from the search field element.
To get the attribute’s value, we’ll use the appropriately named getAttribute() method, passing the name of the attribute whose value we’re trying to obtain as an argument. Since the method returns a promise, we’ll follow it with a call to then(), in which we’ll log the resulting value:
await element.getAttribute('autocomplete').then(x => console.log(x))
async function search(value)
{
    let driver = await new Builder().forBrowser("chrome").build();
    await driver.get("https://amazon.com");
    let element = await driver.findElement(By.id("twotabsearchtextbox"));
    await element.getAttribute('autocomplete').then(x => console.log(x));
}
When it comes to Boolean attributes, it either returns true or false or null if the attribute doesn’t exist.
Selenium Is a Valuable Tool, But Don’t Forget to Factor in Its Cost
In this post, you’ve learned how to use Selenium to get the value of an element’s attribute. Generally speaking, Selenium is a great tool to have in your toolset. However, make no mistake: despite having many pros, Selenium has its share of cons as well. Despite being free and open-source, it might have some important costs in terms of a steep learning curve.
Another relevant cost of Selenium has to do with the robustness—or lack thereof—of the tests you create using it. That’s right: Selenium tests are often frail, breaking at the slightest change to the application, which makes test maintenance a heavy burden for developers, QA professionals, and everyone involved in the testing process.
Testim’s Automate is a test automation tool that solves brittle tests by using artificial intelligence to find elements on a web page. Testim understands the element’s attributes and can select and validate elements like CSS, HTML, and more through simple tool configuration (without code). Automate finds elements even when developers make changes to the application, preventing the tests from failing. Start using Testim’s Automate for free today.


")