


Selenium is one of the most—if not the most—popular names when it comes to browser automation tools. And even though you can use its automation power for any purpose you like, most people use this tool to test web applications.
We’ve published many posts about Selenium. Today, we add yet another one to the list by teaching how you can upload and download files to websites using the tool.
We’ll start with a brief definition of Selenium, covering the three main versions in which you can find it. Then, we get to the main part of the post, where we’ll cover how you can upload and download files using Selenium, in that order.
Before wrapping up, we share some final considerations, including an alternative to using Selenium for this kind of task.

Selenium Flavors
In the introduction, we said that Selenium is a popular browser automation tool, commonly used in software testing. That’s not super accurate, though. Rather than being a single thing, Selenium is more of a suite of tools. It actually contains different tools you can use according to your use cases:
- Selenium IDE is a browser extension you can use to create simple record-and-playback tests. Using it doesn’t require coding skills.
- Selenium Grid is used for grid testing, also known as testing across different browsers and operating systems.
- Selenium WebDriver is an API you can use to drive a browser through the programming language of your preference.
WebDriver is the most powerful and complete version of Selenium, and it’s what people typically mean when they “Selenium.” For this tutorial, we’ll use Selenium WebDriver.
Selenium WebDriver: Obtaining the Requirements
Let’s start by obtaining the requirements we need. First, we need Selenium itself.
Selenium WebDriver contains two components: an executable (specific to a particular browser and operating system) and a binding to a programming language. The list of supported programming languages includes Python, C#, Java, JavaScript, and Ruby.
Obtaining the WebDriver
Let’s start by downloading the executable for Google Chrome. Go to the downloads page, and you’ll see instructions telling you to download the version that matches your Google Chrome installation:
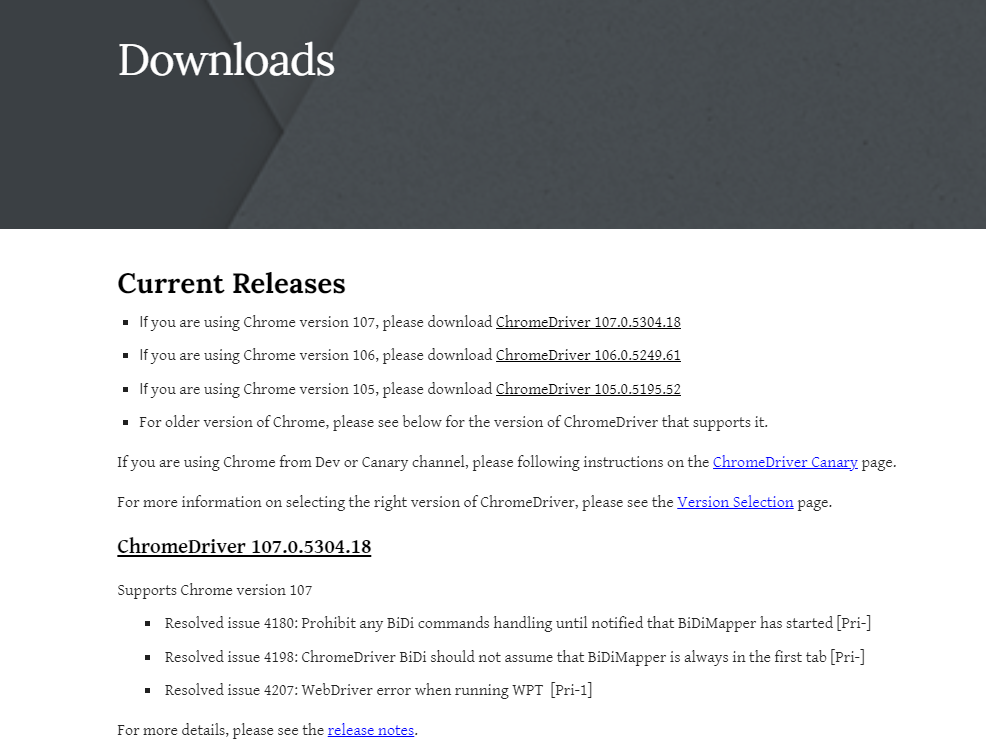
Click the link that matches your Google Chrome version. After following the link, you’ll see another page, where you’ll have to pick the correct version according to your operating system:
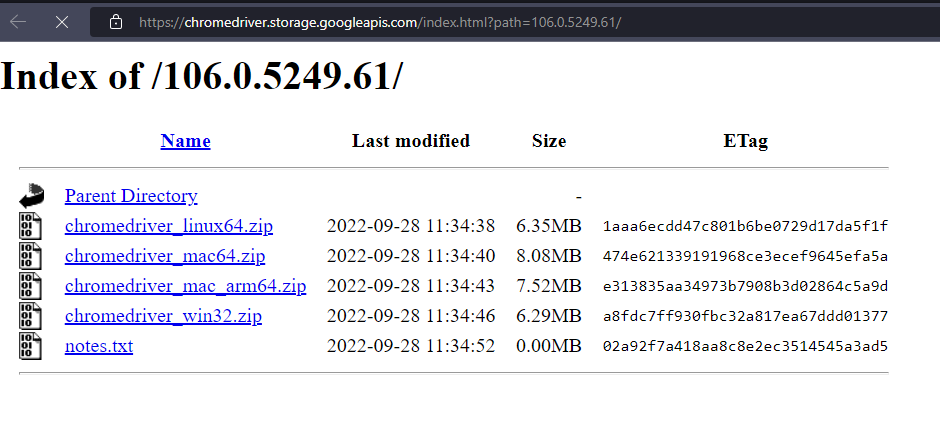
After downloading the executable, extract it to a convenient location. Add the location to your system’s PATH variable. Now you should be able to go to your terminal and execute chromedriver -v to see the current version displayed.
Obtaining the Java Bindings
As we’ve mentioned, there are Selenium bindings for the major programming languages you’d expect. If you count the unofficial ones, the list is even longer. In this post, we’ll use Java. I assume some familiarity with the language and the usage of Maven. But don’t worry: it shouldn’t be hard to adapt the examples to your language of choice.
So, the first thing you should do is to add the Java bindings for Selenium as a dependency to your pom.xml file:
<dependency>
    <groupId>org.seleniumhq.selenium</groupId>
    <artifactId>selenium-java</artifactId>
    <version>4.5.0</version>
</dependency>
As soon as the dependency is downloaded, you’re ready to continue. To test that the setup works fine, let’s create a silly automation that fires up Chrome, goes to google.com and searches for “testing is cool:”
This is what the complete code for that looks like:
package testim;
import org.openqa.selenium.By;
import org.openqa.selenium.WebDriver;
import org.openqa.selenium.WebElement;
import org.openqa.selenium.chrome.ChromeDriver;
import org.openqa.selenium.Keys;
public final class App {
    public static void main(String[] args) {
        WebDriver driver = new ChromeDriver();
        driver.get("https://google.com");
        WebElement searchField = driver.findElement(By.name("q"));
        searchField.sendKeys("testing is cool");
        searchField.sendKeys(Keys.RETURN);
    }
}
No rocket science, as you can see. The main method has only five lines.
- In the first line, you’ll create a new WebDriver object.
- Then, in the next line, you’ll use the driver to go to Google’s home page.
- In line #3, you’ll find an element by its name—more specifically, the search text field.
- The two last lines use the sendKeys method to write the search text to the field and then submit the search, respectively.
Uploading a File Using Selenium
Uploading a file using Selenium is quite easy, as you’ll see. As it turns out, the previous example already contains almost everything you’ll use in terms of Selenium features.
To test this feature, you’ll use the following demo website: https://tus.io/demo.html
This is what the page looks like:

So, how do you upload a file?
It’s just a matter of sending the path of the file you want to upload to the text of the file-select input field. Then, you just have to click the Begin Upload button.
By inspecting the elements on the page, you can find out that the button has the id js-file-input.
The code will be very simple. You’ll start by creating a new instance of the WebDriver class and using it to access the test page:
WebDriver driver = new ChromeDriver();
driver.get("https://tus.io/demo.html");
Then find the file input field respectively:
WebElement uploadname1 = driver.findElement(By.name(js-file-input));
After that, use the sendKeys method to send the path to the file you want to upload:
uploadname1.sendKeys("C:\example.pdf");
That’s all there’s to it. After executing the code, Chrome opens up and accesses the demo site, and the upload occurs successfully.

Downloading a File Using Selenium
While uploading a file using Selenium is easy—almost trivial—downloading files can be a little more tricky. The problem is that Selenium has no way of handling the download windows of the many different browsers.
If you Google around, you’ll see proposed solutions that use third-party tools for handling the download itself. Well, that’s not really downloading a file through Selenium, right?
There is one simple workaround, though. It involves changing Google Chrome’s settings to ensure the browser never asks the location to save downloaded files:
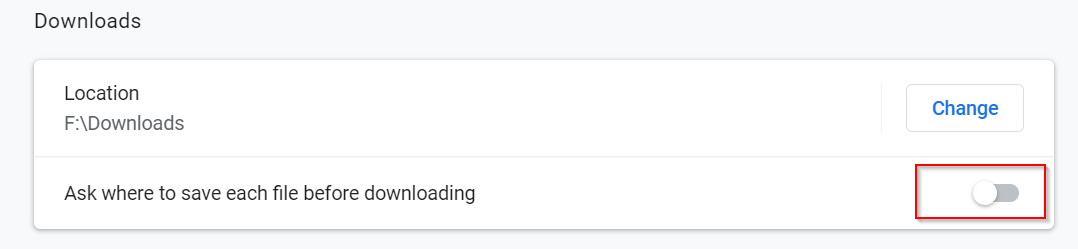
With that option switched off, Chrome will never ask where to save each file. Instead, it will always save each file to the default location. That way, Selenium won’t have to deal with the download window, making the process easier.
So, for this example, we’ll use yet another demo site: https://file-examples.com/index.php/sample-documents-download/sample-doc-download. This is where programmers, testers, and QA professionals can practice software testing. The page we linked to has a few .docx files you can download.
What you’re going to do, using Selenium, is to grab the first button and perform a click on it. Just that.
By now, you know the drill. The first step is instantiating the driver object and accessing the page:
WebDriver driver = new ChromeDriver();
driver.get("https://file-examples.com/index.php/sample-documents-download/sample-doc-download/");
Then, you need to find the button:
WebElement button = driver.findElements(By.linkText("DOWNLOAD SAMPLE DOC FILE")).get(0);
Here, you’re using the findElements method to get all elements with the link text “DOWNLOAD SAMPLE DOC FILE.” There are six buttons with that text on the page, but the one you want is the first one. The findElements method returns a list. Since you just want the first element, use the get method to grab the first item on that list.
Finally, click on the button:
button.click();
That’s it. With four lines of code, you can download files using Selenium.
Selenium Doesn’t Have to Be the Only Choice
Selenium WebDriver is a no-brainer when it comes to testing automation tools. However, Selenium is far away from being a silver bullet. It’s a tool, and like any other tool, it has its pros and cons.
In this post, we’ve covered how you can use Selenium to upload and download files. As you’ve seen, uploading files is super easy. Downloading files can be somewhat tricky, but it’s still doable.
However, the whole ordeal might have struck you as very bare bones. What if, in the process of testing a web application, you wanted to do more? For instance, let’s say you’re testing a workflow on a website that involves downloading a CSV file. It wouldn’t be too far-fetched to want to validate whether the download file has the expected number of rows and columns. That’s exactly the kind of action you can do with Testim’s download validation feature. Give Testim a try today.
Expand Your Test Coverage
What to read next
A Detailed Look at Selenium Pros and Cons
How Much Does Selenium Cost? The Short Answer and the Long One


")