


Web application testing is important for any business to maintain the quality of the website—it helps validate the various functionalities. As web applications and their use cases grow larger, the cost of manually testing for new feature functionality and regressions can spiral out of control. Automating common use cases is required to ensure test coverage while maintaining costs.
In manual testing, tests should be performed manually in every environment by testers who use different data sets, whereas in the case of automation testing, it’s done by a program. Automation testing is faster and needs less investment in human resources, and frequent execution of tests is possible.
Selenium is one such tool that automates the testing of web applications for functional and regression test cases. In Selenium, you can locate the elements, perform actions, record test cases, etc. Taking screenshots at each step of the test process provides a visual record of the use case that can help in troubleshooting when the test fails.
In this blog post, I’ll talk about a few cases where things get complicated while using Selenium. And then I’ll explain how using Testim will make it easier. First, for those of you who may not have much of an idea about why taking a screenshot is essential, I’ll explain.
Expand Your Test Coverage
Why Take Screenshots?
While executing the test cases, a tester will face a number of issues. For example, sometimes test cases fail because of a timeout exception or because finding an element on the web page was difficult. In such cases, it becomes very easy to analyze the issues with the help of screenshots rather than using hundreds of lines of code. Screenshots help you understand the bug location and what the bug is without having to go through raw logs. And it’s not just about knowing what failed and where. It’s also about knowing how your application behaved when things went wrong.
Also during cross-browser testing, to measure the performance of test cases on different browsers, screenshots help you visualize differences between test runs to identify the issues with ease. Hence it becomes essential to understand how to take a screenshot in Selenium.
How to Take a Screenshot in Selenium
You can take a screenshot in Selenium by instantiating the object of Selenium WebDriver. As Selenium supports multiple programming languages, I’ll explain how to take a screenshot in Selenium using Java and Python programming languages.
Java Code
To take a screenshot, you should use the TakesScreenshot method. This method notifies the Selenium WebDriver to capture the screenshot. WebDriver allows you to execute your tests against different browsers and enables you to use a programming language in creating your test scripts. To save the Selenium screenshot in the desired location, you can use the getScreenshotAs method.
Let’s write a code snippet to take a screenshot in Selenium.
import java.io.IOException;
import java.io.File;
import org.apache.commons.io.FileUtils;
import org.openqa.selenium.TakesScreenshot;
import org.openqa.selenium.WebDriver;
import org.openqa.selenium.chrome.ChromeDriver;

public class SeleniumScreen{
public static void main(String[] args) throws Exception {
//Specify the path to your chrome driver
System.setProperty("webdriver.chrome.driver", "Path_to_your_chrome_driver");
// Instantiate chrome driver object
WebDriver driver = new ChromeDriver();
// Navigate to the testim website
driver.get("https://www.testim.io/");
//Use TakesScreenshot method to capture screenshot
TakesScreenshot screenshot = (TakesScreenshot)driver;
//Saving the screenshot in desired location
File source = screenshot.getScreenshotAs(OutputType.FILE);
//Path to the location to save screenshot
FileUtils.copyFile(source, new File("./SeleniumScreenshots/Screen.png"));
System.out.println("Screenshot is captured");
driver.quit();
}
}
In the above Java code, I have imported a few packages to allow the desired capabilities for the program. The important thing here is to initialize the browser object. Therefore, I have created an object of Chrome driver. This object will control the actions of the browser. Then, I will use the TakesScreenshot method to capture the screenshot of the given website. When you execute the above code, WebDriver will take the screenshot and store it in the given location.
Now let me explain how the job of an automated tester is made easy with the help of Python programming language. The above functionality of taking a screenshot in Selenium is made easy with a few lines of code in Python.
Python Code
In the case of Python, all you need to do is write four lines as shown in the code snippet.
from selenium import webdriver
driver = webdriver.Chrome("D:\Selenium\chromedriver_win32\chromedriver.exe")
driver.get('https://www.testim.io/')
driver.save_screenshot("screenshot.png")
You can see it’s very simple to write a Python code to take a screenshot. When you execute the above code, the output will be stored in the file as shown in the below snapshot.

More Screenshot Features
Taking screenshots of the page is mainstream. For custom requirements, you need custom screenshots. Many advanced web applications have more sections and elements on a page. The above example takes a screenshot of the first scroll of the page. But you might want a screenshot of the complete page. Or you might want to take a screenshot only of a particular element or section of the page.
Selenium provides various features to take custom screenshots to cater to these needs. Selenium allows you to take screenshots of the entire page, certain elements of the page, current windows, etc. Here’s an example Python code that takes a screenshot of the entire page and a screenshot of a particular element in the page.
Screenshot of Entire Page
from selenium import webdriver
url = 'https://www.testim.io/'
driver = webdriver.Chrome("D:\chromedriver.exe")
options = webdriver.ChromeOptions()
original_size = driver.get_window_size()
driver.get(url)

#Find height of the page
height = driver.execute_script("return document.body.parentNode.scrollHeight")
driver.quit()
driver = webdriver.Chrome(options=options)

#Change height from default to entire height of the page and take screenshot
driver.set_window_size(original_size['width'], height)
driver.get(url)
driver.save_screenshot('Screenshot.png')

driver.quit()
The default height and width of the browser opened using a webdriver are usually around the value of the screen’s dimension. But the height of the web page can be more than that. The above code first opens the page and gets the dimensions of the entire page. Then updates the height of the browser with the height of the entire page. And finally, takes a screenshot of the entire page.
Screenshot of an Element
from selenium import webdriver
url = 'https://www.testim.io/'
driver = webdriver.Chrome("D:\chromedriver.exe")

driver.get(url)

#Screenshot of an element
elem = driver.find_element_by_class_name("btn-group")
elem.screenshot('Element.png')

driver.quit()
To take a screenshot of an element, you need to first find the element. The above code opens the webpage and finds the element whose class name is “btn-group“. Then takes a screenshot using the reference to that particular element. In this case, you get a screenshot of only the element you’ve chosen.

Screenshot on Failure
We use Selenium for testing. So, we’re happy when a test case passes. But we need to know more when a test case fails. So, instead of taking screenshots for every test case, we might want to take screenshots only when a test fails. You can implement this by combining selenium’s screenshot with exception handling.
The following python script is a simple example of this approach. The script opens a page and tries to find an element. If the element is found, then the test is passed. If the element is not found, then it takes a screenshot.
from selenium import webdriver
url = 'https://www.testim.io/'
driver = webdriver.Chrome("D:\chromedriver.exe")
driver.get(url)

try:
    elem = driver.find_element_by_class_name("dummy-name")
    print("Test passed")
except:
    driver.save_screenshot('Element.png')

driver.quit()
Now you know how to take a screenshot in Selenium using code snippets in different programming languages. How would it be if you performed web application testing or took a screenshot without a single line of code? It would actually reduce the time and effort to write the code.
Now let me show you how Testim takes the screenshot and makes testing easy. But before that, let me give you a brief insight into Testim.
What Is Testim?
Testim is a test automation solution that uses artificial intelligence for testing. It lets you build test cases and evaluate the application without writing tests in code. You also have an option to write code for custom testing.
Now let me show you an example of how Testim makes web application testing easy.
Testim for Testing
First, you have to set up your account to use Testim. You will find step-by-step instructions on how to do it here.
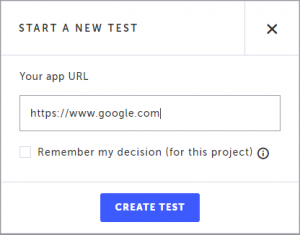
Once you complete the sign-up process and log in to the page, you will be navigated to the homepage of the tool. Create a new test by clicking on the CREATE TEST button. Then click on the record button to start recording the test. You then have to enter the URL of your application.
I’m going to test the Google search page, so I’m entering Google’s homepage URL and then I will click on CREATE TEST.
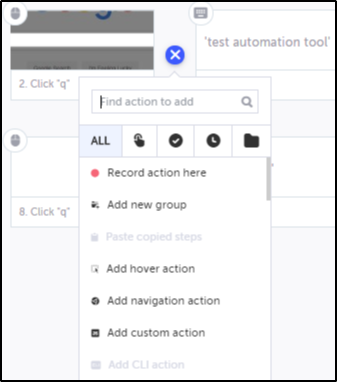
This will open another Chrome browser to record your actions. You can perform your own tasks manually to test the application. Once you complete the tasks on the web page, close the window. Now you can go back to the Testim window to see the list of actions that you’ve performed on the testing website.
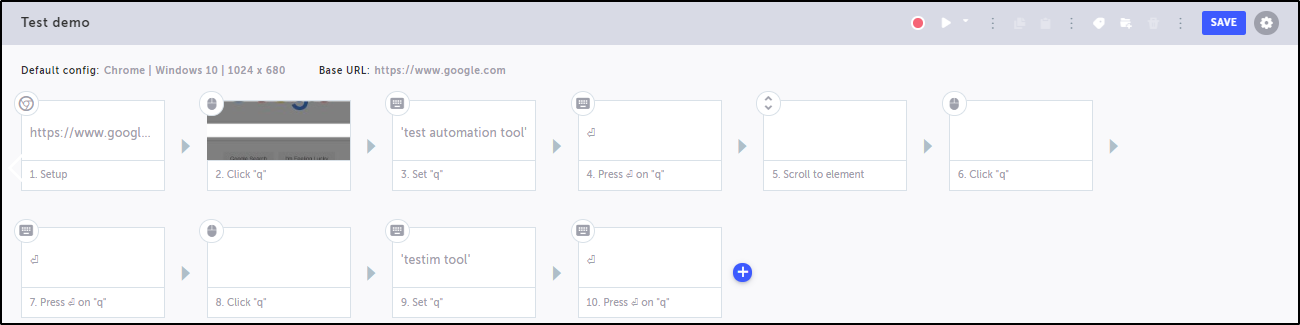
You can see the various steps in the snapshot. These steps include opening a browser and searching for “test automation tool” and “Testim tool” in the search engine. Then when you refer to the search result, the tool clicks on a website. The whole test that I have created includes actions such as finding elements, maximizing the browser, scrolling the page, and selecting a customized drop-down.
How to Take a Screenshot in Testim
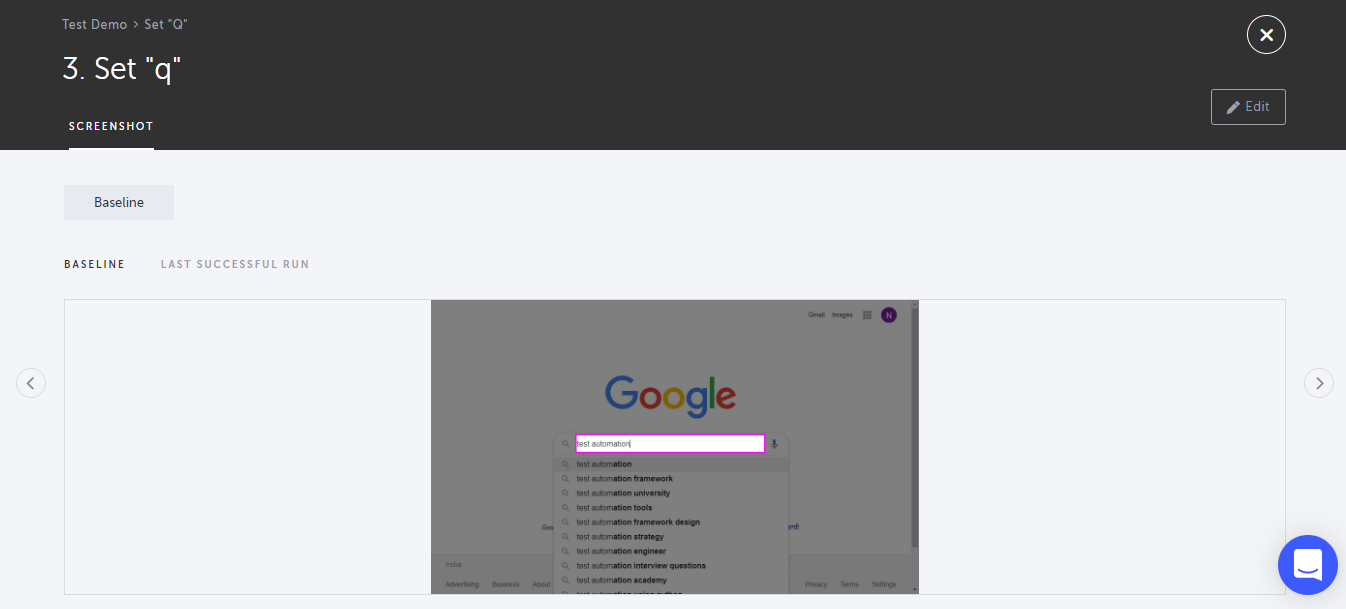
Testim automatically records the screenshots of every step that you took in your recorded flow. All you have to do is click on the test step to view the screenshot.
I didn’t even have to write a single line of code for this.
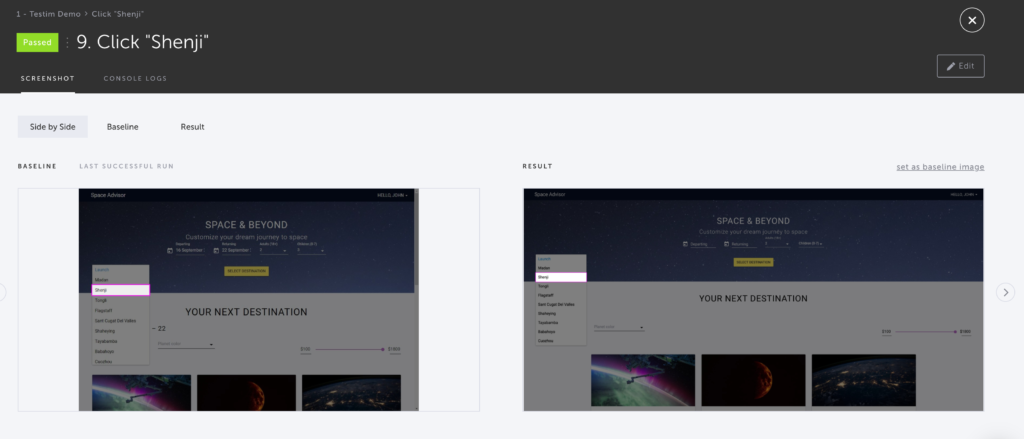
Here’s another example where you can see the original baseline test compared to the last successful run. This allows you to quickly page through the screenshots and see where it deviated from the test.
But each test step does much more than simply show screenshots. They can be configured to add additional actions like validations, conditions, or loops. Each test step can even be customized by inserting an action in JavaScript. It is truly a powerful tool.
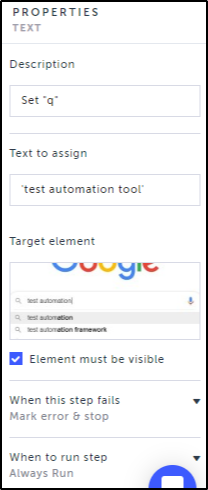
Also, you can view the properties for each test step. Properties provide insights into how that test step is handled by Testim’s AI-based engine. For instance, it might require that the element be visible in order to be selected. You could add additional waits for this step, specify the action to take if something isn’t correct, and view the Smart Locator attributes that indicate how the element is located when something has changed.
All of this information is automatically captured by simply recording a user flow (test case) and navigating through the UI of your web application. You don’t have to write a single line of code, but if that’s your preference, you can also write Testim tests in code. That’s how Testim makes it easy and fits the user. Testim offers many more features to ease the creation and reduce maintenance of end-to-end tests. Be sure to check out some of the other blogs on related topics like: Selenium element not clickable at point, How to find an element by text in Selenium, and Selenium Grid testing.
What Next?
Now that you know a bit about how the Testim works for automation testing, what’s next is that you can try it out and see how the tool can help you. You can check out the Testim tool here. Testim also gives you a 14-day trial to experiment with and learn the tool. And if you get stuck somewhere, you have a lot of resources and documentation to help you out. I hope you’ll enjoy your testing with Testim.


")