


Jest testing: A complete tutorial
When it comes to unit testing frameworks for JavaScript, Jest is certainly a serious contender for the #1 spot.
Initially, Jest was created by Facebook specifically for testing React applications. It’s one of the most popular ways of testing React components. Since its introduction, the tool has gained a lot of popularity. This popularity has led to the use of Jest for testing both JavaScript front-end and back-end applications.
In this article, we’ll talk about the ins and outs of Jest to help you get started with testing. Before we get there, though, we’ll offer you a refresher on unit testing and its importance for software quality.
After that, we’ll start covering Jest specifically, explaining:
- its definition
- what are its main advantages
- and some of its most important characteristics
We’ll walk you through a 100% hands-on tutorial on how to get started with Jest. You’ll learn more about the vocabulary associated with Jest testing, like mocks and spies. Also, we’ll cover some of the basics of Jest testing, like using describe blocks and the keywords it and expect. Finally, we’ll take a look at snapshot testing and why it’s particularly useful for front-end testing. Plus, we’ll dive into testing asynchronous code, integrating jest with CI/CD, and troubleshooting common issues. Let’s get started!
Let’s get started!

The what and why of unit testing
What Is unit testing?
The topic of software testing can often feel overwhelming. There are just too many types of testing, each operating on a different layer, verifying distinct aspects of the application and offering its unique type of feedback.
Among the myriad types of automated testing, unit testing is often cited as the most important one—see: test automation pyramid. Unit tests verify the smallest parts of your application in complete isolation, ensuring they work as expected. In unit testing, you aren’t allowed to interact with external dependencies—e.g. make an HTTP call—nor generate any kind of side-effect.
Why unit testing matters
As a result of those properties, unit tests are usually:
- very fast to execute
- relatively easy to setup, not requiring any elaborate configuration
- very precise in the feedback they provide
Unit testing vs. other tests
In the scale of automated tests, unit tests sit at the extreme opposite of end-to-end testing. The latter provide less-precise feedback, are generally slower, more fragile, though more realistic. The former are super precise in their feedback, are fast, and typically only fail due to the errors in the code.
However, they are in less realistic, because in real life users don’t interact with units in complete isolation.
To sum it up: unit tests are far from being the only type of tests your application needs, but they should represent a significant portion of your testing strategy.
What is Jest?
Jest is a popular test framework for JavaScript. It claims to provide “delightful JavaScript testing” and, after our tutorial, I bet you might agree with this claim! Jest prides itself in offering a complete and hassle-free experience.
The completeness comes from the fact that Jest doesn’t rely on third-party tools for much of its functionality, like some competitors do. And the hassle-free part is due to Jest’s zero configuration setup. You can install it and start writing your first test in no time.
Jest’s popularity and scope
As mentioned in the introduction, Jest has gained a lot of popularity over recent years for both front-end and back-end testing. Many large companies—including Twitter, Instagram, Pinterest, and Airbnb—use Jest for React testing.
Jest itself is actually not a library but a framework. There’s even a CLI tool that you can use from the command line. To give an example, the CLI tool allows you to run only specific tests that match a pattern. Besides that, it hosts much more functionality, which you can find in the CLI documentation.
In summary, this means that Jest offers a test runner, assertion library, CLI tool, and great support for different mocking techniques. All of this makes it a framework and not just a library.
Let’s take a quick look at the advantages of Jest.
Advantages of Jest
Here’s a shortlist of Jest advantages.
- Offers a CLI tool to control your tests easily
- Comes with an interactive mode that automatically runs all affected tests for the code changes you’ve made in your last commit
- Provides syntax to test a single test or skip tests with
.onlyand.skip. This feature is useful when debugging individual tests - Provides excellent documentation with plenty of examples and a supportive community. You can join the Jest community via Discord or ask questions on Stack Overflow
- Brings easy mocking to developers as it’s one of the most painful things to do for testing engineers. We explain further in this post how Jest mocking works
- Jest offers code coverage out of the box through its CLI—just use the –coverage option or the collectCoverage property in the Jest configuration file.
Jest characteristics
From Jest’s website, we can find four main characteristics of Jest:
- Zero config: “Jest aims to work out of the box, config free, on most JavaScript projects.” This means you can simply install Jest as a dependency for your project, and with no or minimal adjustments, you can start writing your first test.
- Isolated: Isolation is a very important property when running tests. It ensures that different tests don’t influence each other’s results. For Jest, tests are executed in parallel, each running in their own process. This means they can’t interfere with other tests, and Jest acts as the orchestrator that collects the results from all the test processes.
- Snapshots: Snapshots are a key feature for front-end testing because they allow you to verify the integrity of large objects. This means you don’t have to write large tests full of assertions to check if every property is present on an object and has the right type. You can simply create a snapshot and Jest will do the magic. Later, we’ll discuss in detail how snapshot testing works.
- Rich API: Jest is known for having a rich API offering a lot of specific assertion types for very specific needs. Besides that, its great documentation should help you get started quickly.
Before we dive a bit further into the Jest vocabulary, let’s show you how you can get started with this tool in practice.
Jest is known for having a rich API offering a lot of specific assertion types for very specific needs.
Get started with Jest: A practical, hands-on tutorial in 5 steps
We’ll now walk you through our five step tutorial on how to get started with testing using Jest.
1. Install Jest globally
The first step will be to install Jest globally. That way, you gain access to Jest’s CLI. Make sure you have Node.js installed, because you’ll use npm.
Go to your terminal and run the following command:
npm install -g jest
Once the installation is complete, execute jest –version to see the version installed.
2. Create a sample project
Firstly, you will create a npm-based project to house our production code and test code.
Start by creating a folder and accessing it:
mkdir learning-jest
cd learning-jest
Then, run npm init -y to create a project. As a result, you should have a package.json file inside your folder, with this content:
{
"name": "learning-jest",
"version": "1.0.0",
"description": "",
"main": "index.js",
"scripts": {
"test": "echo \"Error: no test specified\" && exit 1"
},
"keywords": [],
"author": "",
"license": "ISC",
"type": "commonjs"
}
Now, create a file called index.js and paste the following content on it:
function fizz_buzz(numbers) {
    let result = []

    for (number of numbers) {
        if (number % 15 === 0) {
            result.push('fizzbuzz')
        } else if (number % 3 === 0) {
            result.push('fizz')
        } else if (number % 5 === 0) {
            result.push('buzz')
        } else {
            result.push(number)
        }
    }

    return result.join(', ')
}

module.exports = fizz_buzz;
The code above contains a function that solves the famous FizzBuzz programming interview question.
3. Add Jest to the project
You’ll now add Jest as a dev dependency to the project. Run the following command:
npm install --save-dev jest
Then, go to your package.json file and change this part:
"scripts": {
    "test": "echo \"Error: no test specified\" && exit 1"
  },
To this:
"scripts": {
    "test": "jest"
  },
4. Write your first test
Now, create a new file called index.test.js. Paste the following content on it:
const fizz_buzz = require('./index');

describe("FizzBuzz", () => {
    test('[3] should result in "fizz"', () => {
      expect(fizz_buzz([3])).toBe('fizz');
    });

    test('[5] should result in "buzz"', () => {
      expect(fizz_buzz([5])).toBe('buzz');
    });

    test('[15] should result in "fizzbuzz"', () => {
      expect(fizz_buzz([15])).toBe('fizzbuzz');
    });

    test('[1,2,3] should result in "1, 2, fizz"', () => {
      expect(fizz_buzz([3])).toBe('fizz');
    });

});
We’ll explain Jest’s syntax in more detail later. For now, understand we’re verifying that:
- passing an array containing 3 should result in “fizz”
- an array containing 5 should result in “buzz”
- an array containing 15 should result in “fizzbuzz”
- passing an array with 1, 2, and 3 should result in “1, 2, fizz”
5. Run your first test
You’re now ready to run your first test. Back to your terminal, simply run npm test. You should see a result like the following:
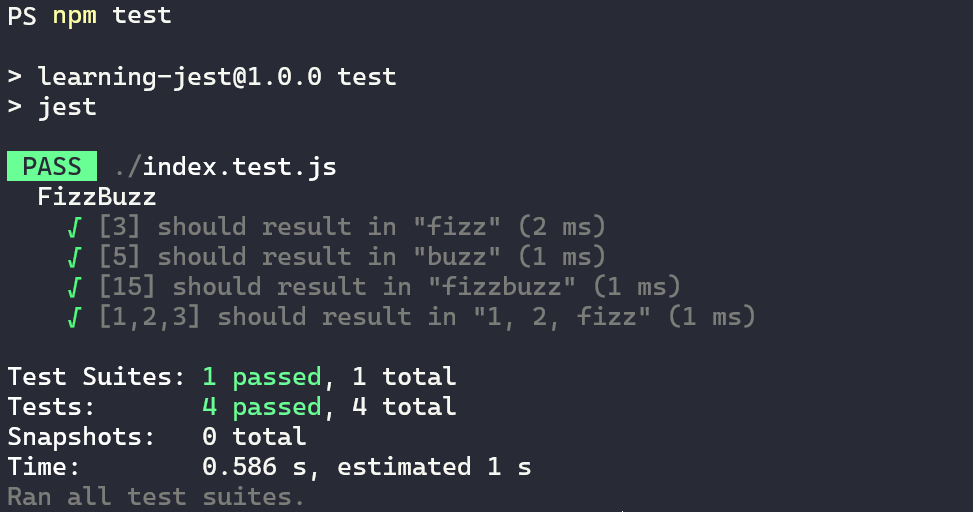
As you can see, all four tests passed. All test suites were executed—which makes sense, since we only have one. The total time for execution was 0.616 seconds.
Now that you had a test of Jest, let’s take a step back and understand, in more detail, its syntax and vocabulary.
Jest vocabulary
Let’s take a look at two of the most commonly used Jest terms that are also used in other testing tools: mock and spy.
Jest vocabulary: Mock
From the Jest documentation, we can find the following description for a Jest mock: “Mock functions make it easy to test the links between code by erasing the actual implementation of a function, capturing calls to the function (and the parameters passed in those calls).”
In addition, we can use a mock to return whatever we want it to return. This is very useful to test all the paths in our logic because we can control if a function returns a correct value, wrong value, or even throws an error.
In short, a mock can be created by assigning the following snippet of code to a function or dependency:
jest.fn()
Here’s an example of a simple mock, where we just check whether a mock has been called. We mock mockFn and call it. Thereafter, we check if the mock has been called:
const mockFn = jest.fn();
mockFn();
expect(mockFn).toHaveBeenCalled();
The following example also mocks a return value for checking specific business logic. We mock the returnsTrue function and let it return false:
const returnsTrue = jest.fn(() => false);
console.log(returnsTrue()); // false;
Next up, let’s explore what a spy is.
Jest vocabulary: Spy
A spy has a slightly different behavior but is still comparable with a mock. Again, from the official docs, we read, “Creates a mock function similar to jest.fn() but also tracks calls to object[methodName]. Returns a Jest mock function.”
What this means is that the function acts as it normally would—however, all calls are being tracked. This allows you to verify if a function has been called the right number of times and held the right input parameters.
Below, you’ll find an example where we want to check if the play method of a video returns the correct result but also gets called with the right parameters. We spy on the play method of the video object.
Next, we call the play method and check if the spy has been called and if the returned result is correct. Pretty straightforward! In the end, we must call the mockRestore method to reset a mock to its original implementation.
const video = require('./video');

test('plays video', () => {
const spy = jest.spyOn(video, 'play');
const isPlaying = video.play();

expect(spy).toHaveBeenCalled();
expect(isPlaying).toBe(true);

spy.mockRestore();
});
OK, now that we know about the two most used technical terms, let’s explore the basic structure.
Jest basics
Let’s take a look at some basics on writing tests with Jest.
Jest basics: Describe blocks
A describe block is used for organizing test cases in logical groups of tests. For example, we want to group all the tests for a specific class. We can further nest new describe blocks in an existing describe block.
To continue with the example, you can add a describe block that encapsulates all the tests for a specific function of this class.
Jest basics: “It” or “Test” tests
Furthermore, we use the test keyword to start a new test case definition. The it keyword is an alias for the test keyword. Personally, I like to use it, which allows for more natural language flow of writing tests. To give an example:
describe('Beverage()', () => {
   it('should be delicious', () => {
      expect(myBeverage.delicious).toBeTruthy();
   });
});
Jest basics: Matchers
Next, let’s look at the matchers Jest exposes. A matcher is used for creating assertions in combination with the expect keyword. We want to compare the output of our test with a value we expect the function to return.
Again, let’s look at a simple example where we want to check if an instance of a class is the correct class we expect. We place the test value in the expect keyword and call the exposed matcher function toBeInstanceOf(<class>) to compare the values. The test results in the following code:
it('should be instance of Car', () => {
   expect(newTruck()).toBeInstanceOf(Car);
});
The complete list of exposed matchers can be found in the Jest API reference.
Jest basics: Setup and teardown
It’s important we understand how to prepare and clean up a test. For example, a particular test relies on a mocked database. We don’t want to call a function to set up and clean up the mocked database for each test.
To solve this problem, we can use the beforeEach and afterEach functions to avoid code duplication. Both functions allow you to execute logic before or after each test.
Here’s an example of mocking a database before each test and tear it down when each test has finished.
describe('tests with database', () => {

  beforeEach(() => {
    initDB()
  })

  afterEach(() => {
    removeDB()
  })

  test('if country exists in database', () => {
    expect(isValidCountry('Belgium')).toBe(true)
  })

})
Moreover, you can also make use of beforeAll and afterAll functions. Both functions will run before or after all tests, but only once. You can use these functions to create a new database connection object and destroy it when you’ve completed the tests.
beforeAll(() => {
  return createDBConnection()
})

afterAll(() => {
  return destroyDBConnection()
})
Lastly, let’s take a look at snapshot testing.
Jest Basics: Snapshot testing for React front ends
At last, the Jest documentation suggests using snapshot tests to detect UI changes. As I mentioned earlier, snapshot testing can also be applied for checking larger objects, or even the JSON response for API endpoints.
Let’s take a look at an example for React where we simply want to create a snapshot for a link object. The snapshot itself will be stored with the tests and should be committed alongside code changes.
it('renders correctly', () => {
   const tree = renderer
      .create(<Link page="http://www.facebook.com">Facebook</Link>)
      .toJSON();
   expect(tree).toMatchSnapshot();
});
Following, the above code renders the following snapshot:
exports[`renders correctly 1`] = `
<a
  className="normal"
  href="http://www.facebook.com"
  onMouseEnter={[Function]}
  onMouseLeave={[Function]}
>
  Facebook
</a>
`;
If the link object changes, this test will fail in the future. If the changes to the UI elements are correct, you should update the snapshots by storing the results in the snapshot file. You can automatically update snapshots using the Jest CLI tool by adding a “-u” flag when executing the tests.
Testing asynchronous code in Jest
When testing asynchronous code, it’s important to ensure that our test waits for the operation to complete before making assertions. Jest provides built-in support for handling asynchronous functions, allowing us to properly test scenarios where a function relies on fetching data or handling errors.
Let’s walk through an example that demonstrates how to test an asynchronous function using Jest’s mocking capabilities.
Jest provides built-in support for handling asynchronous functions, allowing us to properly test scenarios where a function relies scenarios where a function relies on fetching data or handling errors.
Let’s consider a function under test is fetchUser, which makes a network request to retrieve user data:
function fetchUser() {
return fetch('https://api.example.com/user')
.then(response => response.json());
}
Since this function depends on fetch, we need to mock it in our tests to control its behavior. So before running any tests, we set up Jest’s lifecycle hooks to ensure fetch is mocked and reset before each test:
describe('Async Tests', () => {
beforeEach(() => {
global.fetch = jest.fn();
});

afterEach(() => {
jest.resetAllMocks();
});
This ensures that every test starts with a fresh mock and that previous mock implementations do not interfere with other tests.
In the first test, we simulate a successful API call by making fetch return a resolved promise with user data:
test('fetchUser retrieves user data', async () => {
global.fetch.mockResolvedValue({
json: () => Promise.resolve({ name: 'Alice' })
});

const user = await fetchUser();
expect(user.name).toBe('Alice');
});
Here, mockResolvedValue() is used to make fetch return a mocked response where json() resolves to { name: ‘Alice’ }. The test then awaits the result of fetchUser() and verifies that the returned user object contains the expected name.
This is the entire code:
// async.test.js
function fetchUser() {
return fetch('https://api.example.com/user')
.then(response => response.json());
}

describe('Async Tests', () => {
// Mock fetch globally
beforeEach(() => {
global.fetch = jest.fn();
});

afterEach(() => {
jest.resetAllMocks();
});

test('fetchUser retrieves user data', async () => {
global.fetch.mockResolvedValue({
json: () => Promise.resolve({ name: 'Alice' })
});
const user = await fetchUser();
expect(user.name).toBe('Alice');
});

test('fetchUser handles fetch errors', async () => {
global.fetch.mockRejectedValue('Network error');
await expect(fetchUser()).rejects.toBe('Network error');
});
});
We can call this script above asyn.test.js and save it in a new project. Then we hit the command npm test to get the result shown below:

We can see from the results that both tests pass, showing Jest handles async success and failure. The times may vary slightly.
Running Jest tests in CI/CD
Integrating Jest into a CI/CD pipeline ensures your tests run automatically on every code change, catching issues early. Here’s a GitHub Actions workflow to run Jest tests:
name: Jest Tests # Defines the name of the workflow
on: [push] # Runs the workflow on every push event to any branch
jobs:
test: # Defines a job named “test”
runs-on: ubuntu-latest # Specifies that the job runs on the latest Ubuntu environment
steps: # Defines the steps to execute in the job
– uses: actions/checkout@v3 # Step 1: Checks out the repository so the workflow can access the code
– uses: actions/setup-node@v3 # Step 2: Sets up Node.js in the runner
with: { node-version: ’18’ } # Specifies that Node.js version 18 should be used
– run: npm install # Step 3: Installs project dependencies from package.json
– run: npm test — –ci –coverage # Step 4: Runs Jest tests in CI mode and generates a coverage report
The –ci flag flag optimizes Jest for CI environments, and –coverage generates a report. For other tools like CircleCI, adapt the config:
version: 2.1 # Specifies that this configuration uses CircleCI 2.1 syntax
jobs:
test: # Defines a job named “test”
docker: # Specifies that the job runs inside a Docker container
– image: node:18 # Uses the official Node.js 18 Docker image
steps: # Defines the sequence of steps to execute in the job
– checkout # Step 1: Checks out the repository code into the container
– run: npm ci # Step 2: Installs project dependencies in a clean and reproducible way
– run: npm test — –coverage # Step 3: Runs Jest tests and generates a coverage report
This CircleCI configuration sets up a Node.js 18 environment inside a Docker container, checks out the repository, installs dependencies using npm ci, and runs Jest tests with coverage reporting.
Common issues and troubleshooting in Jest testing
Typical Problems
- Timeouts: If tests are timing out, increasing the timeout using jest.setTimeout(10000) (or another appropriate value) can help. However, it’s often better to optimize async code instead of just extending timeouts.
- Mocking Errors: Ensuring mocks are set before tests run is crucial. Using jest.mock() at the top of a test file or within a beforeEach setup helps prevent unexpected behavior.
- Snapshot Failures: If snapshot tests fail due to intentional UI or component changes, running jest -u updates the snapshots. If the failure is unexpected, debugging is needed.
- Module Not Found: This error usually results from incorrect import paths or module resolution issues. Adjusting moduleNameMapper in jest.config.js can help alias paths correctly.
Launch your Jest testing adventure
Finally, we’ve covered all the basic elements for you to get started with Jest testing. When you’re writing your first test cases, it can feel a bit uncomfortable writing mocks. However, mocks are especially useful in unit testing because they allow you to test the business logic of your function without worrying about its dependencies.
If you want to learn more about Jest testing, I suggest reading this guide on unit testing with Jest. I also want to refer you to the Jest cheat sheet. Now go forward and begin with Jest testing!
This post was written by Michiel Mulders. Michiel is a passionate blockchain developer who loves writing technical content. Besides that, he loves learning about marketing, UX psychology, and entrepreneurship. When he’s not writing, he’s probably enjoying a Belgian beer!


