


According to Wikipedia, “Regression testing is rerunning functional and non-functional tests to ensure that previously developed, and tested software still performs after a change.”
Whether you’re dealing with the agile, waterfall, scrum, or another software development methodology, automating regression testing plays a key role in building quality code.
In this post, you’ll learn web application regression testing basics and how to get started. You’ll also see an example of web app regression testing using Testim.
What Makes Regression Testing on Web Apps Unique?
Your users expect a consistent experience from application version to version, regardless of what operating system or browser accesses it. They also expect that once a feature works, it will always work. Regression testing ensures that new code added to the application doesn’t mess up existing features or functions and that it continues to work on different platforms. A good way to think of regression testing is to put yourself in the position of the end-user. If you were to try the application before and after a change, what would be your experience?
For example, user requirements might include:
- The application has a consistent visual style throughout
- App functionality works as anticipated.
- The Application works on different platforms and browsers.
- Invalid input isn’t accepted.
Implementing these requirements calls for an extensive testing approach. As you can imagine, ensuring that no regressions occur across your entire application involves a lot of testing—too much to manually check on every code change.
To start, you will need a core set of end-to-end tests to ensure your most business-critical user flows are covered. Over time, you will want to add new tests to capture the application functionality that has been added to the program. A good way of creating your regression suite is to add your new functional tests to a regression suite that builds over time.
To illustrate, assume that you are building a retail shopping application. When you add features to enhance the “add to cart” module, you should create functional tests to go along with them. Those functional tests are then added to the regression suite. This way, when you release new features in other areas, such as a better search feature, the regression suite will automatically catch any functional issues in the “the add-to-cart” module.
Getting Started With Automated Regression Testing
This section will get you familiar with regression testing concepts using a simple four-step process:
- Choose a testing approach.
- Create a checklist.
- Choose your tools.
- Automate.
1. Choose a Testing Approach
In the first stage of testing, decide how you will perform the testing.
When doing so, ask yourself these questions:
- What functionalities does the user use the most? A risk-based model is a great way to get started by focusing on the highest impact areas first.
- What are my priorities? Start with what’s most important to your application and business while considering your time constraints.
- How often do we change the code? Frequent changes increase risk and require more testing. Stable code might not need as much testing.
- Are there unique characteristics of our application and the environment it runs that should be considered?
2. Create a Checklist
Create a checklist to capture the key objectives of the testing. The questions you include on the checklist determine the area to test and the depth of testing.
For example, your checklist might look like this:
- Does the new functionality perform correctly?
- Does the new functionality affect the application unexpectedly?
- Is the new attribute missing?
- Does the application work on all (relevant) platforms?
- Is the application performance as expected?
- Are known bugs present?
You should add all the features the user is consuming to your checklist. A simple step-by-step list of the user’s navigating actions like “login to > navigate to > open a…” can be your starting point.
3. Choose Your Tools
Choosing the wrong tool can lead you down a path of inefficiency. Companies often select one tool and, within a few months, start to notice the tool’s limitations yet feel locked into it due to sunk costs (e.g., licensing, training, integrations). Yet they power on, getting more invested and wasting more time. Switching to another tool can be time-consuming and emotionally draining. Luckily, there are useful tools out there that are widely used for web app testing, and they have an excellent reputation and a big community.
All tools have their pros and cons, so explore them and see what will best suit your testing needs. Match the tools and their capabilities against your testing needs established in 1 and 2 above. Of course, we hope you will try Testim. 😉
4. Automate
Once you have a clear vision of how you will approach testing your app, what functionalities you will be testing, and how you will build your tests, it’s time to automate.
Automating regression testing will massively improve the quality of your code. Scheduling the regression testing daily can uncover various anomalies and help you understand how your application performs. Its primary execution time is after any code change; however, regression testing daily will strengthen your practical understanding of the application’s behavior to build quality software.
Example of Automated Regression Testing
Let’s say you are building a web application. You want to ensure that your tests properly ascertain the functional quality of the features. Later, when you introduce changes and rerun the tests, you want to capture the behavior that deviates from your expectations.
In this simple example, we use Express.js. The first version of your application uses the write method with the res object. The write method can send multiple data during the session, and to end the response, you have to call the end method on the res object.
Below is the code for the web app with the res.write object and method:
var express = require('express');
var app = express();
app.get('/', function (req, res) {

  res.setHeader('Content-Type', 'text/html');
  for (var i=1; i <= 2; i++) {
    res.write('<p attr'+ i +'=Response'+ i +'>Return: '+ i +'</p>');
  }
  res.end();
});
var server=app.listen(80);
Let’s assume that someone introduces a change to the application. You will want to ensure that the changes don’t break expected behavior.
In this example, we will rewrite the application and introduce a bug using the send method on the res object. The send method will send the data and end the response. The res method isn’t usually used to send any data, but this example will show a typical coding bug.
Below is the code for the web app with the res.send object and method:
var express = require('express');
var app = express();
app.get('/', function (req, res) {

  res.setHeader('Content-Type', 'text/html');
  for (var i=1; i <= 2; i++) {
    res.send('<p attr'+ i +'=Response'+ i +'>Return: '+ i +'</p>');
  }
});
var server=app.listen(80);
As you can see, the only difference in the code is res.write() vs. res.send() type of response, but they act very differently. The write method sends all the data generated by the for loop. On the other hand, the send method sends only the first response generated by the for loop and immediately ends the response.
Therefore, the client was served with the first response, but the second response was not delivered to the client because it closed the session. In this example, the result is that the first version of our web app returned two responses. The second version returned only one.
How to Test Your Web App With Testim
The steps to do a regression test on this web app are pretty simple. After creating your new test, you add up your base URL to set up the property, which is the server you are testing. Here, you can modify the browser parameters like the resolution of the new tab. You can modify the timeout of opening the browser, time delay after every step or select predefined configuration options. After creating the first property, you can start with creating validations, conditions, or actions to be a part of the test.
- Go to the address and port that the server is listening on.
- Testim runs as a browser extension so that you can run the test on the local server.
- Match HTML attribute attr1 generated on the server response and check its expected value, Value1.
- Testim can match attributes and elements
- Match HTML attribute attr2 generated on the server response and check its expected value, Value2.
- Schedule the test.
- Tests can be scheduled, cloned, labeled, and added to suites.
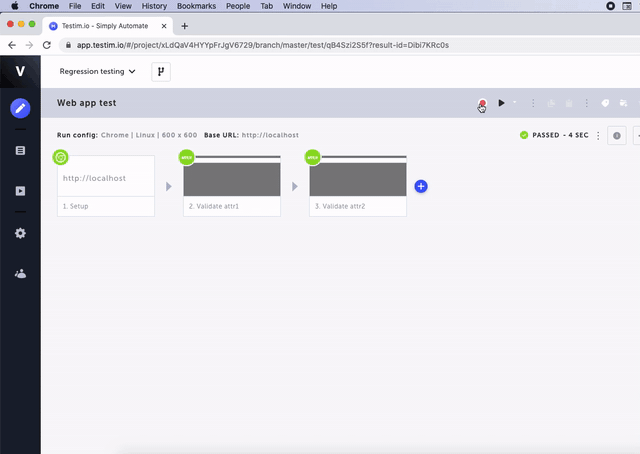
Running the test for the first version of the application looks like this:
Running the test for the second version of the web app looks like this:
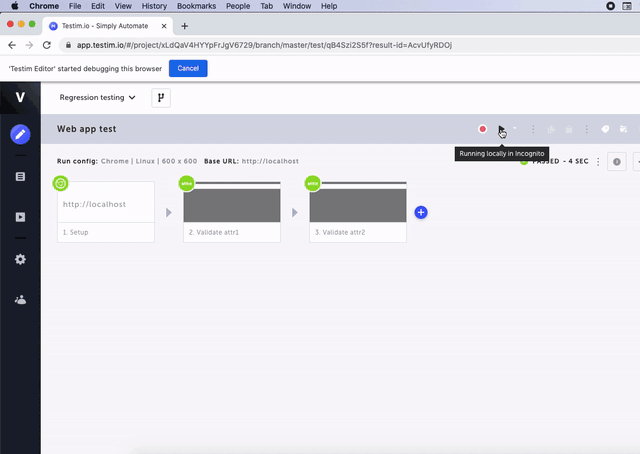
As a result, the second test is failing because of the missing attr2 HTML attribute.
Automate Regression Testing to Take Quality to the Next Level
Automated regression testing is one of the most powerful ways of ensuring the ongoing quality of your software. The goal is to detect if the application is behaving as expected when new changes are introduced. Regression testing includes tests from all previous application versions and indicates when a new code change impacts existing features.
Testim provides a compelling and quick way of creating tests that can serve as a functional regression suite. You can use Testim to create end-to-end critical-path user flows that are tested on a scheduled basis. As you build more functionality into your application, you can test it using Testim and then add those tests to your regression suite to ensure ongoing quality.


