tl;dr
Testim is launching Root Cause, a new open source software project to capture screenshots, console logs, and network logs to help troubleshoot Puppeteer and Playwright tests. The project is hosted on GitHub and maintained by Testim.
Testim is also launching the Testim Root Cause cloud service, a SaaS-based offering using the Root Cloud code to store and share your Puppeteer and Playwright test results online for better collaboration.
Testim’s AI-based test automation platform known for fast authoring of stable UI tests is now named Testim Automate.
Let’s reset
Do you use the Puppeteer or Playwright framework to write browser tests?
Do you hate troubleshooting tests when they fail?
If you are like most developers I know, you’d probably prefer to be writing code to solve a problem over debugging a failed test.
Testim is making root cause analysis easier, and you don’t have to switch frameworks.
Introducing Root Cause
Testim has long delivered robust root cause analysis capabilities in our flagship product, now named Testim Automate. These capabilities, including highlighted screenshots for each step, parsed console logs, and network HAR files, form the basis of Root Cause.
Root Cause is an open source project hosted on GitHub and maintained by Testim. Developers can download, modify, and use in their environment for free. They can submit enhancement ideas through issues or contribute code for the benefit of the community.
Realizing many organizations may not want to stand up their own Root Cause shared service, we are launching Testim Root Cause, to store Puppeteer or Playwright test results in the cloud for broader team access and to aid collaboration when troubleshooting. This service offers a substantial free tier as well as paid tiers for higher capacity.
Diagnosing failed tests
Failed tests arise from numerous issues, including poor design, a network outage, a server issue, or an application bug. Without adequately diagnosing the problem, you risk releasing code that can damage your brand, lower customer satisfaction, or cause a missed sale.
Though necessary, troubleshooting failed UI tests can be difficult and time-consuming. First, you need to determine where the test failed. Did it select the wrong visual element? Did it fail to find the button to “click”? Did it timeout because of a network issue?
You may need to sift through console logs or download and inspect the network file (HAR). Each task takes time and may or may not lead to the source.
The power of visualization
I’m not talking about some mental exercise to envision the future you seek. I’m talking about seeing what the test did with your own eyes. What elements were selected? Did the application respond to those actions correctly? You can often see very clearly what happened; a popup prevented the correct element selection, or the page hadn’t fully rendered, selecting the wrong button.
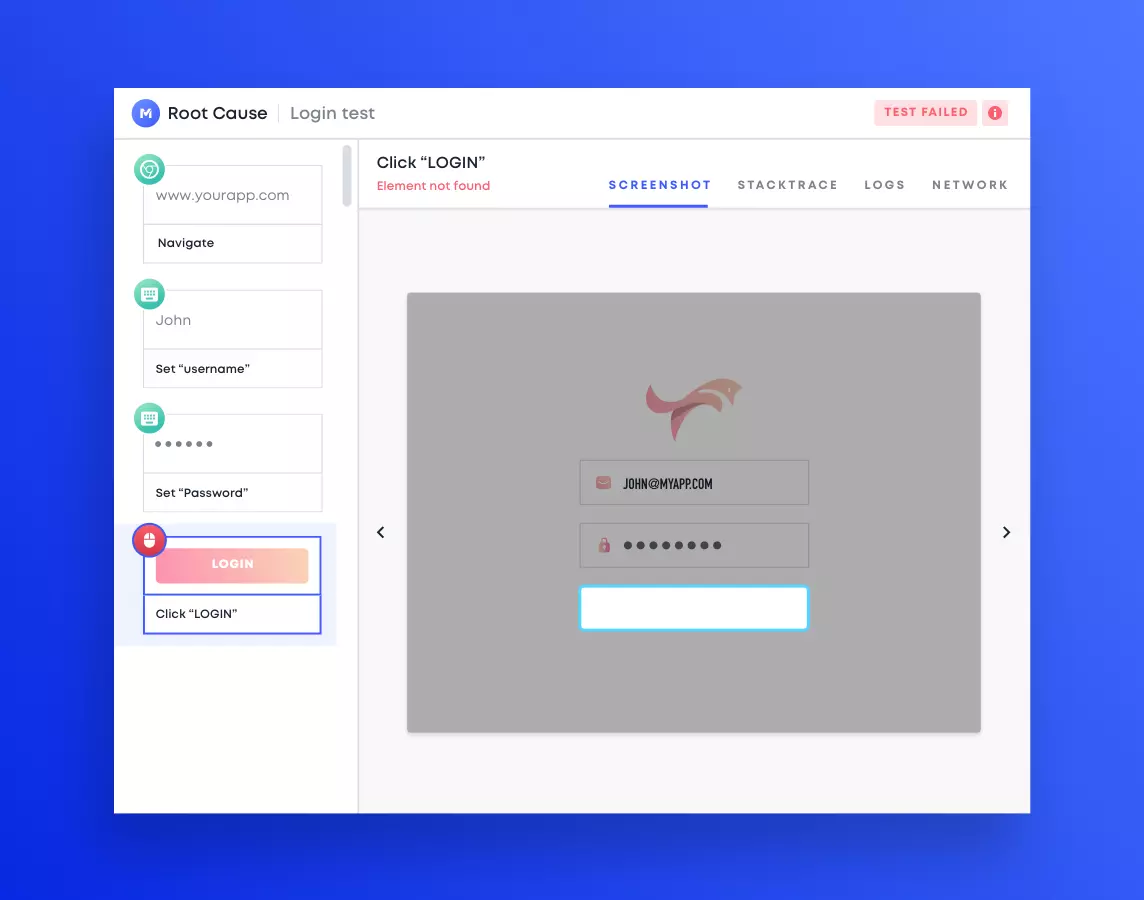
Screenshots at every test step, provide a visual record. Screenshots that highlight the action taken on an element make it straightforward. They show that a properly designed test follows the user journey you are trying to emulate. They also demonstrate where a failed test went wrong. A failed step in a screenshot might not indicate the root cause, but it’s where the analysis should start.
Console logs and Network HAR
Once you have determined where a test failed, you may need to dive deeper to ascertain why. Often, console logs or network HAR files can provide clues. But depending on the test, they can be large files that take time to download. Finding the information you need can involve scrolling through volumes of logs, searching for the failed step.
Pre-fetching extensive network HAR files and parsing console logs to the related test step can speed your efforts to untangle the spaghetti.
Root Cause
Testim Root Cause does most of the work for you. It simplifies screenshot capture by instrumenting Puppeteer or Playwright without changing your tests. Screenshots, console logs, and HAR files are automatically saved locally with Root Cause, and in the cloud with the Testim Root Cause service.
Root Cause then renders the highlighted screenshots in an intuitive viewer to aid understanding of the test flow, actions exercised, and failed steps.
Pre-fetching the network HAR files and console logs provides immediate access when you need it, saving time waiting for large file downloads.
The Testim Root Cause service includes test run and suite run reporting that is filterable and searchable to identify problems to address quickly. Results labels help you view tests by release or feature. The graphical reports help show overall health and release readiness.
Tag failed runs with a reason code to establish a history that can demonstrate systemic issues that need resolution.
Getting started
First of all, this solution integrates with your existing Puppeteer or Playwright framework, so you don’t need to start over or rewrite your tests.
There are two options to get started—download Root Cause open source or use the Testim Root Cause cloud service.
Root Cause open source is a free download with unlimited use. Test results must be saved to a local drive and managed by the user. See the documentation. Or the OSS project on GitHub.
Testim Root Cause cloud uses the same Root Cause open source code with one additional step of signing up for the service. See the documentation.
In either case, the installation is a simple NPM package install. Then configure your test runner to use Root Cause.
Try it out, tell your friends, and help us improve it!


