


QUnit is one of the most used automated testing tools for JavaScript, and it’s the subject of this post. But we’re not giving you another QUnit tutorial. Instead, today we’ll focus on a specific facet of working with QUnit: code coverage.
The Code Under Test
Let’s begin by presenting the code we’re going to test. Here it is:
StringCalculator = function() {};

StringCalculator.prototype.add = function(stringNumbers) {


	  let delimiter = ',';

	  if (stringNumbers.trim().length == 0)
		  return 0;

	  let lines = stringNumbers.split('\n');
	  if (lines.length > 1) {
		delimiter = lines[0]
[2];
		stringNumbers = lines[1];
	  }

	  const numbers = stringNumbers.trim().split(delimiter).map(n => parseInt(n, 10));

	  var negatives = numbers.filter(x => x < 0);

	  if (negatives.length > 0)
		  throw new Error('Negatives not allowed: ' + negatives);

	  return numbers
		.filter(x => x <= 1000)
		.reduce((s, n) => s + n);

}

module.exports = StringCalculator;
This code is one possible solution for the String Calculator Kata, proposed by Roy Osherov. The idea is to implement a function called add, which can receive a string containing comma-separated integers as an argument. The function should then calculate and return the sum of the specified numbers. Additionally, there are a few additional rules that must be followed:
- If an empty string is passed, the result should be zero.
- Numbers larger than 1000 should be ignored. In other words, if you pass a string like “1, 2, 1001” you should obtain three as a result.
- Negative numbers aren’t allowed. If one or more negative numbers are specified, the function should throw an exception with the message “Negatives not allowed,” followed by the specified numbers themselves.
- It should be possible to define a custom delimiter, by adding an optional first line to the string, like this: “//$\n1$2$3”.
QUnit Code Coverage in Practice: Time to Roll up Your Sleeves
We’re now ready to get our hands dirty. Let’s begin by installing QUnit.
Initiating a Project
We’re going to install QUnit via npm, so make sure you have Node.Js installed.
The first thing we’re going to do is to create a new npm project. Create a new directory, cd into it, and run the following command:
npm init
You’ll be prompted for several options. Just press enter to use the default answer for every question. Then, create a folder called “src,” and add a new file to it called “calculator.js,” which will hold the function you’ve seen above. That’s it for creating our project, at least for now.
Installing QUnit
The next step is to install QUnit itself. Run the following command:
npm install qunit --save-dev
This is going to download QUnit and all its dependencies and install them as development dependencies of our project. You’ll also want to install QUnit globally to be able to use the CLI:
npm install -g qunit
Writing Our First Test
QUnit looks for tests in a “test” directory inside the project’s root, by default. It’s possible to override this, but let’s follow the path of least resistance. Create a new directory called test. Inside it, create a file called CalculatorSpec.js, with the following content:
QUnit.test( "Dummy test", function( assert ) {
  assert.equal(2 + 2, 4, "Passed!" );
});
As you can see, the test doesn’t have anything to do with our function. It’s just a dummy test we’ll use to see if QUnit is working correctly. To do that, simply run the “qunit” command. If everything went right, you should see something like this:

Optionally, you can change something in the test to make it incorrect (i.e., replace the “4” with “5”) and run it again to verify if it fails as expected. The next step is to replace this dummy test with a real one. So, replace the content of your file with the following:
/// <reference path="../src/calculator.js" />

require('../src/calculator.js')
var calc = new StringCalculator();

QUnit.test( "Empty string should result in zero", function( assert ) {
  assert.equal(calc.add(''), 0);
});
As you can see, our test just verifies the simplest scenario when it comes to the add function: if you pass it an empty string, you get zero as a result. Now, run the test, and you should see a message saying the test has passed.
With that out of the way, let’s see how we can obtain coverage data for our application.
Installing Instanbul
To see code coverage data, we’re going to use a tool called Istanbul. To install it, we’ll use npm as well. Just execute npm install –save-dev nyc, and you’ll be done in a minute. Alternatively, install it globally by executing npm install -g nyc. That will allow you to use the tool’s CLI.
Finally, update your package.json file, so the test script configuration looks like this:
"scripts": {
    "test": "nyc qunit"
  }
Checking Code Coverage for the First Time
Now we’re ready to check coverage for the first time. Just run npm test or nyc qunit. Here’s the result you should get:
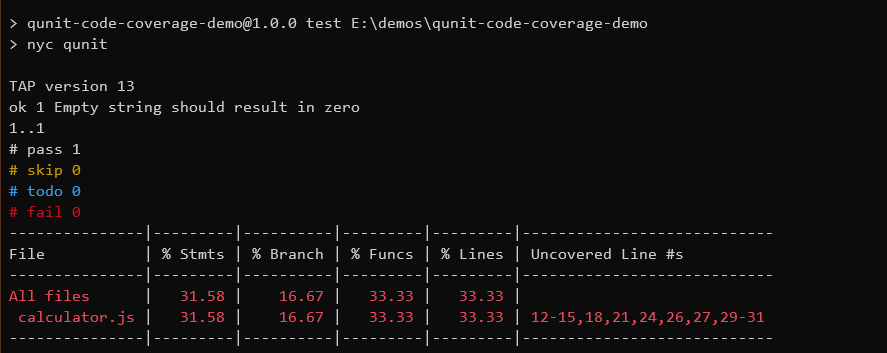
Looking at the image above, you can see that our file has only 16.67% of branch coverage, despite having 33.33% of lines covered. It’s important to stress that difference since you can have 100% of line coverage without having 100% of execution branches covered. How is that possible?
It’s simple. Consider the following function:
function add(a, b, revertNegativeNumbers = true) {
    if (revertNegativeNumbers) {
		a = Math.abs(a);
		b = Math.abs(b);
	}

	return a + b;
}
Now imagine we wrote a single test case for the function that tests the scenario where revertNegativeNumbers is true. What would happen to our coverage? We’d get 100% line coverage, but not branch coverage since the test doesn’t cater to the scenario where the parameter is false.
Improving Code Coverage
Let’s see how we can improve the coverage for our function. The results table shows which lines remain uncovered, which makes our lives easier. Let’s pick, for instance, line 18, which has the following code:
const numbers = stringNumbers.trim().split(delimiter).map(n => parseInt(n, 10));
This is the line where we split the string and parse the resulting pieces as integers. It doesn’t get executed because our single test passes an empty string, causing the function to return early.
In order to cover this line, let’s create a new test. We’re going to check whether our function can handle a string with a single number:
QUnit.test( "String with a single number should return the number itself", function( assert ) {
  assert.equal(calc.add('5'), 5);
});
This is the coverage result I get now:
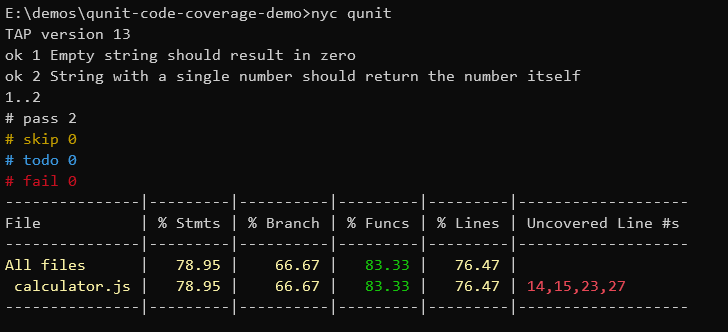
All of the columns went up, and line 18 no longer shows up as an uncovered line. Nice! Let’s add yet another test, this time covering the two numbers scenario:
QUnit.test( "String with two comma-separated numbers should return their sum", function( assert ) {
  assert.equal(calc.add('7, 2'), 9);
});
And here’s the result:
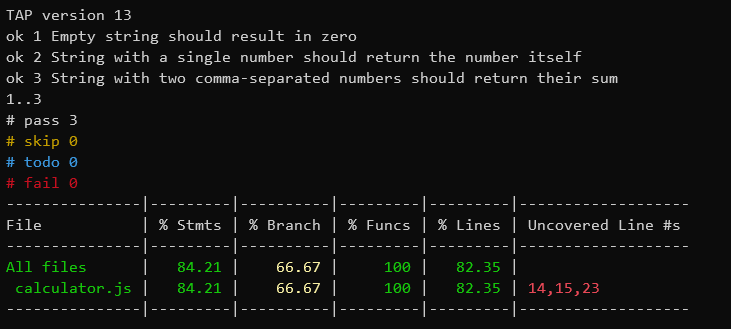
This is where we stop. As an exercise, add more tests and see how they affect coverage.
General Considerations About Code Coverage
Having completed our introduction to seeing code coverage with QUnit, we’re now going to talk a little bit about code coverage in general. The first question we’re going to tackle here is: what amount of code coverage should we aim for?
Code Coverage: How Much Is “Right?”
This question causes heated debates. Many people will argue that you must absolutely reach 100%, while others will tell you not to bother with coverage at all. Who’s right?
The first thing to have in mind is that, while a high coverage isn’t necessarily a good thing, too low coverage is certainly a bad thing. Your team won’t have the confidence to make necessary changes to the code—including refactoring—without the safety net that only a comprehensive test suite provides. On the other hand, 100% might mean nothing, since coverage itself doesn’t tell you anything about the quality of your tests.
What Coverage Can’t Tell You
You could have 100% test coverage and a codebase full of bugs. That’s because code coverage alone doesn’t ensure the quality of your tests. You could even have all of your tests without assertions and still, have complete coverage. So, coverage by itself doesn’t ensure test quality, only that a given piece of code was covered by at least one test case.
Code coverage is only useful to ensure quality once you use it along with some techniques or processes to validate the tests themselves (i.e., mutation testing.)
Not All Code Is Created Equal
Finally, keep in mind that codebases aren’t homogeneous. Code varies when it comes to how complex it is, or how critical it is for the business, and even in the number of changes it suffers. Organizations are increasingly taking these differences into account when designing their testing strategies. Instead of trying to test every line of code equally, sometimes it makes more sense to acknowledge the fact that not all code is equal and go for a risk-based approach. This is particularly useful in times where resources are scarce—and when aren’t they?
QUnit Code Coverage: What Are the Next Steps?
You’ve just seen an introductory guide on seeing code coverage data with QUnit. Where should you go now? In short: keep practicing. Here are some things you could try next:
- Continue improving the coverage until you reach 100%.
- Try now to change the code in a way that it’s no longer right, but the tests still pass, and coverage is still 100%. What does that tell you about coverage and quality?
- Learn how to add coverage to your CI/CD pipeline.
- Try getting coverage data using different tools.
Before saying goodbye, here’s a piece of warning. Code coverage is one of the most important test metrics, no doubt about it. The problem with metrics is that they stop working when people turn them into targets.
Finally, bear in mind that everything we’ve done today relates only to unit testing. This isn’t the only type of testing available: don’t forget end-to-end testing, regression testing, and more. So, code coverage, while useful, only tells part of the story. You need metrics on other types of tests as well if you are to see the big picture.
This post was written by Carlos Schults. Carlos is a .NET software developer with experience in both desktop and web development, and he’s now trying his hand at mobile. He has a passion for writing clean and concise code, and he’s interested in practices that help you improve app health, such as code review, automated testing, and continuous build.


