


Async code in JavaScript can be difficult at the best of times. When you add unit testing into that mix, trying to get your async code and your unit tests to play well together can feel very difficult at times.
In today’s post, we’ll show you the different techniques you can use to effectively handle asynchronous code and promises while unit testing in Mocha. We’ll start by going through the best (and easiest) way to test async code in Mocha; then we’ll break it down in more detail to better understand how async handling works with Mocha.
But first, let’s look at the simplest solution to testing a promise in Mocha.
What Is the Simplest Way to Test Promises With Mocha?
Since you may be in the midst of wrestling your failing tests back into the green, let’s jump straight into how you can effectively test promise-based code in Mocha.
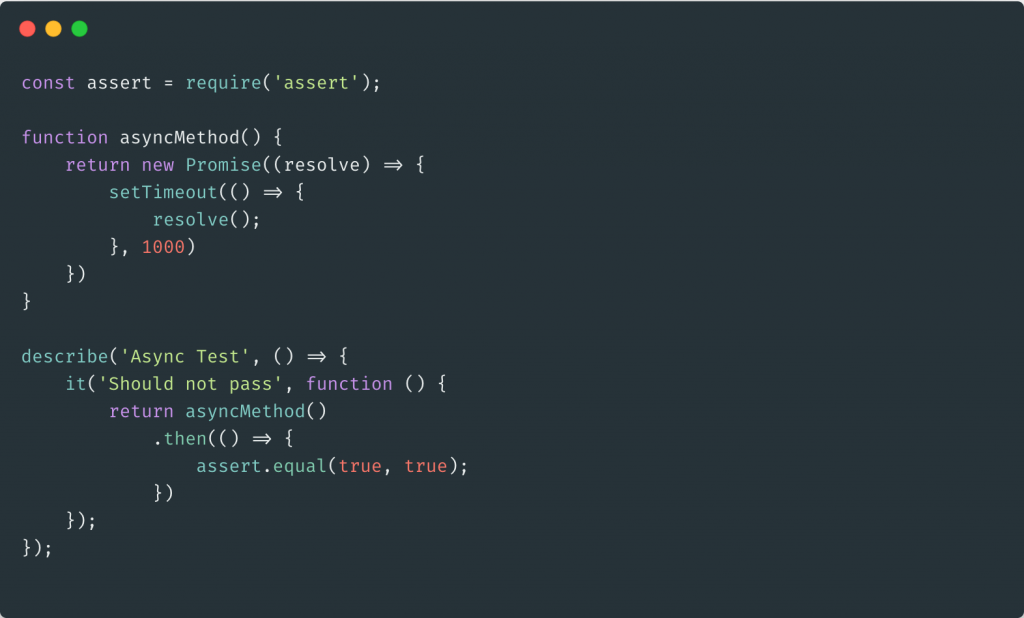
If a function returns a promise that you want to assert on the result of the function, all you need to do for it to work effectively with Mocha is return the promise in your it block. Then you can assert on the result of the promise in the chained .then of your promise.
By returning the promise to Mocha, you ensure that Mocha waits for the async task to be completed before the assertions are run and the test is marked as complete.
Check out this example:
But the eagle-eyed among you might be thinking: Wait, why are we using .then? The .then syntax is so 2015! Can’t we just use async/await? And if you were thinking that, then your hunch was correct. You can!
To use the newer async/await syntax with Mocha, all you have to do is ensure that your it method has the async keyword, and instead of returning your promise, you just add an await keyword before your async function. (We’ll go into more detail as to why this works shortly.)
Check out this example:

And those are really the quickest ways to get your Mocha tests working with async code. However, there are a few more nuances and pitfalls to testing async code in your unit tests.
If you’re not in the midst of wrestling your production test suite back into a green state for an imminent hot fix release, then read on. Next, we’ll explore the ins and outs of async handling in Mocha so you have the tools for every situation and the chops you need to debug those tricky async issues.
The Secret for Async Handling in Mocha Tests
Let’s start by assessing why async is so hard within JavaScript as well as in our test suites.
When we use traditional synchronous code, Mocha doesn’t know how long to wait for the test suite to complete unless we explicitly tell Mocha how long to wait for. This is important, so it’s worth re-iterating.
To ensure async error handling works in our Mocha tests, we need to explicitly tell Mocha what to wait for.
But what do we mean by explicitly telling Mocha to wait? Let’s break it down with an example.
Why Mocha Struggles With Async Tasks
Mocha will struggle to make sense of when to wait for an async task if it’s not explicitly told to.
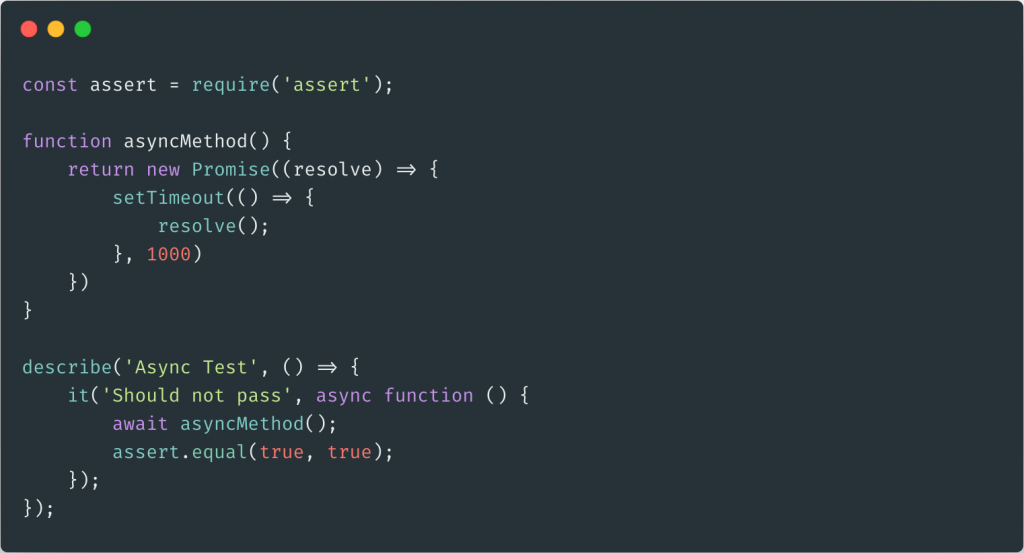
To understand why Mocha struggles to wait for async tasks, let’s look at an example:
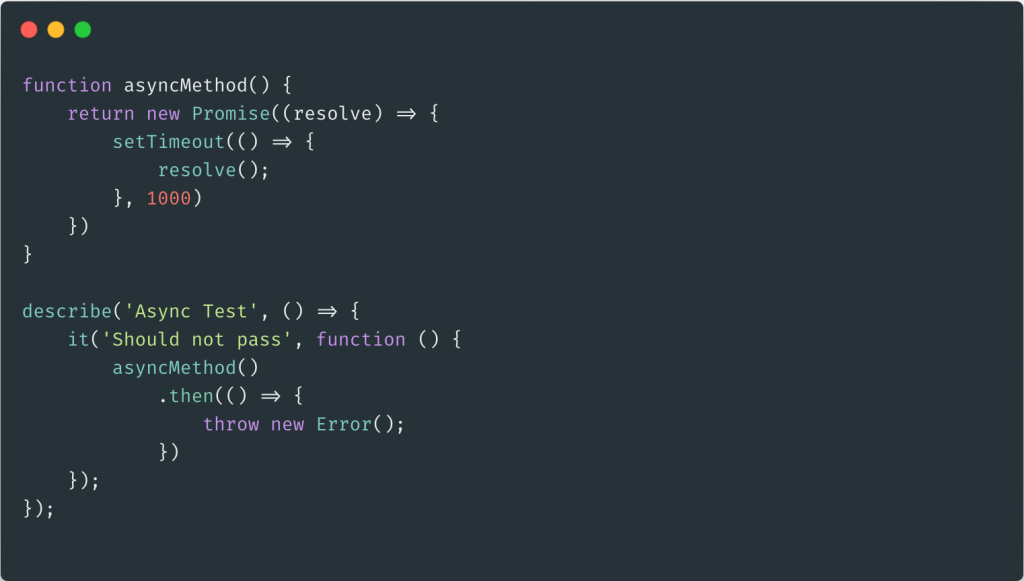
In the above example, we can see that the async method waits one second and then fails at that point. But since we haven’t told Mocha that our function is asynchronous, Mocha goes on it’s way marking the test as passed and executing subsequent tests.
At some point in the future, our promise is rejected and an error is thrown. But it’s too late! Mocha has already reported that our test is green. Our suite is passed, and, in the worst case scenario, our automated testing could be shipping our code to production with failing tests!
However, it’s not all doom and gloom. As we saw at the start, we can return our promise to Mocha, and Mocha will then correctly wait for our assertions and our tests will pass. But returning promises isn’t the only way that we can handle async in our tests.
And by now you might be wondering: What are the other methods for handling async in Mocha? Let’s take a look at the different ways that we can handle async code in Mocha and explore the pros and cons of each method.
3 Options to Test Async Code With Mocha
Generally speaking, there are three main ways that we can use to ensure that Mocha knows whether our code is complete or not:
- The done callback
- Returning the promise
- Using async/await
Let’s explore each of these methods in turn and examine their pros and cons to understand when we should use each, and what we should be looking for.
1. Use the Done Callback
The first option for using Mocha to handle async methods is with the done callback. And while there are other, more elegant ways to handle async promise code, the done callback still has some key advantages.
The way the done callback works is as follows: Rather than Mocha running the test code to completion and assuming the tests pass, Mocha waits for the invocation of the done callback before marking the test suite as complete.
The reason we introduce the done callback is because the done callback is the only real way you can test your own callback code with Mocha. The done callback syntax is also explicit in a way that can be useful. We’ll see in the next section how the elegant but terse method of returning promises can lead to hard-to-spot bugs.
Here’s the done callback in action:
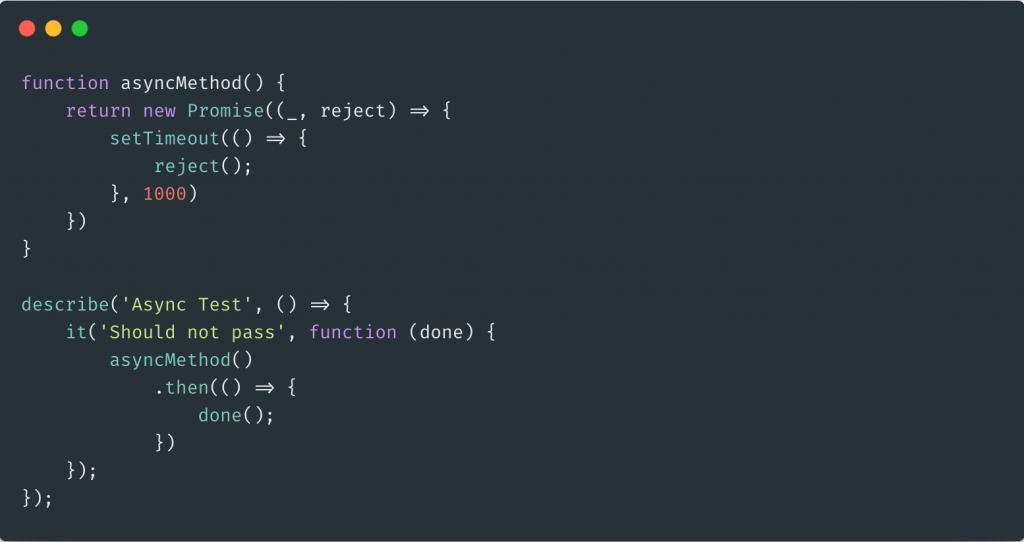
You may notice a problem in the above example.
If the async task fails, the test library will wait for our done callback potentially forever. Well, it’s unlikely that Mocha will wait forever, as it will likely time out first. The reason Mocha waits is because this implementation only calls done when the async method is successful and ignores the failure state.
Hopefully, by now you’re starting to understand a bit more about how the done callback method works. Let’s now take a look at the promise return method and its pros and cons.
2. Return a Promise
The first method we discussed in today’s post was simply to return the promise to Mocha. The reason the returning method works is because Mocha chains its own .then after the .then with the assertions. By adding an additional .then, Mocha ensures that it always marks the test suite as green correctly.
But while the return method looks like a gift from the heavens, the promise returning method, as always, has problems. A big area of difficulty for the returning promise comes if the return is somehow forgotten. If a return value is forgotten, the test suite may still pass without any assertions passing.
Check out this example:
Can you spot the problem? Because the fat arrow (=>) method uses implicit returns, it’s hard to see where the missing return value is. I cannot begin to tell you how many times I’ve been investigating a production bug only to find out the async tests had been reporting false positives the whole time—nightmare!
3. Convert to Async/Await
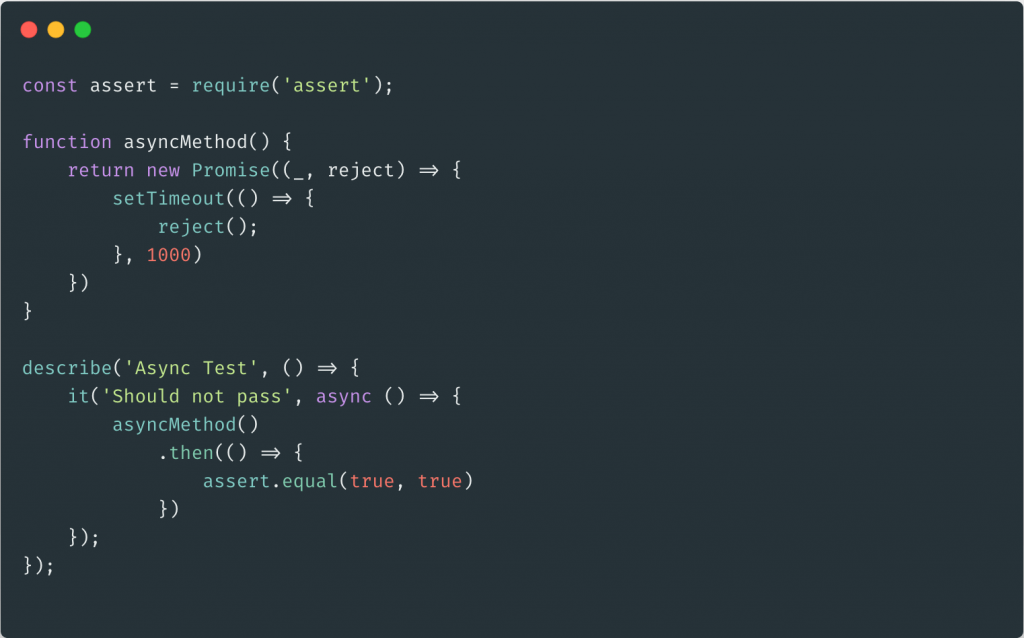
The last option we’ll consider today is to convert your existing code into async/await format. When you convert to async/await format, you benefit from the same benefits as the promise returning example but with formatting that’s slightly easier to read.
And don’t worry if, for whatever reason, you can’t yet use the async/await keywords in your production environment, as using special keywords in tests can be easily kept separate from production code.
Check out this example:
Now You Can Handle Async Mocha
And that’s all there is to understanding async error handling with Mocha. Your options for async error handling can be summarized as:
- Use the done callback if you are integrating with callbacks or prefer the explicit nature of the syntax.
- Return your promises if you can’t use the async/await keyword.
- Use async/await syntax if your environment supports it and you understand it.
And that’s all there is to it. Choose the method that’s right for your code at any given time. Experiment with the different options and see what feels best to you and your team. But no matter which method you choose, you should now be handling your async code in Mocha with elegance and peace of mind.
Happy testing!
This post was written by Lou Bichard. Lou is a JavaScript full stack engineer with a passion for culture, approach, and delivery. He believes the best products emerge from high performing teams and practices. Lou is a fan and advocate of old-school lean and systems thinking, XP, continuous delivery, and DevOps.


