


You probably already have Jenkins running to automate the build process of your applications. However, you might be aware that to increase quality in your build process, you need to include testing. So, in this post, I’ll cover why automated testing is so crucial in continuous integration (CI) pipelines. Then, I’ll explain how to integrate testing into a Jenkins job. Finally, I’ll show an example of how to integrate Testim with Jenkins.
Jenkins Test Automation and CI, Explained
Before you roll up your sleeves, let’s take a step back to ensure we’re all on the same page regarding some definitions. Don’t worry, though: if you’re familiar with the terms we’ll be covering, feel free to skip this section and go straight to the hands-on parts of the post.
What Is Continuous Integration?
Continuous Integration (CI) is a fundamental practice for modern software development. It consists of having developers integrate their code to a common repository at least once a day. Nowadays, it’s common for seasoned development teams to integrate their code many times a day. Another crucial part of CI are the automated checks that happen after engineers integrate their code: the CI server typically builds the code, runs all of the automated tests, and maybe more verifications, such as security checks, static analysis, linters, and more.
CI solves the problem of “integration hell”—i.e., developers would work in isolation for weeks or even months and only then attempt to integrate their work. This made integration incredibly hard; there were plenty of merge and logical conflicts. As a result, engineers dreaded integration, postponing it until the last possible moment—which only made the problem worse.
Expand Your Test Coverage
The other major benefit of CI are the checks and validations that are performed with each commit or check-in, which can detect problems with the code way before it makes it into production, as we already said.
But since this post is about automated testing, that’s what we’ll expand upon in the next section.
What’s the Role of Automated Tests in CI?
As you’ve seen, CI is a practice where developers regularly integrate their code into a shared repository. And to make sure that the integration is successful, there’s a set of automated tests to assess the code’s integrity. Then, if there’s a problem, developers detect and fix it quickly. Jez Humble, co-author of the book Continuous Delivery: Reliable Software Releases Through Build, Test, and Deployment Automation, created a test to certify that a team is genuinely doing CI. In Humble’s test, one of the questions asks if an automated suite of tests runs after every code commit. Hence, automatically running tests is one of the key tenets of CI.
The idea of practicing CI is that everyone in the team has the latest working version of the code. That’s why you integrate several times a day. Also, when you include automated tests in your building pipeline, developers’ productivity increases. Developers can push code changes with more confidence because the automated tests are validating their changes automatically. However, tests need to run as fast as possible to provide feedback promptly. Otherwise, it could take too long to fix and find problems, decreasing code quality.
It’s also important to note that CI doesn’t promote the use of any specific tool because what matters most is the practices and culture itself. But, to get a better idea of how to practice automated testing in a CI pipeline, let’s take a look at how you can accomplish it using Jenkins.
Jenkins 101: Definition, Pros and Cons
Let’s now briefly cover Jenkins, explaining what it is, why would you want to use it, and even some of its limitations.
What Is Jenkins?
Jenkins is an open source CI/CD tool. More specifically, it’s an automation server. You can use the power it gives you to automate tasks necessary to build, test, and even deploy your applications.
Jenkins is one of the most popular tools in its category. Much of this popularity is due to its extensibility; thanks to its plugin architecture, Jenkins can be made to work with a large number of tools and services. Users can leverage the existing plugin ecosystem or even create one of their own.
Is Jenkins An Automation Framework?
In software engineering, terms and expressions are often overused and misused to the point they become almost meaningless. I think this has happened to the word “framework,” which nowadays many people use as a synonym for “tool.” So, with that meaning in mind, Jenkins can be considered an automation framework.
However, if you want to be more precise with your terminology, prefer calling Jenkins an “automation server,” as per the definition from Jenkins’s official site.
How Does Jenkins Work?
To configure CI/CD in Jenkins, you need to use its Pipeline. Here’s a quote from Jenkins site:
Jenkins Pipeline (or simply “Pipeline” with a capital “P”) is a suite of plugins which supports implementing and integrating continuous delivery pipelines into Jenkins.
In Jenkins, you express the steps of your CI/CD process using code, via the Pipeline DSL (domain-specific language.) That way, the configuration becomes a simple file that you can add to your version control repository and track the changes made to it.
Do Testers Use Jenkins?
Testers wouldn’t use Jenkins when performing tests, either manual or automated. However, testers, QA professionals, or any professionals responsible for software testing (which, ideally, should be everyone in the development team) can use Jenkins to configure a pipeline in which tests are automatically executed and evaluated whenever a code change is pushed to the central repository.
Why Would You Want to Use Jenkins?
As you’ve seen, Jenkins extensible architecture is responsible for much of its popularity. But that’s not all. Here’s a non-exhaustive list of Jenkins advantages:
- Quick setup: easy installation and configuration.
- Flexibility: use it just as a CI server or as a complete continuous deployment solution for your app.
- Free and open source: it suits your pocket.
- Large community: you won’t need to search for help and support for much time.
Additionally, when using Jenkins you have a plethora of plugins for helping you with test automation. There are of course plugins for many different test frameworks that can help you run your test suite. Also, it’s no use having tests but not seeing their results, so the same plugins can often display and summarize them.
Some Limitations of Jenkins in Test Automation
There’s no perfect tool, and Jenkins is no exception. So, here are a few disadvantages of this tool:
- Redundancy of plugins. Having a large plugin ecosystem is great, but it can sometimes be overwhelming, especially for beginners, when you have multiple plugins for the same end.
- An UI which could use some improvements. The UI can feel non-intuitive and confusing, especially for beginners.
- The user management features are a little underwhelming. Some more advanced functions are hard or impossible do to.
- Low quality of some plugins. The plugins very widely in their quality, and many of them are semi or fully abandoned.
How to Integrate Test Automation in Jenkins
As you might already know, Jenkins works with a plugin system that allows you to build jobs easily. You can install tools and integrations with third-party services like cloud providers. However, let’s not forget that Jenkins is merely another layer on top of the OS the build agent is running. This means that anything you could run in the command line of the build agent can be run through Jenkins. In this case, Jenkins acts as an orchestrator of the commands you need to run in a pipeline.
When you’re new to Jenkins, the easiest way to get started is by using the shell plugin. This plugin allows you to define the command your pipeline wants to run. For instance, a typical set of commands for an application that implements CI is like the following:
- Compile the application.
- Run a set of tests, which could be unit, integration, or functional tests.
- Generate an application artifact that you can deploy across different environments.
For an application written in .NET, the commands would be the following:
dotnet build
dotnet test
dotnet publish
If any of the above commands fail, you could use a Jenkins plugin to notify the developer who pushed the code. Also, the team will know that the build is broken because it failed with the latest code integration.
As I said before, depending on your technology stack, there might be plugins where you simply define a set of parameters, such as source location or language version. But in general terms, the workflow would be similar to the one above. You can include other types of tests like integration or functional tests, linting, or code coverage—it depends on the environment you’re targeting. For instance, some folks would recommend that you only run unit tests for a development environment. But, honestly, I’d suggest you run some critical functional tests as well to catch problems early.
Let’s see how to put in practice what I’ve explained so far.
A Concrete Example in Jenkins
The following guide uses Testim to run automated tests using a custom integration in Jenkins. If you don’t have a Testim account, you can sign up for free and record your first test. As I mentioned earlier, you can include other types of tests, like unit tests. Keep automation and parallelization in mind so that the test phase of the pipeline doesn’t take too much time. So, let’s create a simple job in Jenkins and integrate some tests into it.
Prerequisites
Before you start following this guide, you’ll need to have access to the following resources:
- A Jenkins instance where you can create jobs.
- Node.js in the Jenkins agent you’ll use to run the job (the latest LTS version is 16.18.0)
- A Testim account with a test available to run remotely from Jenkins.
Creating a Build Job to Run a Testim Test
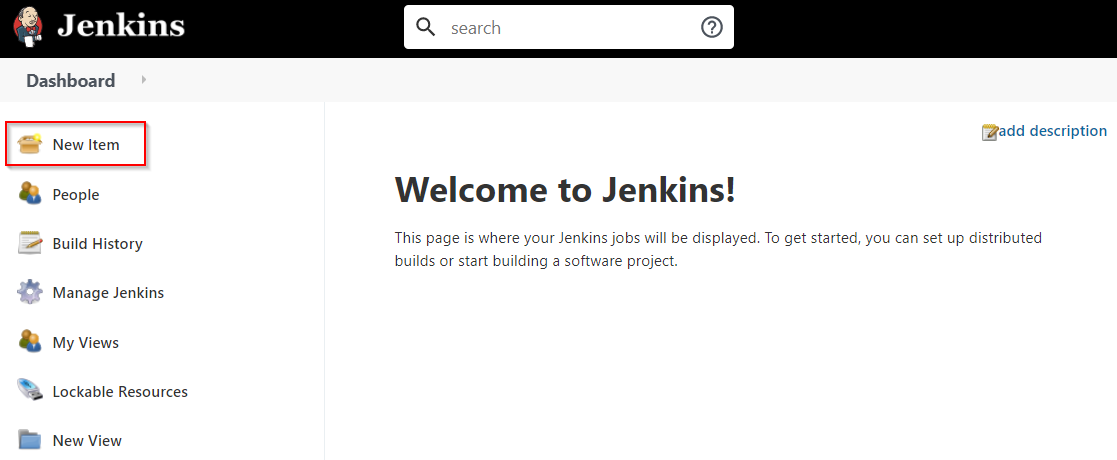
Let’s start by creating a Jenkins job. In the left panel, click on the New Item link:
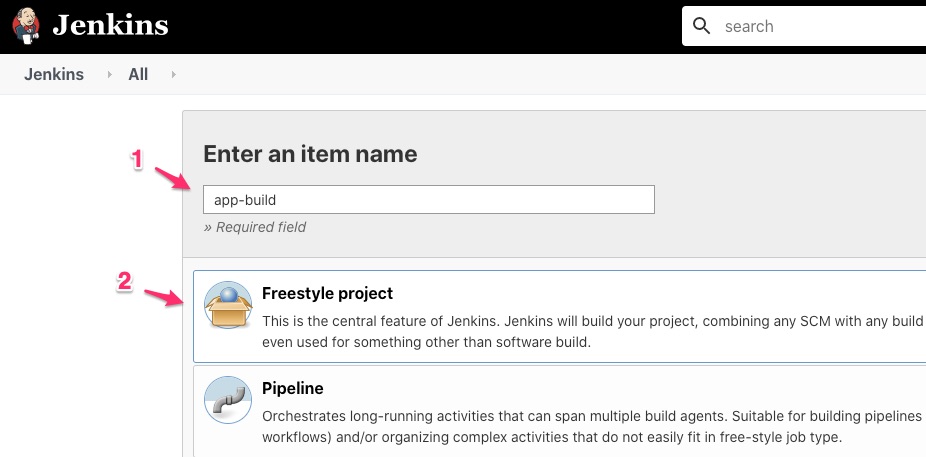
Enter a name (1) for the job and choose the Freestyle project option (2). Ideally, you should use a Pipeline project and use Git as a source of the pipeline definition. But for now, we’ll use the simplest method, which is the freestyle option. After selecting Freestyle project, scroll down a little bit and click on the OK button:
In the new screen, scroll down to the bottom of the page. In the Build section, click on the Add build step button (1) and choose the Execute shell option (2) if you’re using Linux or Execute Windows batch command if you’re using Windows.

Now, in the Command text area (1), enter the commands (2) that you need Jenkins to run. Let’s continue with the .NET app sample, like this:
dotnet build
dotnet test

mkdir -p "${WORKSPACE}/.npm-packages"
prefix=${WORKSPACE}/.npm-packages
NPM_PACKAGES="${WORKSPACE}/.npm-packages"
export PATH="$PATH:$NPM_PACKAGES/bin"
export NODE_PATH="$NODE_PATH:$NPM_PACKAGES/lib/node_modules"
npm config set prefix ${WORKSPACE}/.npm-packages
npm install -g @testim/testim-cli

testim --label "<YOUR LABEL>" \
--token "<YOUR ACCESS TOKEN>" \
--project "<YOUR PROJECT ID>" \
--grid "<Your grid name>"  \
--report-file test-results/testim-tests-$BUILD_NUMBER-report.xml

dotnet publish
Here’s what that code will look like in Jenkins:
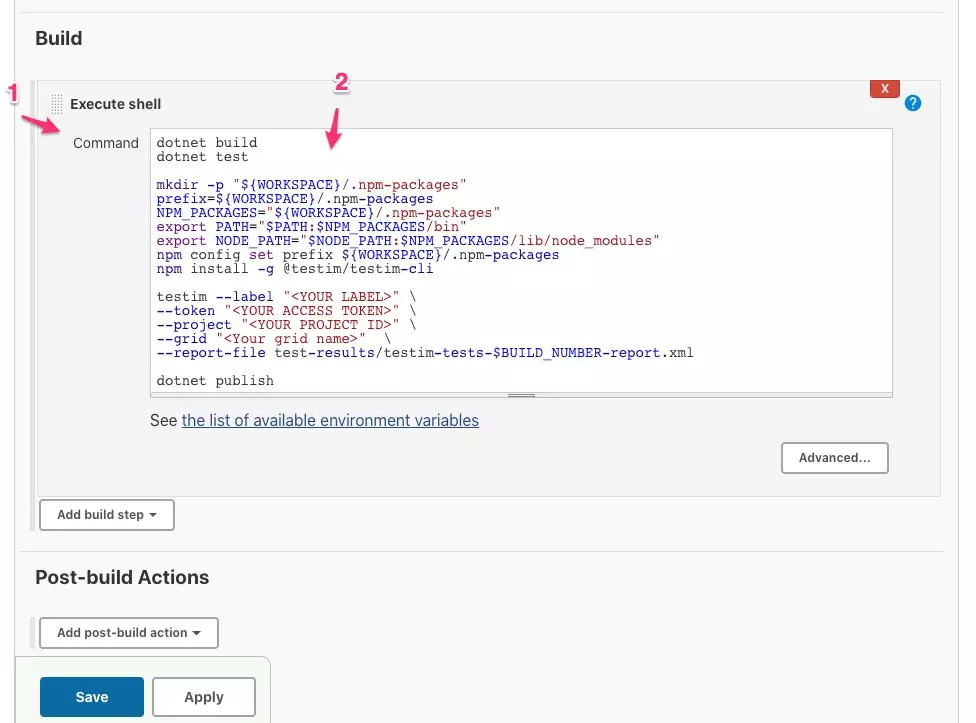
Notice that I include the build command before running any test because the first “test” should be that the code compiles. Then, I include the command to run the unit tests. And finally, I add the command to run functional tests with Testim. Also, notice that I include other commands to make sure that the proper npm packages and the Testim CLI are available. If they’re not available, Jenkins installs them.
Lastly, to save the work, click on the Save button. And setting up Jenkins for test automation is as easy as that! Now you have a build pipeline in Jenkins that not only compiles the application, but it also runs unit and functional tests to increase quality.
Increase Your Build Confidence
As you saw, integrating automated testing into your build pipeline is not a difficult task, and testing is crucial when you want to do CI. Keep in mind that having a suite of automated tests you can run after every code commit is one of the key tenets of CI. Moreover, these tests should run fast and cover functional scenarios from your users. If you decide to use Testim, you can record a functional test with a Chrome extension and run that test from a Jenkins job.
Using Jenkins for test automation isn’t your only choice. Jenkins is only one of the many tools out there for doing CI. You can integrate automated testing with other tools like CircleCI, Codeship, or GitLab as well. Check our guides on how to do it. But in general terms, you simply generate the integration code and paste it into your CI tool—as we did today with Jenkins.


